Restoration of wooden windows with your own hands
Restoration of old wooden windows is popularAmong people who do not want to install PVC structures for one reason or another (they do not like plastic, do not have enough money to replace, etc.). But very few of them know that this work can be done independently without recourse to specialists. The reason is that there is a myth about the incredible complexity of restoring wooden windows with your own hands, so few people take it for it. In fact, this is not at all the case. Yes, the work is laborious and requires patience, but everyone can fulfill it, even if it is a little friends with their own hands.  If you relate yourself to this category of people,Then you will find our article useful. In it we use the real experience described in Viktor Borisov's blog (by the way, we recommend reading it - there are a lot of interesting reports).
What is needed?
For the restoration of wooden windows with your own hands, you will need the following set of tools and materials:
- Construction hair dryer (not necessarily the most powerful one).
- Grinding machine and a set of circles for it (60 and 100).
- A hard spatula with a blunt end (the usual with a sharp edge will cut the tree when removing the paint, which we do not need).
- 2 brushes.
- Stain.
- Lacquer.
- Shtapiki (it is possible to buy very cheaply in shops from joiner's workshops).
- Sealant.
- Window fittings.
- If necessary, new glass.
A hair dryer and a grinder are better for borrowing temporarily from acquaintances, as buying them is expensive. In addition, you need a drill, but you can do without it if you want.
The process of window restoration with their own hands
First, we try to remove the sash of the window, notDamaging loops, since finding similar ones will be problematic (but perhaps we have checked). If the screws do not unscrew - we punch them with a core and try again one time. Does not work? Then drill the sour screws with a small drill or remove it in another way (connect the fantasy). We glue the window. We removed the leaves, if they are sturdy and do not stagger, then skip this step. If the play is present, then we dismantle the doors, knocking out the wooden choppers with a core, glue it with glue for wood and collect it back. We are waiting for the complete drying (the time depends on the glue you use) and proceed to the next step. We open the window To make it easier to remove the paint, we recommend that you immediately remove all hardware, glazing beads and glass. The shtapiki are thrown away, leaving one for the sample (they rot first, so it's better to replace them with new ones). Remove the paint When restoring wooden windows with their own hands, the master advises you to remove the paint using a construction hair dryer and a slightly blunt spatula. The surface of the window heats up, the paint begins to "swim" and at this time it is easily removed with a metal spatula. For maximum efficiency, the spatula should be kept near the heated surface, then the paint will be removed even more easily.  Important! Do not keep the dryer over one piece for too long, otherwise the wood will start to deteriorate. Remove the paint from the larger part of the window can be a grinder with a nozzle 60. This method is much easier and faster, but increases the cost of work, as the circles from the paint are clogged fast enough and they need a lot. In remote places, some masters use a boron with a special attachment, which is replaced by a small piece of sandpaper.
 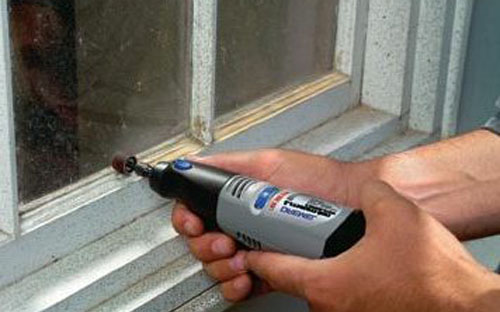 Surface grinding After removing the paint, the surface of the leaflets and the window frames is grinded first with a coarse nozzle and then with a shallow one. What is it for:
- It is necessary to completely remove all the paint residues, leaving only the wood (it will not work with a spatula).
- It is required to perfectly level the surface before processing.
Hard-to-grind places are treated with a bor-machine or by hand sanding.  Preparing Staples From Purchased BlanksCut beads of the right size and drill holes in them with a very small drill for studs. If you start nailing glazing beads without preliminary drilling, they can crack.
  Treatment with stain and varnish MorilWindow frames, sashes and glazing beams are processed. Color pick up individually (the seller in the building store is obliged to advise you on this issue).
  After drying, all elements are varnished inOne or better in several layers. Further, the windows can be assembled and installed in place. You can cover the windows with varnish and after assembly, pasting glass with a construction tape.
  But the shtapiki still have to be completely processed and allowed to dry before assembly, as the installed glazing bead is not covered with varnish from all sides.
Warming of wooden windows
A rubber seal is used toso that the doors are tightly closed (not blown) and the windows are warmer. It can be installed in two different ways. The simplest is the usual insertion, like on metal entrance doors. In this case, a thin seal of rubber or foam rubber is used.  The second method involves contour millingthe flap of the groove into which the sealant is inserted (the so-called Swedish technology). Milling requires a certain skill and the availability of special equipment. Make it correctly without experience, most likely, will not work.
  Therefore, it is better to use the first method, although it is less durable. Well, or you can order insulation windows in the repair shop, along with the departure of the master one window will cost about 1000 rubles.
Change the varnish to the paint
If you want to paint the windows, not openvarnish, the process of restoration will be somewhat different. In particular, after removing the old paint and pre-polishing it is necessary to repair all cracks and small defects with putty. Next, sand the surface again, and ideally. Wipe the wood with a damp cloth, allow to dry and 2-3 times primed. And only after that you can paint. The paint is applied in 2-3 layers. After drying, it can be treated with the smallest abrasive material, if the painting is done with blemishes (for this purpose there are special polishing nozzles).
Editorial Board
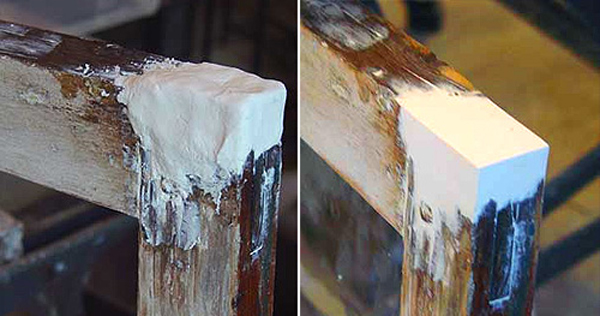
Before undertaking the restoration of woodenwindows with your own hands, you have to prepare for the fact that under the layer of the old paint there may not be a solid and beautiful massif, but rot and rot. Windows with damaged wood should be thrown out. But we had to restore and such - the rot is removed, in its place is installed a patch bar. It is fixed with glue, the joint is masked with putty. When painting the replacement part of the window is not visible, but under the varnish is noticeable and strong. Glass Glass during the restoration can not be changed. However, in many Soviet windows they are rather crooked and delicate. It is better to replace them with thick and much warmer, durable, reliable and beautiful ones. However, this extra cost and not small. But if you buy glass wholesale and cut yourself, it will not be too expensive (many workshops for cutting glass make a huge mark-up).