
Scrapbooking books and covers for the wedding book with your own hands - master class
The decoration of the wedding book has a number of advantages, with the help of which you can make it pleasant to relatives and learn something new.
Scrapbooking books and covers for the wedding book with your own hands - master class
 How to do this and what characteristics should be observed in the work? A detailed master class for the design of the book cover for the wedding! Making a book
  To make a wedding book, you need fromsheet cut a small yellow flower rectangle 12 by 13 centimeters, and also using a yellow chevron on a rectangle of 6 by 13 centimeters. You can use a striped line for more convenient work to glue each rectangle. It is also necessary to take into account the width parameters for the yellow line in the size of 1 centimeter.
  We select the leaves and cut the appropriate leavesfor decoration. We need to take the sheet in a blue stripe and cut the straight protruder to a size 11 by 6.5 centimeters. The leaves in the cage are cut at 8 and 5.6 centimeters. Using a blue strip in a thin line, we make 8 by 3.5 centimeters. The leaf in a blue flower is 10 by 8 centimeters.
  The sheets must be spread out and glued usingPictures. The bottom should be in a blue flower. On it we put a sheet in a blue strip and after - beige sheet in a cage and last - using a thin strip of blue color. Preparation of a cover for a wedding book
 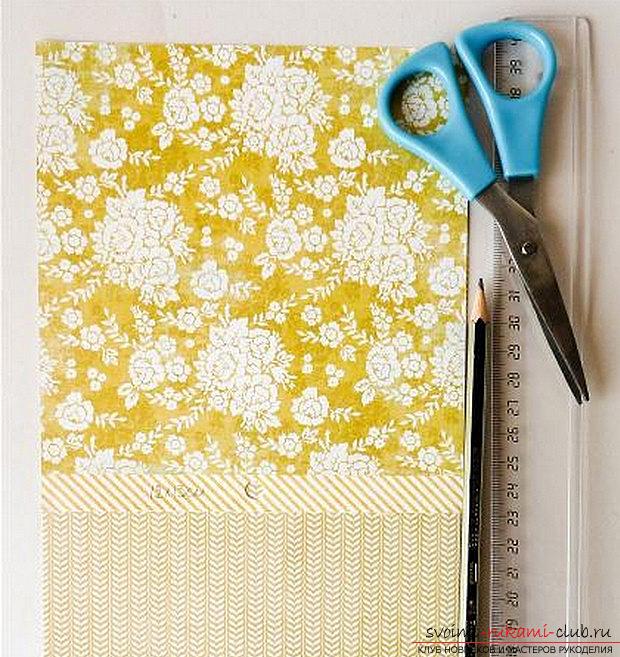 The cover must be decorated with the help of a paste,using metal numbers and a chipboard. Using flocking rubbers, you can cut out sheets with images that you like and peel off the film from the side (front). Then, turn the pictures in the place of the page where you need and then rub with a scissors pen or a scribbling stick. After you rub the rubbing, you can remove the rest of the unnecessary layer on the film, you just need to pull the edge off and pull it up. On the sheet will be a beautiful image in the style of velvet.
 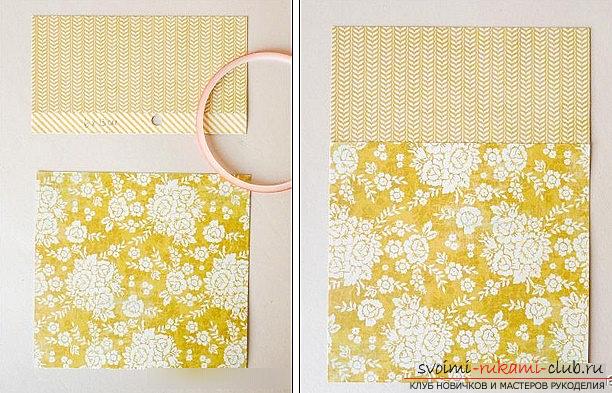 You can also add a chipboard to the page.As a round frame based on glue, as well as figures with the event and date. To glue a metal digit on the cover, it is necessary to apply glue on the back of the product. Then, it is necessary to arrange the digits with the date and firmly press it against our cover.
 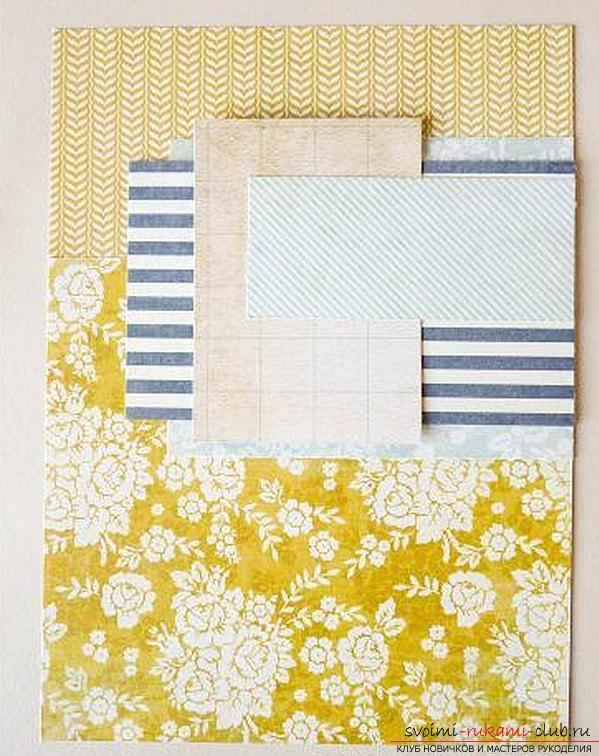 Thus, the title of the book is ready for us!
Comments
Related posts:
 This master class will teach you how to create your own hand notebook in the scrapbooking technique
 Scrapbooking women's passport passport with flowers and drawings - master class
 Scrapbooking a quick envelope with your own hands - a master class on scrapbooking
 Scrapbooking book binding with your own hands - technique and a master class for work
 Scrapbooking a New Year's card-envelope with your own hands - a step-by-step master class