
Scrapbooking cards for Christmas with your own hands - master class scrapbooking
Oh, these New Year holidays! In addition to the amazing New Year atmosphere, which promises us a special mood, we also have a lot to do. Men run shopping in supermarkets, collect all the necessary products from the list, children are engaged in writing their New Year's "Christmas Lists" for Santa Claus or Santa. Women have to deal with even bigger issues, because they have to prepare a New Year's table and take on the most important responsibility - to prepare the house for such a significant holiday in any family.
Scrapbooking cards for Christmas with your own hands - master class scrapbooking
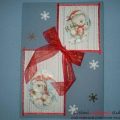
And what do many like to do on such holidays? Of course, to receive and give gifts! In this article, we will consider one of the options for a New Year's gift, which can be done with children. After all, from early childhood, one should teach children that getting presents is only one of the positive aspects of the future celebration. You should also do it yourself with your own hands. After all, Santa Claus, strangely enough, and his family, also want to receive something in memory. A Christmas card is a great way to raise yourself and others the mood, learn something new and just decorate the apartment. We are preparing an original postcard for the new year - a scrap technique. Therefore, we will try to consider a unique way of creating a new and interesting gift with our own hands. What kind of gift is it? Of course, we are talking about scrapbooking technique. It is this kind of New Year's postcard that has become more popular lately. And the main symbol of the New Year is the herringbone. We will use it as the main decoration for the future application. But, strangely enough, the work will also require special materials, with the help of which it will be extremely easy to realize our idea. What are we to do and what tasks need to be addressed?
- Prepare a paper of green color in pastels for A4 format - from them we will make Christmas trees
- It will also require a cardboard design look, so that the decoration of the postcard was excellent (also a replacement in the form of pastel paper)
- Scrapbumag - another design option for our postcard.
- Paper "golden shades" - to work on the decor
- Knife for dummy works or clerical work
- Creasing - a necessary tool for work, can be replaced with an awl or spoke
- Ruler
- Scissors
- Hole puncher
- Punch type hammer
- Adhesive
- Scotch tape on two sides
- Half-beads
- Pillows (stamp type) in the colors of greenery and golden hues
- Tweezers for work
- Requires tapes
- Stamp in the form of snowflakes
- Stickers, as well as additional decorations for your taste
Prepare a template and workpiece 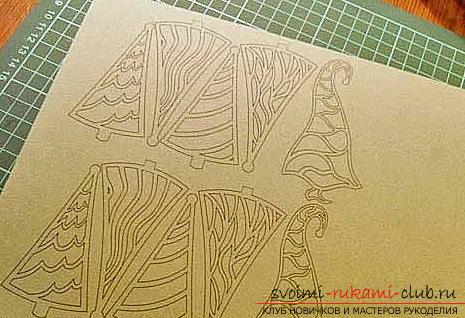 for the beginning, we select templates for the futureblanks. Print them with pastel paper. Then, using a mock-up, or a clerical knife, we cut out the necessary forms of birches. Then, turn the products over so that there are no problems with the markup line. Those should not remain. After that, we make the tint of the fringe edges, using the ink pad in green. As a convenient option, it is better to work on the workpiece with a podstavochkoy.
 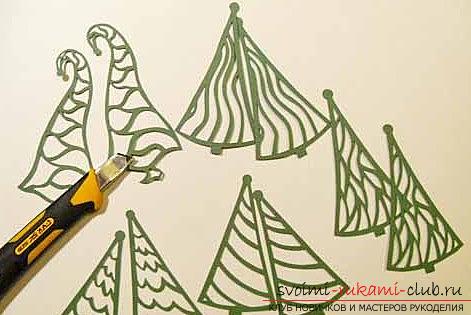 Next, we work with scrap paper, which will becomesubstrate to the Christmas tree. Gently pastes a Christmas tree on the selected paper. In those places that are not glued, apply glue with a needle, or toothpicks. Scrap paper should be cut using a contour around the tree, leaving a small version of the allowance. The edges are toned again.
 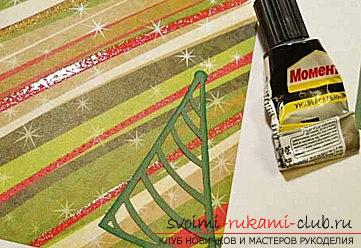 Postcard design After, we work on the basispostcards. To do this, we form a rectangle of paper in the size of 20 by 15 centimeters. It must be pierced to the middle. After, it is necessary to round the corners.
 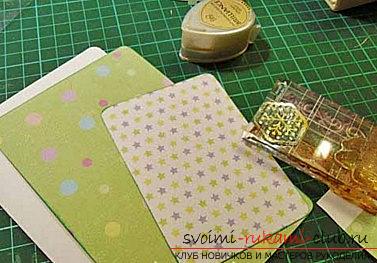 If there is a necessary cutter, it will be excellent. You can also take figured scissors. Or take the usual to markup. Next, using scrap paper, we cut out two versions of the layers at 9.5 centimeters and 14.5 centimeters + 7 centimeters per 10 centimeters. Blanks should also be rounded. Also we make the tint of the edges. For the elegance of the product, we manufacture the product by means of a "golden snowflake". Shutdown In order to make the top layer a substrate,should take the gold paper and arrange allowances on the sides of 5 millimeters. Then, using a hole punch, we form the elements of the decorative appearance. Then, the parts must be glued to the tape with foam. Protective properties of adhesive tape can be removed easily with a pair of tweezers. Then, along the way, we complement the image using several half-beads. We take our Christmas trees and with the help of an adhesive tape, fix them on the product. The Christmas tree is fixed with two layers of adhesive tape. Thus, our New Year tree is completely completed!
Comments
Related posts:
 Scrapbooking a quick envelope with your own hands - a master class on scrapbooking
 Bears-postcards - a hand-crafted scrapbooking technique and a master-class
 Scrapbooking a New Year's card-envelope with your own hands - a step-by-step master class
 Scrapbooking postcard in the form of a portfolio with your own hands. Master class postcards.
 Scrapbooking of a cash box - a master class of scrapbooking for a gift