
The self-design of a gentle dress in the floor will be a wonderful decoration of your wardrobe
 In today's world, girls do not lag behind a stepfrom modern technologies in the field of women's clothing. Every girl wants to look dignified, beautiful. But how to do it, when at every step, in every store the same dresses are sold. And for girls, if they see another in the same or similar dress, this is tantamount to suicide. After all, every girl wants to be inimitable, excellent. And yet, all the year round, when summer, autumn and spring come, the girls have the same problem - there is nothing to wear. Do not always have the money to buy a new dress. The only and best way out of this situation is to start sewing yourself, all by yourself. Dress is women's clothes that will emphasize femininity, adorability, grace, sensuality, elegance of every girl, woman. Dressing in the floor is lightness, tenderness.
  In order to make your ownpattern dress in the floor, do not need to spend a lot of effort. The main thing you need to seriously approach is the correct measurement of the parameters to prepare for the pattern. And the following actions will enthrall you so much that you can not stop, and new ideas will come and come. Pattern dress in the floor - it's easier! There are, as simple patterns, and complex. Beginners are advised to begin to test their strength with a simple pattern that does not require special difficulties. Below is a sample of a simple pattern of dresses in the floor on straps. Girls-schoolgirls in the lessons of labor training learn how to sew on these patterns.
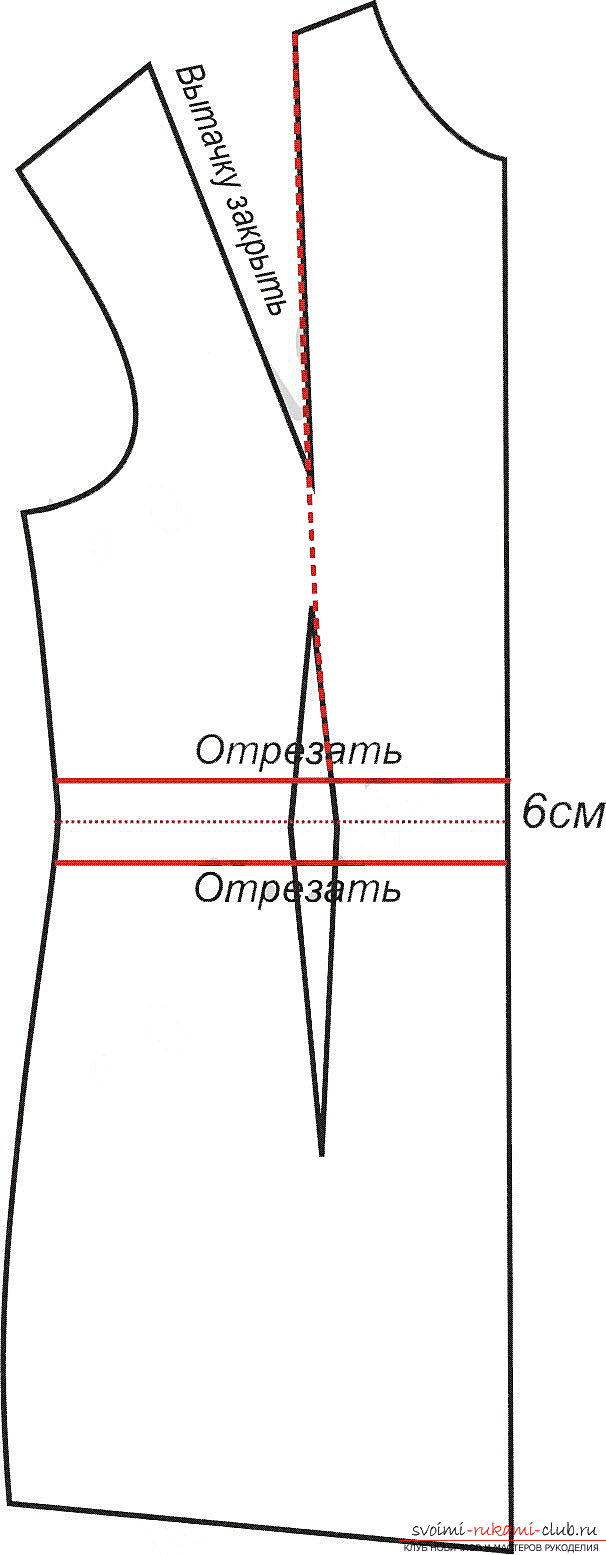 A more complex pattern already has a complicated system (it consists of several parts). Quite ordinary people make this pattern.
 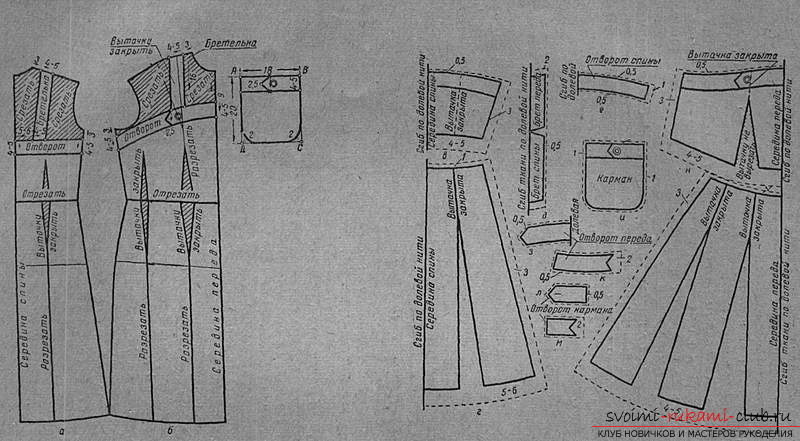 Details of cut dresses in the floor: Do not forget to give allowances for seams and additional allowances in those places where refinements are possible after fitting. Backrest - 2 parts (if the amount of fabric allows, the backrest can be cut with a fold like one piece) Before - 1 piece. Backrest skirt - 4 parts (2 parts from the main fabric and 2 parts - from the lining fabric). Coat transfer - 2 parts (1 part from the base fabric and 1 part - from the lining fabric). From the glued padding it is necessary to cut the details of the coquette.
  Sewing dresses: All open sections should be swept after grinding. Those sections, which, after grinding, are ironed must be swept before grinding. 1) First, take care of the upper part of the dress, i.e. coats. 2) Glue with a thin fliseline of the coquette of the backrest and the cuff. 3) The fastener on the buttonhole and button is located on the middle seam of the back coquette, so this seam should be worn only to the mark. 4) And so, grind the middle sections of the back (upper and lining) up to the fastener label, seam the tongue. 5) Stitch the shoulder seams, iron. 6) Fold the coquette with the inside sides, turn the fastener (do not forget to insert the loop) and the neck, unscrew, sweep, line the edge. 7) , along the edge of the line. 8) Tepe We begin the lower part: grind the middle seam of the backrest (if you have cut the back of the two parts). 9) We make two parallel lines for the assemblies in the upper cut of the gear and the backrest. 10) We join the sections between the marks. 11) We connect the backrest to the upper back rest coquette and before also connect with the upper coquette gear, press the allowances on the coquette. 12) Lower sections of the lining of the coquettes to sweep. 13) We grind the side seams of the dress. 14) We grind the side seams of the lining of the coquette.15) Lower the coquette (lining) and rolozhit line in the region of the front side of the upper koketki.16) to try on, check the bottom of the gown and adjust if necessary (aligned, shorten). The bottom can be processed in several ways: by a Moscow seam, or (with special equipment) with a role seam, or simply swept and stitched with a narrow seam.17) It remains to sew a button and the dress is ready. Naturally, getting into the trend and being like everyone else -this is not beautiful and correct. But at least one dress in the floor should still have a girl in her wardrobe, so that, with the appropriate mood and desire to merge with the crowd, we had our way out of the current situation. Make your dreams come true, create your masterpieces. Do not be afraid if you do not get something right the first time. Try again and again. Until you try and do mechanically even the most complicated patterns of dresses.
Comments
Related posts:
 The self-design of a bright summer dress will be a wonderful decoration for your wardrobe
 A wonderful knitted Japanese jumper will become an integral part of your wardrobe
 Sew fast dress in Greek style. Easy dress of light dress
 A beautifully orange tree made of ribbons will serve as a beautiful interior decoration or gift.
 We make new dresses in our wardrobe with our own hands. A pattern of elegant, gorgeous Raglan dress is easy. Instructions and photos