Shishechka as an oddity Christmas tree - decorations and crafts with their own hands
Autumn has long come, and winter is very close. Of course, we are not heroes from the Games of Thrones, but we are also going to prepare for the winter! For this we have many options and, of course, unique crafts, ornaments to diversify your home or make a unique gift to a loved one.
Shishechka as an oddity Christmas tree - decorations and crafts with their own hands
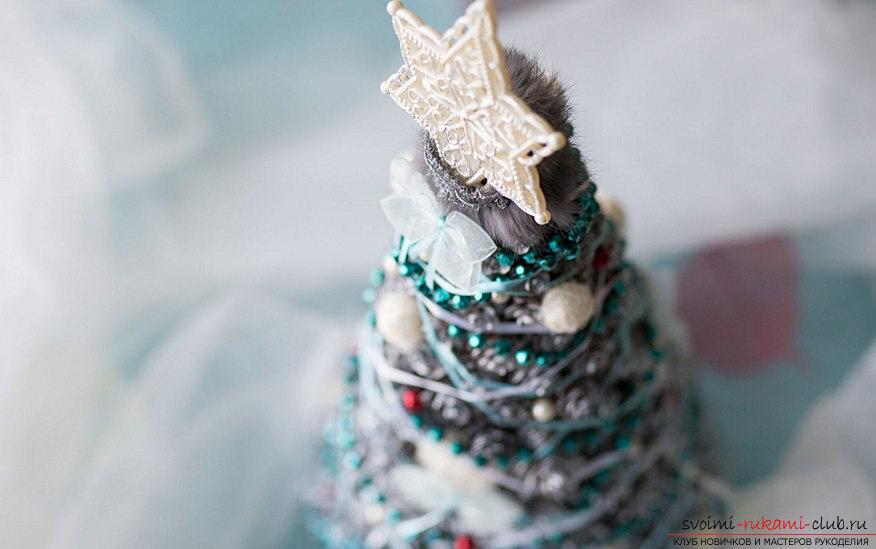
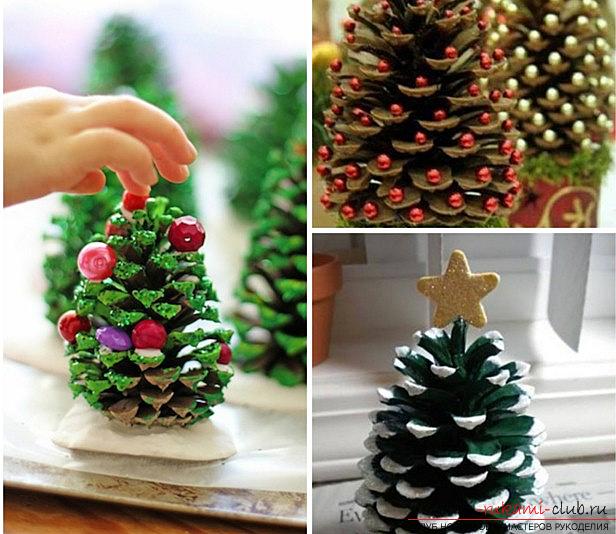 It would seem that completely ordinary objects of autumncan become unique ornaments for the winter. Have you ever thought about the fact that the shape of the knob is great for making a unique version of the New Year's composition? So we thought about creating something new and unique. So, even the objects of autumn can have the necessary charm and charisma to become real objects of winter! For example, a cone. It is unique in its kind. If you look at it from one side - we see quite a familiar and standard example of autumn art of nature. If you look at another (try to paint the cone in green), you can notice that it is an excellent decorative object for a house, a good gift for a guest or even an ornament! Shishka - a new Christmas tree
  Firstly, this kind of decoration is excellentsuitable for the exterior decoration of your future Christmas tree and for many years will be able to decorate your house. On the other hand - it's very convenient, because such an article does not require too many resources. After all, the main foundation and framework for our creativity will be the little cone itself. In addition, this shishechku not shamefully handed as a small, souvenir gift for the new year and Christmas for a loved one. Or, to make a present for another occasion - on the first day of winter! After all, the cone symbolizes autumn, and we decorate it in the form of a New Year's gift! So, we will need certain resources, with which our little cone will have a second life and will be able to survive this winter in warmth and comfort! It is worth noting that working with the cone will not be too difficult. The element has all the necessary characteristics for processing. The cushion is easy to dry, it lends itself to painting and of course, the possibilities with decoration also remain at the same level, as for example - with paper. The only thing that can not be depicted figuratively.
- Obviously, we need to collect or get the bumps (which have blossomed)
- Next, we need a special felting needle
- Also, take glitter from glass
- Take the glue
- It will take wool for our felting
Our task is to form a New Yearfir-trees made of cones. The ripe little cone has one minus - it is sensitive to the change of humidity in the air. In dry weather, she reveals her veil. Therefore, the compressed knobs need to be treated beforehand. It is necessary to dry them using an oven (near the door) or next to the battery (in winter). When you see that the cone is ready for deformations for the benefit of the craft - start your work! Sticky bumps should be baked in the oven at a temperature of 170 degrees. Thus, its structure hardens. How to form a kind of toy shishechki? Next, we form the toy itself. We need to take a needle for the work of felting and pieces of wool, which we must twist into small balls. They need to do more, but adding a little wool. The more wool - the more difficult it is to separate it. You have to be careful, because the needle for felting is a dangerous tool. Now, we form the balls and dunk them into the water with warm heating, then roll between the palms. We get fibers with an elastic composition, which will make the balls in a round shape. After these water manipulations, we soak the balls with a towel (terry), and then - expect full drying of our wool. After - the tree must be decorated. To do this, you need to spread the balls on the adhesive backing. The usual little knob in sizes for five-six centimeters demands 23-25 balls which it will be necessary to fix. As a stand we will take a thread coil. The reel can also be decorated, but for this it is necessary to take an adhesive of transparent type and to roll it with glitter from glass. Then, the Christmas tree from the cone is fixed on the base. After, you need to put our woolen balls on the product with the help of hand-made elements. Experiment to get what you like. It is advisable to take a large set of knobs so that there is more room for change and improvement. Also, the bump can be treated with paint to make it really a real Christmas tree. But, regardless of the painting, it is best to add varnish. It will allow us to preserve the old look of our cone and add the "gloss" effect, which is so necessary for obtaining a unique and interesting thing. Also, you can use the services of beads, various beads, glitters, brads for decoration. There are a lot of ways to decorate the knob. But, only you decide which one is right for you. In addition, it is highly recommended to make a set of knobs, combining a variety of schemes and solutions in order to decorate and perfect the option of a beautiful and excellent shishechki for the new year.
Comments
Related posts:
 Registration of a unique ornament of a New Year's tree by own hands - a master class
 Master-class of making a New Year's craft by oneself - hangers from ribbons.
Master-class of manufacturing by own hands of an alternative New Year tree - crafts of Christmas trees from coffee beans.
Master-class of making a New Year's craft by oneself - hangers from ribbons.
Master-class of manufacturing by own hands of an alternative New Year tree - crafts of Christmas trees from coffee beans.
 New Year's hand-crafting: Christmas boot for the 2015 contest, New Year's crafts by own hands
 Christmas tree bells with their own hands: new ways of decorating a Christmas tree and a house