Simple rules for constructing a pattern-base make it possible to make an individual pattern
Simple rules building a pattern-base isa way to create a universal drawing, modifying which you can sew absolutely any element of the wardrobe, no matter what it is - a dress, skirt, blouse, shirt. By and large, the pattern-base is the prototype of each of the listed products. That's why every novice seamstress must learn it. What you need to build it, you will learn from the article we offer. Everyone who begins to master the skill of sewing, you need to understand one simple truth - there is no tailoring of products without patterns. Therefore, it is necessary to learn how to make patterns on your own. To build them you will need an elementary knowledge of drawing and mathematics. To learn how to model clothes or sew one or another part of the wardrobe, we need to build one single pattern, namely a pattern-base. We will try to figure out what it is. Pattern-base is, by and large, a cast from your own body, through which we will create our own clothes. By adding individual parts and some manipulations in the form of folds, cutouts and so on, we can cut and sew absolutely any model or style of things. Using this simple pattern in the form of a flat pattern sweep, the most complex and unusual models of products will be available to us. The first thing you need to know is where do we get the pattern-base. This is exactly what the drawing requires. A drawing is two parts. One of them is half back, and the other half of the front part of the product. They are called shelves.  Now let's move on to some details of these shelves. It's about armholes and darts.
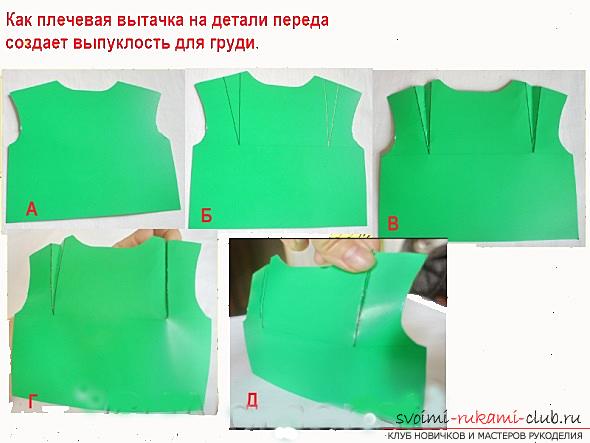
 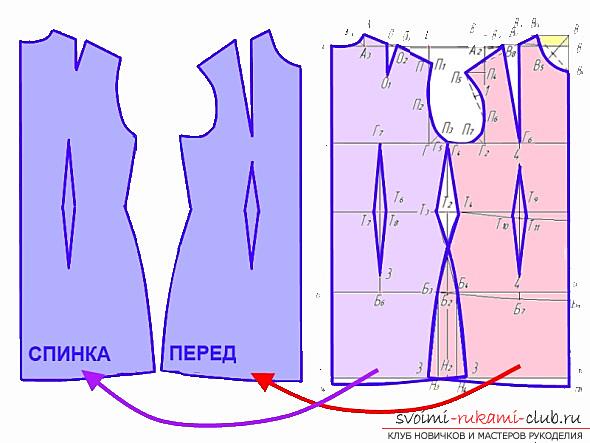 First armhole. It is a bend, a hole where you can sew up sleeves or not sew them, but leave the armhole in its original form. On the pattern-basis, we have clear armhole lines. If we sew a dress of another style, the lines can be changed, but remember that the armhole should in no case be smaller than on the base, otherwise the fabric will squeeze hands, creating discomfort, and the whole product will lose the appearance that should it would have. Now about darts. Each dress or blouse has several darts. Shoulder tucks may be in the middle of the shoulder or they may be moved closer to the zipper, if any. Tail thighs are usually located on either side of the zipper when it is provided, or the middle seam of the back. In the case where a stretch fabric is chosen for sewing a dress, darts are not necessary, which greatly facilitates the process of cutting. On the front shelves, too, there are darts. The female breast is the volume, and it, in turn, requires additional volume in the chest area on the fabric for a dress or blouse. What is a dart, let's try to consider the example of a regular circle of cardboard. The following photo is an example of how a dart on the front shelves is formed and a volume is created in the chest area.
 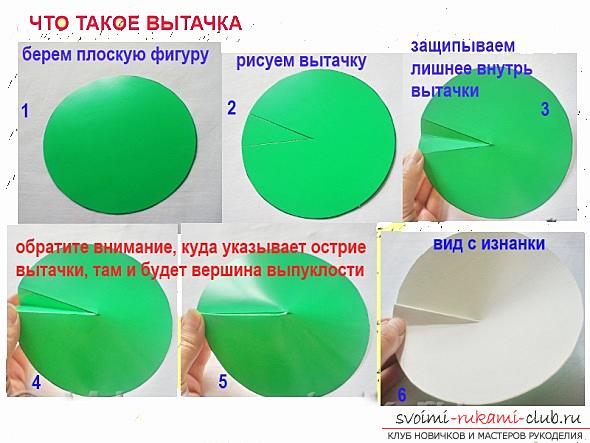 Now consider simple construction rulespatterns that you need to know. The creation of a pattern-base or a basic pattern will not take much time. But before you begin the process of cutting, you should focus on the basic details.
- The basic pattern has two components - the front and back sections.
- The shelves have cutouts in the amount of three pieces - two mandatory darts and, of course, an armhole.
- Darts on the front shelf should be deeper than the backrest darts.
- The patch of the backrest shelf is smaller than the front shelf.
To build a basic pattern, you will need rectangular paper, to which measurements will be applied. We must take off our standards:
- you will need to apply length from the level of the cervical vertebra to the level where the length will end, for example, dresses - so we get the length of the finished product;
- Half-chest of a breast with addition five-seven centimeters is a size of width of a product.
Using these simple rules for constructing a pattern-base, it is fast enough and not difficult to make a drawing that will become the main thing when sewing all things.
Comments
Related posts:
 We make our wardrobe more diverse. We make a pattern of a simple dress base with our own hands. Simple diagrams and photos
 How to sew the most stylish women's jacket for spring and autumn. Principles of building a pattern of a jacket and sewing it
 Simple patterns of pupae-primitives will allow you to make a doll yourself handmade
 Step-by-step description of the construction of the overall pattern for York
 Build a pattern of the dress for girls with a step-by-step description and photo.