
Simple ways of tailoring the catch for curtains with your own hands. How free of ordinary materials to make useful and popular in 2014 crafts
What to do if the curtains are constantly confused underlegs, prevent walking on the balcony or just watering the flowers on the windowsill, and you can not remove them because you can ruin the entire long-planned and ongoing design of the room? The answer is quite simple - use picks. Such simple accessories perfectly complement your curtain and turn it from an ordinary piece of fabric into something completely extraordinary. After all, this detail is intended not only for practical purposes, but also largely modernizes the design of the curtains. With their help, you can effectively collect parts of the curtains and create, such an artificial drapery that will only give your decoration for windows even greater elegance. In addition, having secured the curtains with the help of such handicrafts you will allow the light to penetrate more into the windows and accordingly make your room even brighter and lighter. And more than that practical and wonderful catchments for curtains you can sew completely for free with your own hands. All the necessary information, ideas and examples will be presented in our article. Usually pick-ups for curtains are made of fabric. But this is not an obligatory condition. You can also make them from beads, glass beads, beads, ropes and rings with brushes, which will not even need to be strengthened. Perhaps crafts made of such material will have slightly less functionality, but they will look just fine. If you are planning to make a pick up for curtains in the children's room, then use a regular soft toy. Simply sew additional rivets to it (for example, on each of the legs) and you get simple, but original and interesting to the baby pickups for curtains. 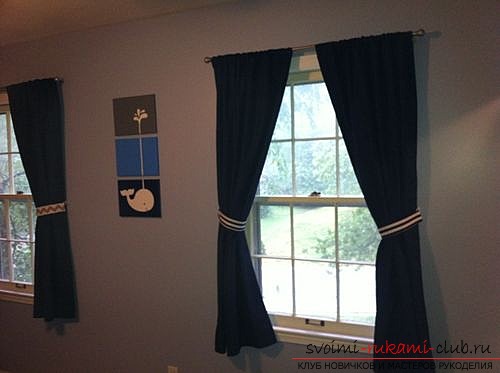
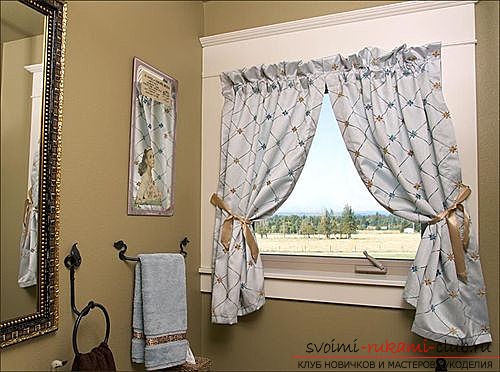 Also if you want to give originality to yourpicks for curtains, then the best assistant for you will be ordinary magnets. They can also be sewed in any product you are interested in and so not just fix the curtains, but also make it original and with a twist. Therefore, if you want your curtain to stand out from the crowd of others, then just plug in the fantasy and you will not notice how you yourself will find dozens of variations and materials from which you can make curtain raises. But at the same time the most popular is the classic picks made of cloth, often using special patterns and a sewing machine. Such picks should be attached to specially designed hooks slightly below the windowsill (although now there are many alternative ways of fastening).
In order to sew such picks for curtains you will need with your own hands:
Now proceed directly to manufacturing: 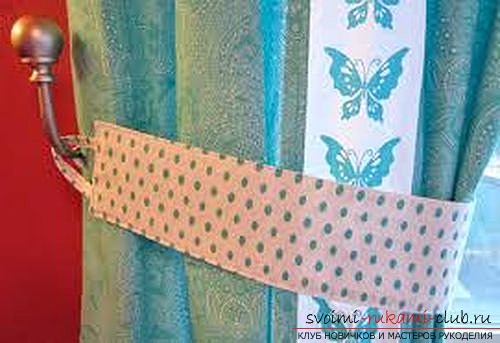
 Step 1 Take the cloth. Not necessarily its color should be the same as that of curtains, but they should harmoniously combine with each other. It is best to choose a hard and dense material, it will be much better for the soft options to keep the shape given by you. And one more condition the fabric should not drag on. If you choose a variant of the material with a picture, be sure to follow the symmetry and harmonious arrangement of the picture. Step 2 Draw a rectangle on the cardboard or thick enough paper. You can make them absolutely of any sizes, depending on your ideas and wishes, usually they have the parameters 35 by 10 cm. Of course you can cut directly on the fabric, but this option will be much more convenient when you press the allowances. Step 3 Our fabric should be folded in half and attached to the finished pattern so that its long side coincides with the bend line. After the contour, circle our rectangle, and then grow on each side of 0.5 cm. This will be necessary for the allowances. Original models come out of two strips. Thin fabric is best strengthened with adhesive fleece.
 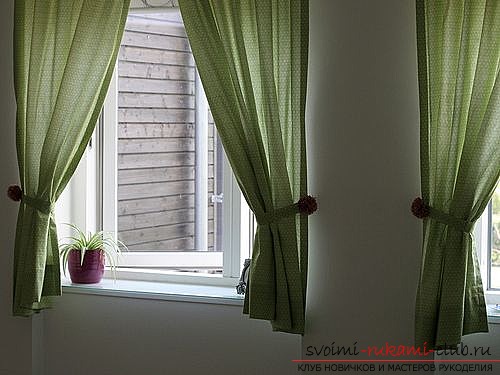 Step 4 Add one of the details of our workpiecethe wrong side in half and properly iron the resulting line of bending. Then in the wrong side we fold the allowances and iron in the same way. With the help of a pattern it will be much more convenient to do. Step 5 Next, fold our fabric face down and leave one of the slices open and sew. Then turn inside out and sew up the hole. Step 6 Master the slotted hinges. They can easily be replaced by sewing a loop of lace or fabric. Step 7 Sew a button. To do this, first mark the place and use a sharp blade to make a hole. Then it will need to be swept. You can also replace the button with your own discretion with simple buttons. Step 8 To the wall using dowels we attach special hooks. We fix picks on them. You can, on the other hand, make a metal loop on the wall, and hook on the hook and fasten them in this way. The location of the fasteners depends directly on the intended location of the pick-ups on the curtain. There are options when they are in the middle of the window opening or at the floor. But the traditional placement of picks at a height just below the windowsill is considered. That's all the excellent pickups for the windows,made by hand, made! Thus, you can see that making beautiful, beautiful, and most importantly very practical pick-ups for curtains with your own hands is very simple. Manufacturing does not require you any special skills, or beyond, just the simplest materials and basic techniques, and of course your unlimited imagination. All this in combination with our helpful tips will help you create such a practical and unique crafts and decorate your curtains with it. So do not forget to share the results of the work done with the rest of the readers in the comments and let your products bring interesting and positive emotions to the surrounding people!
Comments
Related posts:
 How to sew the original curtains of linen with your own hands. We make beautiful and popular in 2014 ornaments for windows made of natural material
 Children's crafts, handicrafts for the school with their own hands, crafts made of natural materials, autumn crafts, crafts made of dough with their own hands, how to make a grassy little man, a school pencil case with their own hands.
 Crafts from improvised materials: a panel of pipes for the contest Spring 2016, hand-made articles from improvised materials
 Make beautiful autumn crafts in school with your own hands from improvised materials with a step-by-step description, photo.
 How to make handmade crafts from available materials. Interesting ideas for the simple creation of unique handicrafts