How to prepare a Christmas tree of beads? Lesson and master-class beadwork
The holiday celebration of Christmas isconstant preparation for the most positive events and magic that should fill our home. In search of inspiration, we are trying to create something new, unique for decoration, decoration or a gift made with our own hands. New Year's holidays promise a lot of experiments and possibly the development of new techniques. Beadworking in this case will not be an exception, but will only help to organize your holiday competently and come up with a unique gift or an odd job for your home.
How to prepare a Christmas tree of beads? Lesson and master-class beadwork
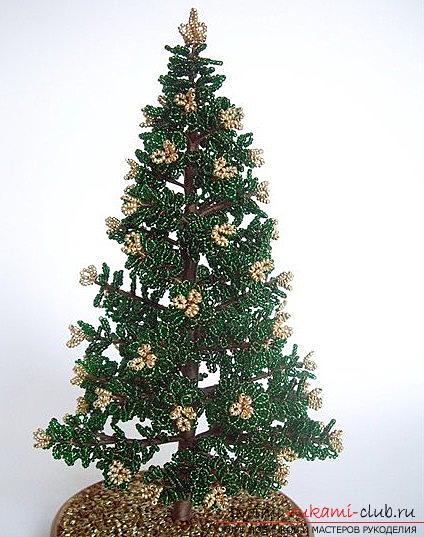
 So, what is the main symbol of Christmas andNew Year in the circle of all families and countries? Of course, the New Year tree. Making a Christmas tree with your own hands is a laborious process, requiring attention and a huge amount of materials. But, the technique of beading makes it easier to carry your burden and suggest how to create such a tree, using a minimal set of improvised tools. Such an experiment can be a bright reason for creating an exciting, New Year's gift. Or maybe you have a desire to decorate the kitchen with a new and unique Christmas tree made by yourself? If you are ready to study, then, it is worth studying this master class. Decorating a New Year's tree with beads - materials and a lesson
 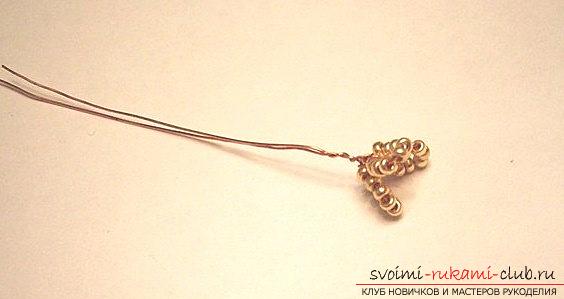 Our herringbone will consist of a wire onstand, as well as special bead sets attached to it. Of course, for such work, a special beadwork scheme and the master's desire to learn something new will be required to obtain a unique result. A set of materials for beadwork will help you quickly make a craft, and knowledge of technology will facilitate the creation process. Also, you will need a list of those things that we will use for our future Christmas tree:
- A large amount of wire is required
- Let's take the beads of green, golden color
- It will take a string of dark brown color
- Also need a gypsum
- Take the sticky substance PVA
- Prepare the decor elements for the primer - the remains of beads and elements of sequins
- Flat type kapshoo
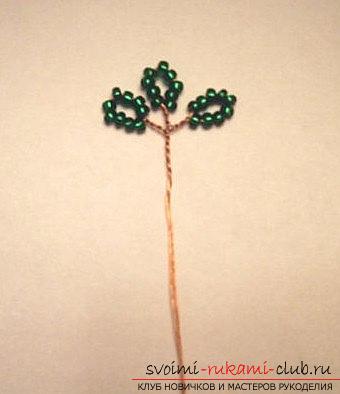
The first part of the work  In order to form a herringbone, workshould be divided into three parts. In the first part we will prepare our preparations, we will shape the crown. For the second - we form the branches of the future tree, and also we attach them to the element of the trunk. In the third - we form a winter tree, decorate it. In order to make our Christmas tree, you will need the beads in green, from which we make the paw billets into three loops. In each loop we use nine beads. Next, we form 60 blanks of similar variations in the form of golden shishechek. Decoration of branches
 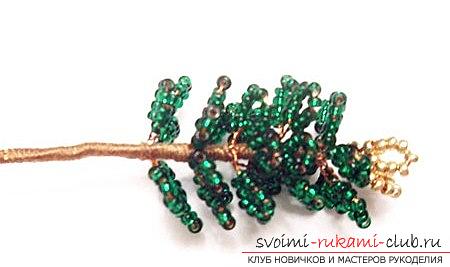 After - we produce the formation and weaving of woodusing beads in a golden hue. It is necessary to form a variant of the vertex. We take a loop of the apex type for fifteen beads to surround it with three loops of the same type. Further, we go down and twist eight identical legs in the form of workpiece in pairing meaning. The variants are obtained on four tiers, using the loop legs in the New Year tree. We use beads of green color. Next, we twist three paws. Next, we form the vertex. For the free end of the product in the wire, we must add four wire elements of strong type - for the basis of the future trunk. Also, for roots. We are working on the second stage!
  Steam twigs It is necessary to take the variant of workin the form of a paw on a gold bead and screw them together in pairs with four green paws. Then, we produce the winding with a thread. We form five more branches, also we fasten it on three parts to a row. The next two rows we form on six branches, but using six legs for each branch. In the next two rows on four branches and eight green paw options. After, the next two rows on four branches of ten claws of green color. In the next row we use six twigs and twelve legs of green color. After, the next row uses two twigs. To form them it is necessary from ten branches on eight legs of green color for everyone. You need to twist two by pairs, pairing them up to the mating points, so that it is slightly lower than the variants of the six legs. Then, we make the conjugation of double branches for the trunk. In the last row we use five branches of the triple type. For them, you need to make 15 twigs, as for the previous row. We twist them, fix them in pairs, attach two pairs of green pads to the junction points. We twist for the third branch and make the completion of each triple branch, completing the products by attaching the legs of the green color. Each triple branch to the trunk is attached. During the fastening, we make a tightening with the help of a thread. Fixing the foundation. We use capsot in order to fill in the gypsum and fix the root of our product there. After that, we make gypsum drying, then we spread the foundation with glue, then fill it with decor in the form of our beads. The product is ready!
Comments
Related posts:
 The master class will teach how to make a New Year's craft - a Christmas tree from plasticine on a toothpick
 This master class will teach you how to make your own hands a New Year greeting card.
 We make a Christmas tree from ordinary macaroni, a detailed master class with a step-by-step photo
 How to make a voluminous Christmas card? A lesson for children - a master class
 How to make a New Year's card in vintage style with your own hands? Master class and lesson