We study the information on how to make a plastic ceiling in the kitchen with our own hands
When there is a question of finishing the ceiling in the kitchen,it is very important to take into account one point. Everything that will be cooked on the hob will necessarily rise to the ceiling and settle there. Of course, you can install the hood, but it will not save your ceiling by one hundred percent. So, it is necessary to choose a material that would be both durable and beautiful, but most importantly it should be practical, that is, it is easy to be cleansed. There are many such materials, one of them is plastic panels. To install plastic panels, you will need the material itself, fasteners in the form of screws, several metal guide profiles. From tools the drill, a level, a plumb, a screwdriver. Like any repair process, this one is divided into stages. 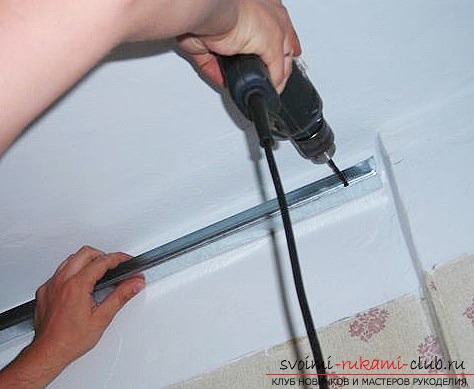 Stage number 1 - preparation of the ceiling and installation of the crate. Concrete ceiling must be repaired, that is, they fill up the defects with filler and process with a primer. Then begins the installation of the frame, in the kitchen to use better metal profiles. First of all, the guiding profiles are installed along the perimeter of the room under the ceiling. They are attached to the walls with self-tapping screws on plastic dowels. Then the whole area is placed ceiling profiles, the distance between them - 40 cm. They are attached to the ceiling on direct hangers, the distance between the last 40-50 cm.
  A very important point - thus constructedThe design should be in the same horizontal plane. Stage number 2 - installation of the mounting plate. It is a special plastic element, which has an angle of 90 degrees in the section. With one side it is fixed to the crate, a bar is set against the wall. On the other hand, the element has a groove where the ceiling skirting board is inserted. The gap between the bar and the plinth is the place where the plastic panels are inserted. The bar is installed around the perimeter of the room and fixed with screws with a press washer, the distance between which is 20-25 cm. Now a skirting board is installed, the corners of which are connected with a special corner element, so that no joints will be seen.
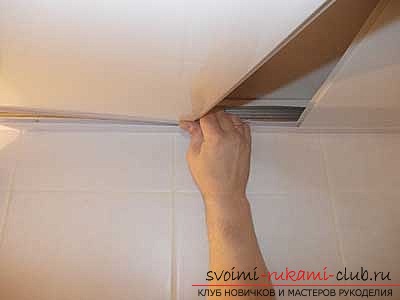
  Stage number 3 - installation of panels. The first panel is installed, which is inserted into the gap between the plinth and the strip. On the opposite side we attach it with a screwdriver with a press washer to the elements of the crate. The next panel is inserted into the previous one and is also fixed with screws. Very often the last panel in size does not fit the remaining space. It must be pruned, use a metal hacksaw with small teeth to do this. It remains only to install a skirting board on the last panel.
Comments
Related posts:
 How to make New Year costume with your own hands? We will provide comprehensive information.
 Repair in the kitchen with your own hands - an idea for reworking the kitchen in order to make the premises lighter and more comfortable
 How to create a cushion decor with your own hands? First you need to study the information provided.
 We study card-making, find and share ideas for postcards created by our own hands.
 How to make a watch from cardboard with your own hands on the 2015 Competition, hand-made crafts