Quilling technique of a Christmas tree with own hands - a master class
A distinctive feature of any methodHandicrafts are the basic functions that are laid in this creative process. First of all, it is an opportunity to develop your own qualities and learn something new. Secondly, it is a way to make it more enjoyable and exciting that occupation, which is the main one. So, for example, during the New Year it is quite successful to do such needlework that will help decorate your home, prepare a new gift or please your native people.
Christmas tree for the new year - Quilling technique
The period of Christmas holidays is time,when we are using a variety of methods to try to give warmth and magic to surrounding people. With the help of manual works, it is quite possible to decorate an apartment, complete a New Year gift or simply, to prepare a thematic craft. Today we will consider the option of working with quilling techniques - decorating objects with paper. Through the formation of various forms of paper ribbons, we recreate the items that we need for applique. Preparation of quilling for a Christmas tree The theme of the lesson is the creation of a Christmas tree, using quilling techniques. Everything is simple enough. Take advantage of modern schemes, with which help make the desired Christmas tree will not be difficult. Such a tree can decorate your house, become the main subject of the future craft of the postcard, or another gift product for your relatives and friends. Special ideas and ways of implementation will help us in our work. But first, you need to collect the necessary material, which will become the starting point in future work on materials. So, where to start?
- Prepare corrugated cardboard green
- Corrugated cardboard brown
- Corrugated cardboard of orange color
- Corrugated cardboard of green color
- Corrugated cardboard in white color
- Corrugated cardboard in pink color
- Corrugated cardboard in crimson color
- A small set of decorative ornaments, for example - half-beads
- Glue stick
- Toothpick to work on quilling
- Lace of golden color
- Ruler
- Plain pencil
When all these materials are gathered together, you can start working on a model of our future herringbone. Let's get started! Forming parts 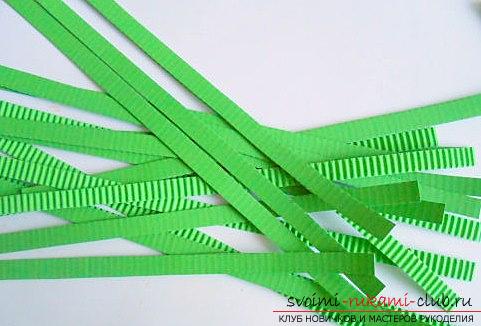 First, you need to take a sheet of paperpaper-cardboard (corrugated) and cut it into strips in length by 1 centimeter. Strips are cut out and after, for each tree we will prepare up to 9 strips. Using a toothpick, we wind up cardboard for each strip. To tighten this cardboard you need dense actions, but, do not press the cardboard, and also do not pull it together. This can lead to the fact that it will break up.
 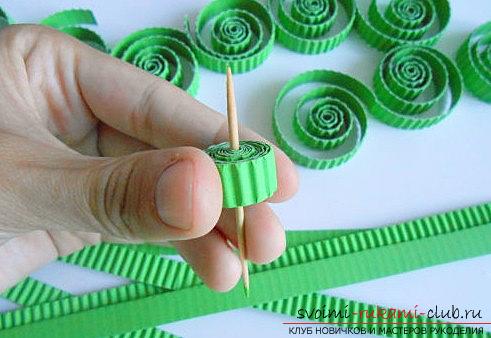 Quilling for the details of the treetwisting nine circles, for this we need a special ruler with a diameter, or an officer's ruler. Depending on your size, the diameter of each circle will be determined.
 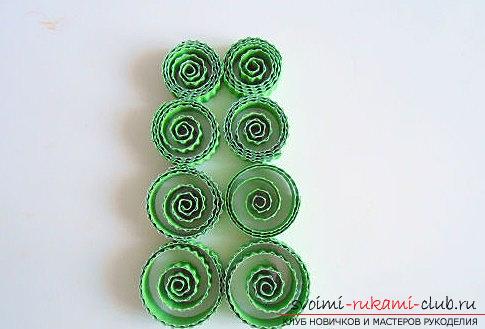 Each row of trees should be made up of two circlesin the same size. Each subsequent row of circles should be three times larger than the previous circles. Create the necessary shapes of the circles and bend them with your finger. The shape of the circle must be embodied in the form of a drop. The end of the figure must be bent upwards. After, the circles are bent from all sides and again laid out in the form of pairs. Then, the shape of each mug is corrected as necessary.
  For the ninth strip we form a circle of denseof the species, it is also necessary to glue the tip and give it a droplet shape. But, here the tip should not be bent - it's the future top for our Christmas tree in the new technique. Decoration and decoration of our Christmas tree
 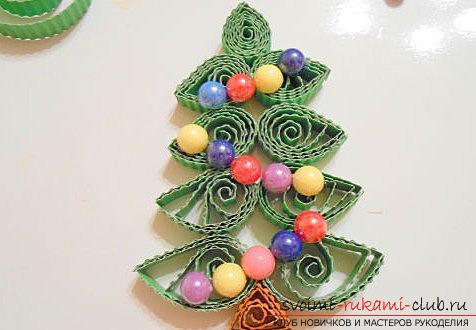 Also we take cardboard in brown color, or inorange color to cut the strip in the size of the thickness by 1 centimeter. The circle is formed, then pasted and after, using your fingers - create a triangle.
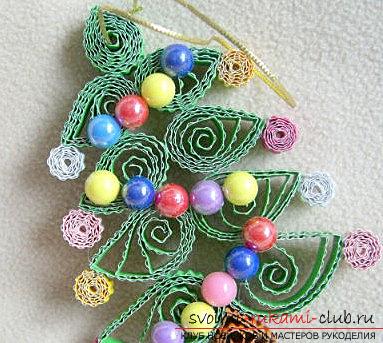
 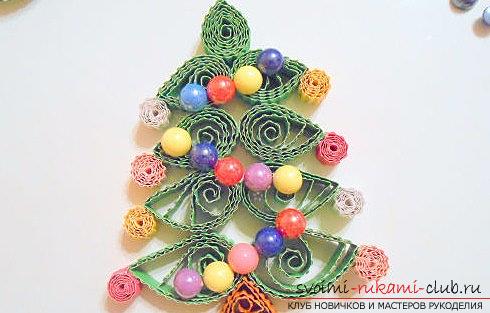 To do this, turn the corners on the right and leftside, after - at the top. Then, you need to glue together each element of the Christmas tree and their details, using a sticky substance. The tree can also be decorated with various decorative ornaments in the form of buttons, beads, rhinestones, or beads. Here everything remains for your consideration. We form small strips of white, pink, yellow, crimson tones for cutting strips in width by 1 centimeter and length by 10 centimeters. They need to be twisted in the form of dense circles and glue their edges. Thus, the balls of the tree are formed. They are also fixed for each twig. At the top, we plant our golden rope. So, the decoration is completely ready!
Comments
Related posts:
 This detailed master-class of quilling colors will tell you how to make your own hands a bouquet in the basket.
 Creation of an artwork of Santa Claus and herringbone by own hands - a master class of quilling
 Colorful peacock and quilling technique for birds - a master class with their own hands
 This detailed master class contains a quilling lesson for beginners and will teach you how to make yourself a quilling ballerina.
 Quilling of a bell of a Christmas tree for children - a technique of needlework by the hands and a master class