
Tenechnika "Mosaic weaving" beads with their own hands. The lesson and materials are free.
Modern beadwork techniques includeyourself a lot of different schemes that you can use to improve your own skills. Thanks to modern methods, the implementation of modern beadwork techniques is much easier than it was before. In this case, there are very advanced techniques that are often used by people. A certain task requires its own technique. 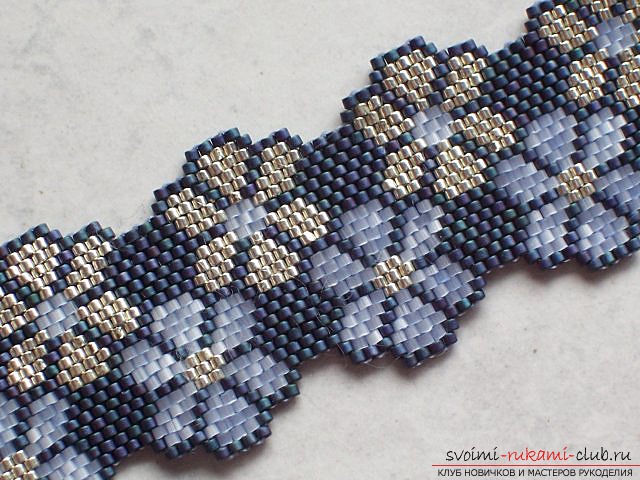 What if you need to make your own braceletown hands? Then, for this subject, the beadwork scheme according to the mosaic principle is perfect. In mosaic technique, in the main, various beaded strips or bracelets are woven. Next, they are located in a checkerboard pattern, forming a fairly flexible linen of beads. It is worth mentioning immediately that in the illustrations of modern lessons for clarity, the distance between the beads is shown more. It is worth noting that in the weave everything looks much less convenient, but using a magnifying glass, this material is quite logical and qualitatively fixed to create a beautiful and unique mosaic with your own hands.
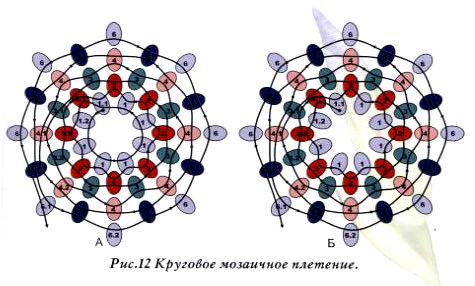
  Biseriny densely adjusted to each other, so thatwas visible itself of the thread. In order to make any decoration, in particular - a bracelet, you need to cut the thread in the size of 2 m length. Then, you need to string beads in such a way that you can stretch the thread. Then, we stretch it out and do not bring 15 senimeters to the end. After, thread the thread again through beads, creating a fixation. Next, beads will stick to the thread, and this bead will act as a stopper. Next, you need to dial beads for the first row. One bead is used for the second row, it should be allowed to the ends of the thread, to the fixed bead. Next, you need to pass the needle through the third bead from the needle. After, string one of the beads for the second row, and then - thread the needle through the underlying beads, also skipping one of them in the first row. Next, you need to repeat this action to the end of your series. Also, forget about pulling on the thread. In the beginning, the appearance may have a slightly oblique structure, but when you execute several rows, everything will look as beautiful as possible. Further, at the beginning of the third row,string the first bead, and then, work from the fixed. To do this, draw the needle with the first bead, which will act in the previous row. Next, continue this action to the end of the series. go through the beads that protrude. Next you need to continue the weaving, while - change the direction at the end of the row. The algorithm of this problem is very simple. We put on one bead - let the needle through with the help of the protruding in the previous row. And so on until the necessary product is ready. This is the basis of the mosaic.
Comments
Related posts:
 Winter wood lesson with your own hands. Beadwork and photography works.
 Mosaic weaving beads on schemes (video)
 A lesson on embroidery beads with their own hands, advice for beginners with embroidery beads with photos and descriptions.
 Lessons in creating a bracelet from beads with your own hands. Materials are free.
 How to make a hedgehog out of cones. A lesson with my own hands. Photo-materials and instructions.