
How to crochet the original and cute booties, how to choose the thread, make the necessary calculations.
There is a saying "A child is a heart,which goes separately. " Every loving mother wants only the best for her heart. From the very first days of her life, she took care of the baby to always have a sound sleep, tasty healthy food and clean clothes. And of course every mother wants her baby to be the most beautiful. Therefore, needlewomen and craftsmen around the world knit wonderful things for crumbs. If you are new to knitting, do not get discouraged. You too can create a beautiful and necessary thing for your child - to bind booties. They are soft shoes for the youngest. Booties are usually worn on crumbs that do not yet know how to walk so that their small legs do not freeze. So, if you decide to knit booties, you should first consider a few important points. The first of these is the choice of threads. Baby skin is very tender and sensitive, so pay close attention to the composition of the yarn. Try to choose the one in which most of the natural fibers: cotton, silk, flax, wool. Most manufacturers make special markings on the threads, so choosing a yarn will be easy enough. In this article we will knit light pinets for the warm season or for the house. For summer options, which will protect the legs from overheating and of course serve as a decoration, yarn made from 100% mercerized cotton is perfect. Such booties will be perfect to let in air, and bright colors of threads will make even the most ordinary variant elegant. When you have decided on the thread and the model, you will only have to take measurements and get to work. Most knits are knitted, starting with the sole, so the main measures can be considered the length and width of the foot. The easiest and most affordable way to measure a leg is to circle it on a piece of paper. It will also be possible to make notes in the process of knitting. The length of the foot is measured from the heel to the thumb. Before you start knitting, you must perform a preliminary calculation of the loops. To do this, tie the sample 10x10 cm and calculate how many loops are obtained in 1 cm. Knitting starts from the sole, so you also need to calculate how many loops should be in the original chain. If the knitting is in a circle, then from the length of the foot you need to take away its width. For example, if the length is 12 cm and the width is 6, then the length of the original chain should be 12-6 = 6 cm. How many pieces of 1 cm do you already know, so boldly start knitting. The first pinets are connected for a leg approximately 10 cm in length. In order to increase or decrease the size of the pins, you can take a thicker or thinner thread and hook, or tie more or fewer rows of soles. 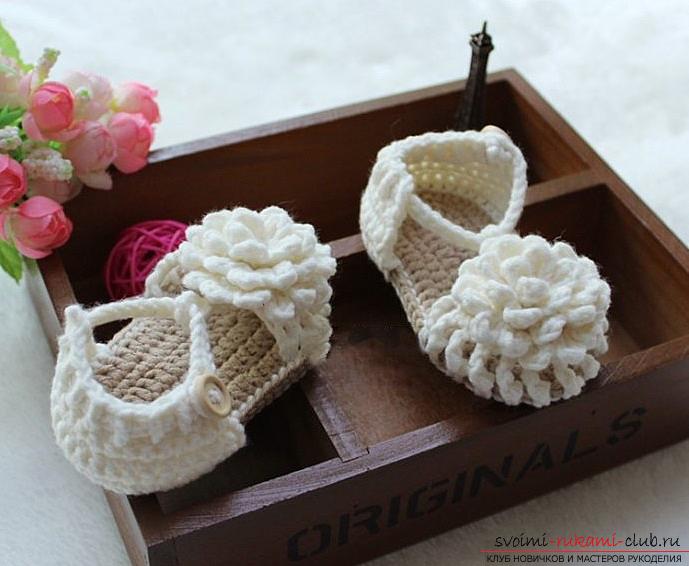 It will take:
- The yarn is beige and brown;
- Hook of the appropriate size.
 The work begins with a chain of 12 v. + 3 timesp. Then in the 4 th from the hook loop a 2 tbsp. with / n. in the next 10 loops knit for 1 tbsp. s / n, in the outer loop to bind immediately 7 tbsp. c / n and continue to work on the second side of the original chain. Again, tie 10 tbsp. c / n and in the 12th loop of the chain to bind another 2 tbsp. with / n. Now you need to connect the connecting column to the 3rd vpp. It turned out the first round. The second circle begins in 1 cpt. and 1 tbsp. b / n, connected from one loop. In the next 2 tbsp. s / n the first round, you need to tie in 2 tbsp. b / n, then 3 tbsp. b / n, 4 polust. с / н, 3 tbsp. with / n. In the next 7 stitches, two stitches are tied together. с / н in everyone. We again switched to the opposite side and need to continue knitting mirror, first 3 tbsp. с / н, then 4 полуст. с / н, 3 tbsp. b / n and 2 times 2 tbsp. b / n with one base. Like the first round, finish s.c. The third circle begins with 3 ppp. and 1 tbsp. s / n, tied from one loop, * 2 tbsp. s / n with one base, 1 tbsp. c / H *, from * 2 more times, then 9 tbsp. с / н, again from * 3 times, in the next loop to connect 2 tbsp. s / n with a common base, again from * 4 times, 9 tbsp. c / n, o from * 2 more times. At the end of 1 c.s. The sole is ready. Now let's start knitting the back. It will be located on the side where we finished knitting. From the connecting post, which ended the circle, count to the right 8 loops and make a mark. Now from it, count to the left 20 loops and make a second mark. They can be made using a thread of contrasting color, pins or buy a special handmade marker on the needlework shop. Pig knits art. b / n. in the first row there should be 20 loops. The second river. 1 pp, 2 tbsp. b / n, then bind 2 tbsp. b / n with one top, 12 tbsp. b / n, again 2 tbsp. b / n with a common top, 2 tbsp. b / n. Third r. 1 ppp, in all the loops of 1 tbsp. b / n. Fourth р. 1 pp, 8 tbsp. b / n, 2 tbsp. b / n with a common top, 8 tbsp. b / n. The Fifth River. 1 ppp, in all the loops of 1 tbsp. b / n. The Sixth River. 1 pp, 2 tbsp. b / n, 2 tbsp. b / n with a common top, 9 tbsp. b / n, 2 tbsp. b / n with one apex, 2 tbsp. b / n. Seventh r. 1 ppp, in all loops of 1 tbsp. b / n. Eighth r. 3 ppp, in all loops of 1 tbsp. with / n. We finished the heel of knitting. The thread can not be cut off. You need to tie the clasp. Tie in 35 volts, then execute the s.c. in all the loops, starting from the 6th from the hook. Thread, fasten, cut and hide the tail. Now we have a fastener with a loop on the end. On the second side of the back part sew a button. When you knit a second pinetochku, do not forget to fasten the fastener symmetrically. Now proceed to knitting the tip of the booties. Count 8 loops from the beginning of the heel and fix the working thread in the 9th. For the second booties, count down on the other side. Make a note. Count 22 loops and make a second mark. The first river. Bind 5 cpp, * 1 stp, 1 loop to skip, 1 tbsp. with 3 / h *, continue from * to the end. The second river. 5 ppp now we will seize only art. c3 / n and do not touch the hp. It is necessary to link 12 tbsp. with 3 / n with a common vertex. Now, from this vertex we will tie a loop from 15 bp, fix it to the common vertex of the 12th century. with 3 / n. Now in this loop you can pass that buckle, which we tied. In principle, booties ready, it remains to bind her a pair. The main thing, do not forget to do the work symmetrically, so that there are not 2 left or right booties. In order for the pinets to come out even more beautifully, we will tie the flower on the tip of the pinets. It is necessary to divide the spout of the booties into 3 expanding circles. On the diagram they are marked in red. The first is the smallest and consists of 5 tbsp. b / n, connected in a circle over the spout of the spout. In each of them it is necessary to bind 1 c.s., 2 cp, 1 tbsp. с / н, 2 в.п., 1 с.с. The second circle of our flower also consists of the original 5 tbsp. b / n. they must be linked in a staggered manner with respect to the first small circle. Then in each of the loops to tie in 2 tbsp. b / n. It turned out 10 tbsp. b / n. In each of them to connect 1 c.s. 2 tp, 1 tbsp. с / н, 2 в.п., 1 с.с. Link the last, largest circle following the pattern. It remains to go into the loop on the nose and fasten the button to the button, and the beautiful pinets will please the baby and his mother. The next pintochki we will knit in the form of funny guinea pigs with a patch.
 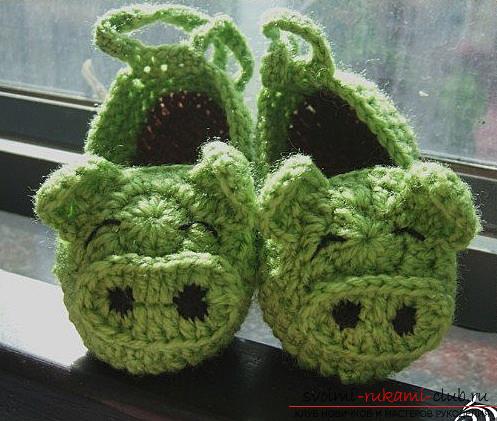 The sole is knitted almost as well as in the first variant.
 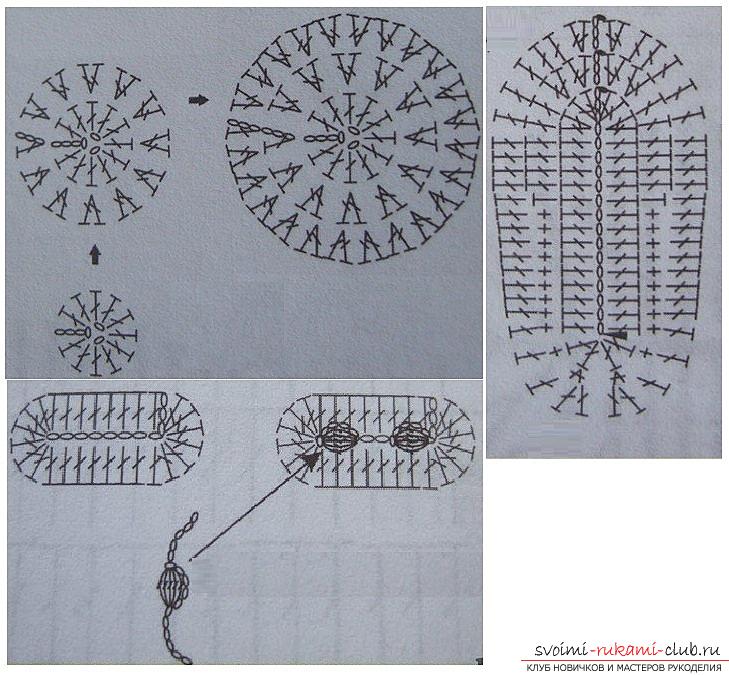 First you need to dial 15 bp. + 3 timesp. Now in the 4 th from the hook loop to bind 4 tbsp. c / n, then 13 tbsp. с / н, 6 tbsp. s / n with one base, knitting passed to the second side of the chain from the vp, 13 tbsp. s / n, 4 tbsp. s / n with one base in the loop from which 3 bp are connected. and 4 tbsp. with / n. to finish a circle 1 с.с. The second round to begin with 3 ppp. in the next 2 loops to tie in 2 tbsp. с / н, 6 tbsp. с / н, 1 полуст. s / n, 10 tbsp. b / n, in the next 2 loops to bind 2 tbsp. b / n, 10 tbsp. b / n, 1 half. с / н, 6 tbsp. c / n, and in the next 2 stitches to connect the 2 tbsp. with / n. to finish the second circle 1 с.с. The third circle. 3 percentage points 2 tbsp. s / n with a common base, then knit st. c / n and in the last loop of the circle to connect 2 tbsp. c / n with a common base and finish 1 c.s. The sole is ready. A thread can not be cut off. The next 2 rows knit without a raise. This will be the sides of the pins. Tie the noses separately in a circle (see figure). In the ring of 3 cp. bind 3 tpp, 11 tbsp. с / н and 1 с.с. In the next row, double the number of loops. A total of 24 loops. The third circle knit similarly to the second - to double all the loops - 48 loops. To link a patch, type 8 bp. + 3 timesp. In the outer stitches to bind to 8 tbsp. with / n. Focus on the scheme. If you want, you can just embroider your nostrils. Ears in pig can be performed as halves of circles or in any other way you like. It remains to simply connect all the details. You can tie a string at the back of the string in the form of a chain from the intersection. and 1 row of Art. b / n. Experiment, try it. We wish you even loops.
Comments
Related posts:
 Mulino what is it and how to choose the thread
 How to crochet a plaid for a child, free schematics and a description of knitting a blanket with one linen
 Boots without seams with knitting needles: how to properly connect them according to the scheme
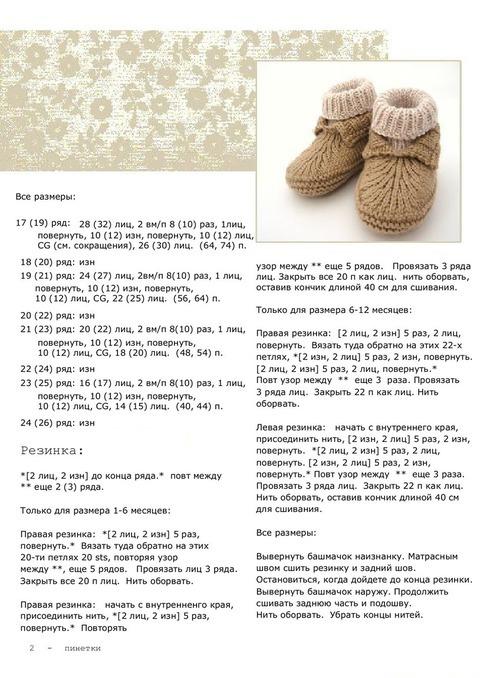
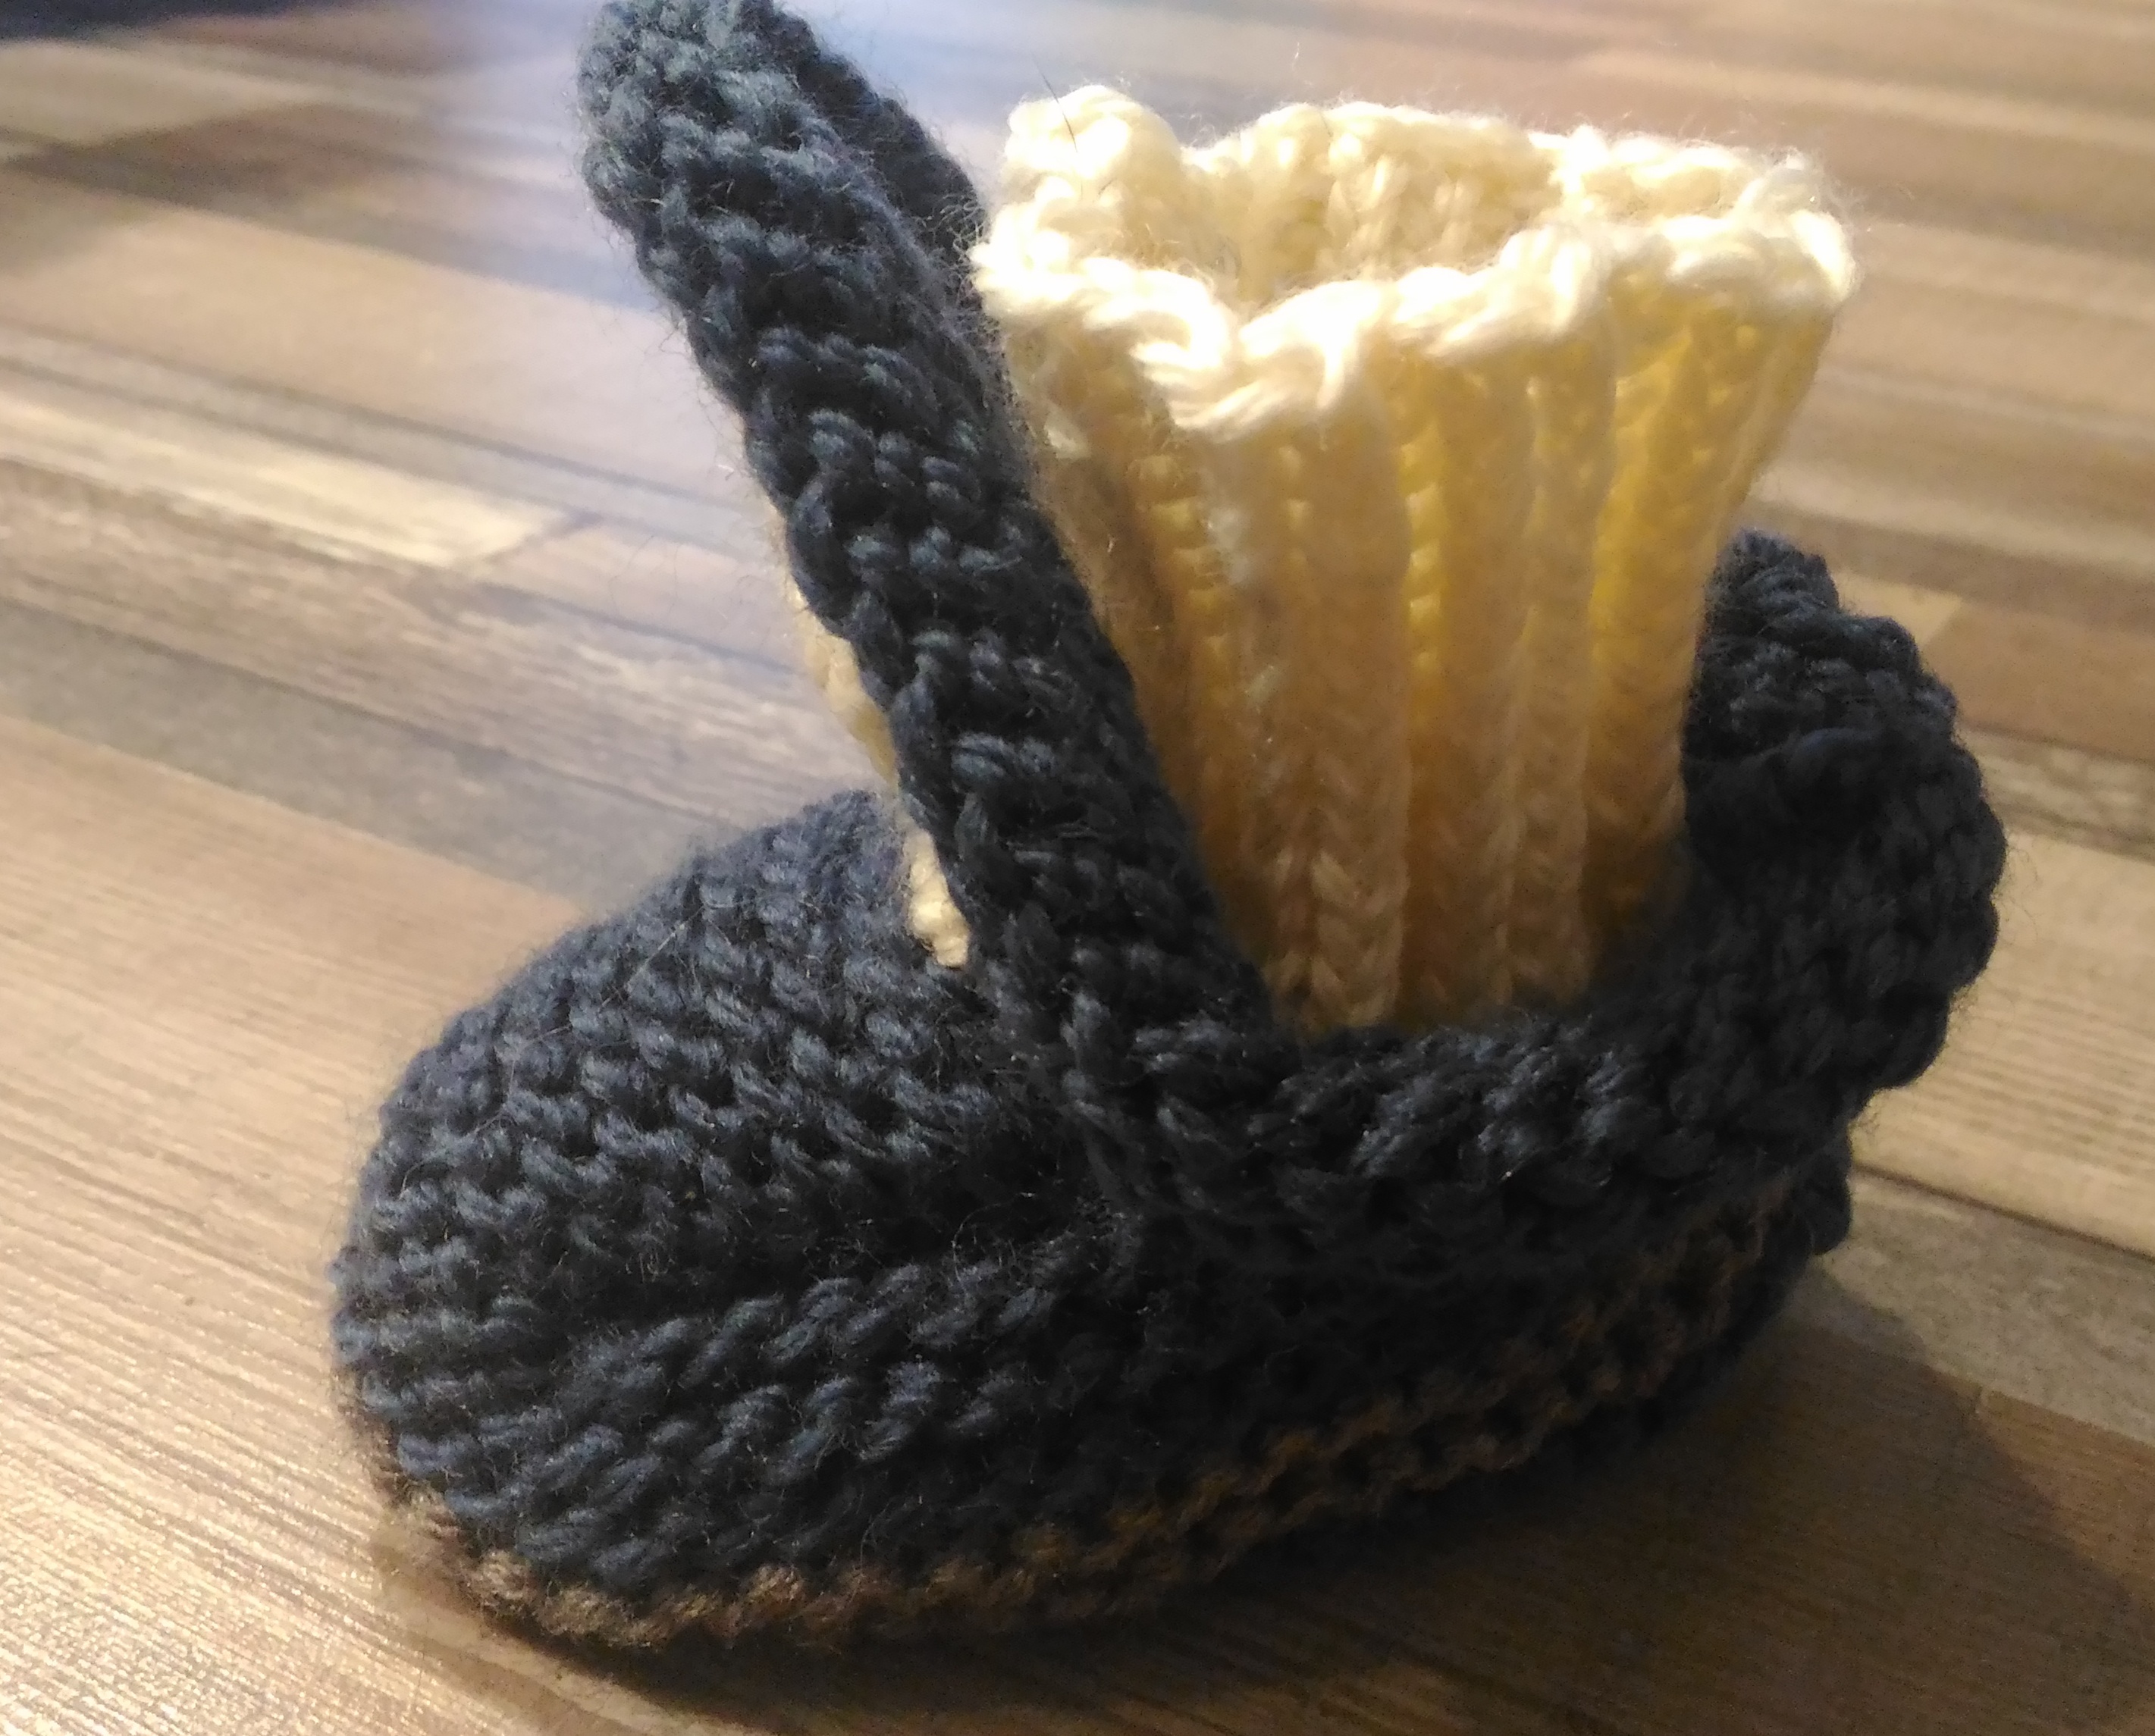 Step-by-step photo master-class: how to tie booties machines
 How to bind booties for a baby with their own hands? Knitting lessons on knitting needles for a boy