
Tips and tricks for knitting crochet crochet and a step-by-step master class on knitting hats for a boy.
The beginning of the history of the appearance of caps is lost in the depthscenturies. The first image of the cap was found in the ancient burial in Thebes. On the tombstone there was a man in a hat, presumably from a straw. It's amazing how different the destination was in hats. The ancient Greeks wore caps for long journeys, as protection from the hot sun, and they were worn by absolutely everything, whereas in ancient Egypt only a pharaoh could wear a headdress in the form of a crown. In Russia, they wore headdresses, both women and men. Over time, the caps transformed and changed their outlines, decorations and destinations. Women decorated their headdresses with fur, feathers, precious stones, embroidery and many others. With the arrival of the popularity of oriental color, the caps acquired the appearance of a turban and turban. Hats also acted as a determinant of the person's belonging to a certain status or profession. Cute berets in which flaunt fashionable women in autumn in ancient times were the main headdress of doctors and artists, because it was convenient for him to hide his hair. Notaries demonstrated their status with the help of beaver hats, and boyars in Russia preferred large caps with many layers, because in such a cap even in a large crowd one could immediately see who the boyar and who the common commoner was. In the fashion trends poured tricorns, bugles, cylinders and bowlers. The width of the fields and the height of the crown were changed among the caps and hats. As in earlier times, hand-made things are very much appreciated, and the hats are no exception. Craftsmen create them in completely different ways from a variety of materials, including crochet. Conditionally the caps can be divided by the seasons for light and openwork summer and warm for the off-season and winter. Both options are very easy and simple to crochet. This article will discuss the main points and questions that beginners have to crochet a cap. And a master class was offered to create a nice headdress in order to consolidate knowledge. With our detailed description, the thing will definitely turn out, and you will want to continue creating beautiful creations from "magic loops". To begin with it is necessary to be defined with purpose of a cap. In summer, it protects the hair from the scorching rays of the sun and protects the head from overheating, and winter options are protected from hypothermia on frosty days. Based on the fact that you need a hat to choose yarn. For light summer options, cotton threads, with the addition of silk, linen, acrylic, viscose or bamboo, are suitable. To ensure that the hat was warm in late autumn, in winter and early spring, yarn with a wool content is chosen. As the cap comes into contact with the delicate skin of the face, the best option is blended yarn, where besides the woolen component there is microfiber, bamboo, cotton or silk. Such a product perfectly preserves the heat and, at the same time, will be non-sticky and pleasant to wear. After the yarn is selected, it is necessary to select a hook. Manufacturers usually write on a package with threads, which hook number is suitable. If this information is not indicated or the label is lost somewhere, simply measure the diameter of the hook head in the narrowest place, it must match the diameter of the thread. So, the hook and yarn are selected. It remains to determine the required number of threads. There are in the knitting cap a very nice plus - for any option is enough for one - two hanks of yarn. Provided that the cap will simply fit the head and will not have fields of 20 cm. Now it is necessary to take measurements, from their correctness will depend on how well the cap "sits" on the head. 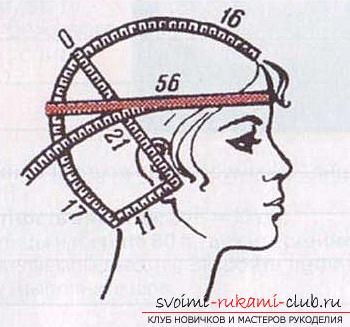
- First you need to measure the circumference of the head(in the figure it is indicated 56 cm). It is necessary to take a measurement along the frontal part above the eyebrows and the most convex occipital part. It is necessary to tighten the head with a measuring tape tightly.
- The distance from the estimatedthe edge of the cap to the crown. Someone will prefer a deeper headgear, reaching to the eyebrows, and someone will want the forehead to be opened. (in the figure 16 cm).
- The distance from the back to the top (in the figure 17 cm)
- Along the sides (in the figure 21 cm). To do this, from the top of the head measure with tape through the temples.
- The last measure is the distance from the middle of the nape to the earlobe (in the figure 11 cm).
An important point. If the cap is knitted from thick threads, it will be necessary to make an increase to the girth of the head about 1.5 cm. This is an allowance for free fit. When yarn, hook and yarn are selected, you can start knitting. Most of the caps knit from the top with the bottom of the cap. To calculate the required diameter of the bottom, measure "head girth" by 3.14. The bottom of the cap is knitted in a circle. To start work, you need to dial 3 - 4 cp. and close in the ring. You can also use a sliding loop or an amigurumi ring. In the last two cases there will not be a round hole in the center of the cap. This is perfect for winter options. For knitting the bottom use mostly art. mon, half-necks, and st. sn. The addition of loops in each successive series must be done uniformly and symmetrically. For art. it is necessary to first bind 6 loops and then add 6 loops each time. For polostolbikov cn - the first row of 8 loops and + 8 loops in each successive row, for st. sleep first 12 loops and then + 12 in each row. You can knit the rows in a spiral or at the beginning of each row of the lifting loop, end the row with a connecting post. In the first case, for the convenience of counting the increments, the beginning of each row should be marked with a string of contrasting color or with a special plastic marker (sold in shops with goods for needlework). Knitting such a round bottom has its own cunning. What would the cap beautifully and tightly fitting his head, the last 3 - 4 rows should be tied, alternating rows with the addition of loops and without the increase. It is better to try on several times a hat during knitting, so it will be clear if you need to change something. When there are 3 - 4 rows left before the desired depth of the cap is reached, they should be tied with a crochet of a smaller number (for example, if No. 2.5 was used, then the last row should be knit number 2). So she'd better stick to her head. If the fantasy prompted to tie the hat, which is also a kind of caps, you need to think about how the fields will be strengthened. To make them stiff, I use starch, PVA glue, fine wire and line. Before you begin to strengthen, the hat must be put on the frame. In his role can act a special dummy, or an ordinary glass inverted pot. To them it is necessary to attach cut from a strong cardboard box (the usual Scotch tape will do). Several solutions for stiffening:
- 1 tbsp. l. starch + 1 glass of water. Heat on fire without boiling. You should get a jelly-like mass.
- 100 ml of PVA glue + 100 ml of water stir until uniform.
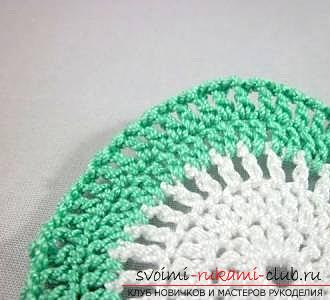
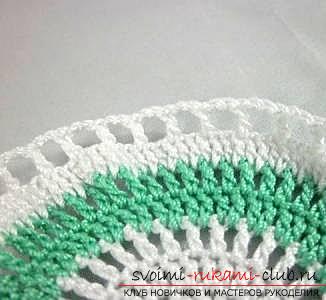
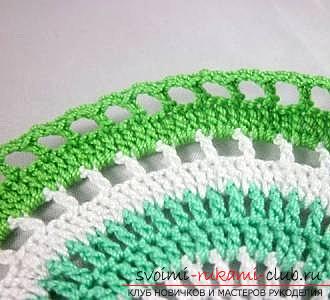
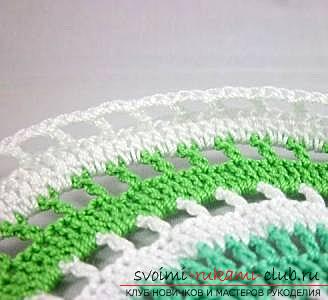
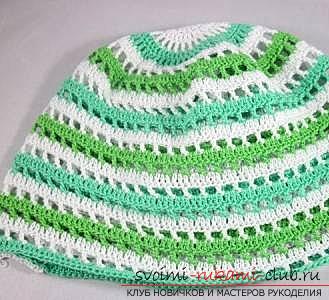
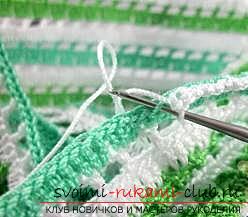
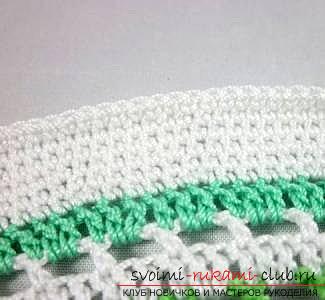
The hose should be well impregnated with a solution,slightly squeeze, place on the frame and leave until completely dry. The disadvantage of this method is that after washing it is necessary to repeat all over again. It is more practical to strengthen the fields of the cap with a fishing line. From it make a pair of turns equal in length to the fields of the cap and tied to them, using 1 st. and, if desired, a "stepping stone". When knitting baby caps, it must be taken into account that it should be as comfortable as possible for the baby. She should not interfere with the child, then he will not have a desire to take the cap off his head. For the very crumbs the best option is to create a headdress with strings. In such a cap you can safely play or relax. Another important point for children's hats is the lack of unnecessary details. Bright beads, ribbons, brooches and much more can weight the baby's head and easily fall into his mouth. If the cap has fields, for example, in summer panamas, there is no need to make them too wide. They can make visibility difficult, and the baby will be uncomfortable. In the master class below to create a cap with his own hands, a summer hat will be presented for the boy. After all, for some reason, most attractive and practical hats are suggested for girls. Our club suggests correcting the injustice and creating a light summer hat to protect the boy from heat. The yarn used for knitting this cap is cotton. Taken three colors, white, salad and green. Use the hook number 1,25. The hat will turn out to be tender enough and, at the same time, the knitting will be tight to keep the shape. 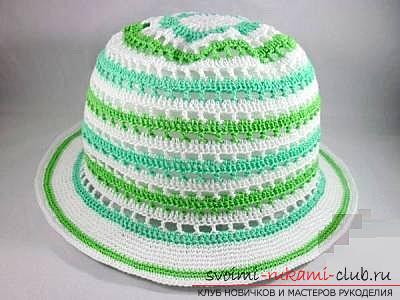 The pattern for this cap is chosen to be simple -alternation of loin and dense rows. Knitting is performed art. sn and air loops. The bottom of the cap is best made of white yarn, because the main purpose of the product is protection from solar overheating.
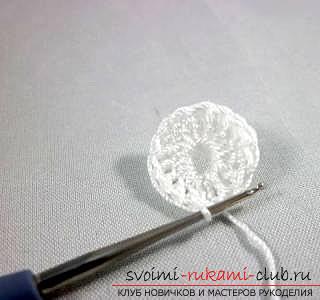
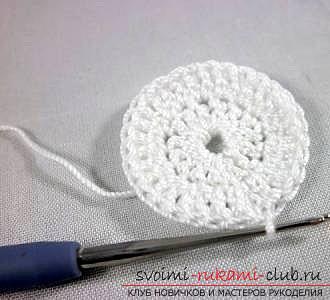
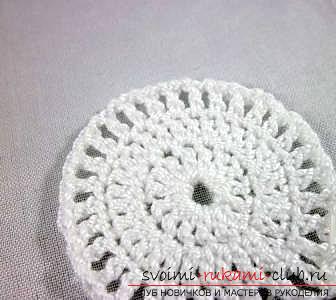
 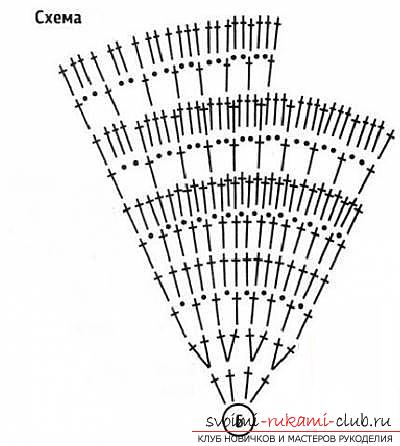 Begins knitting with a ring of 6 cp.
Comments
Related posts:
 Recommendations, tips and master class with photo on knitting crochet crochet.
 Master-class with a diagram, photo and description will teach knitting crochet for a girl with a crochet
 A master class on knitting a baby cap for newcomers. Photo, description and diagram of knitting
 Master class on crochet of children's hats for girls Strawberry summer with descriptions of steps and photos
 Master-class on crochet of children's dresses, handbags and hats according to the schemes with description and photo for free