Together we create crafts for the garden with our own hands. The result is beautiful and practical
The idea of decorating your site visited many, butnot everyone takes up the implementation of their ideas, because the jewelry that you can buy in the store, they are quite expensive, and tangibly beat on the family budget. But do not despair - you can make wonderful hand-made articles for your garden from almost any rubbish! Virtually everything that is uselessly lost on your site can go into business - you can make magnificent jewelry from tires, bottles, scrap metal and a lot of other orphan material! If you have a creative mood and time, you can easily master this craft, while saving your money. So, let's look at specific examples of what crafts for the garden you can do by yourself! Let's start with one of the most romantic ornaments, namely the white swans. 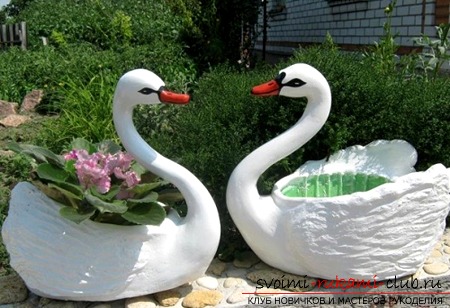 You can simultaneously combine beauty andfunctional, for this we need: - 2 five-liter plastic bottles; - Thick wire, or a metal rod, twisted several times; - Metal grid; - Putty. 1) Cut one side of the bottle in such a way that a container is obtained which will later be used for planting flowers, but to begin with, this container needs to be filled with moist sand, in order to avoid deformation of the workpiece when the putty is subsequently applied. 2) We give the wire a curved shape in the form of a deuce, we make a hole in the lid and insert a wire into it - the skeleton of the future neck turned out.
  3) Mix the filler and lay it on the filmlayer no more than 6 centimeters, this will be the bottom of our vase - a swan. On top putty put the bottle, lightly press it, and smear the excess to the top of the bottle. 4) To make the neck, we form rollers of putty, previously moistened with hands, and press them into the "skeleton" of the neck. In the course of work, we wrap the wet piece of bandage around the neck and squeeze everything with your hands. Pay attention to the transition of the neck in the trunk, the neck should gradually thicken, otherwise the swan will turn unnatural, do not forget and the beak! 5) Proceed to the wings. Press the grid diagonally and fix it with putty (hold the bottle from the inside to avoid deformation of the workpiece). We give the putty a little to grasp. We start to give the wings shape, smoothing the irregularities with wet hands.
 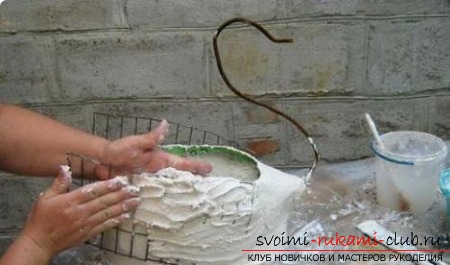 6) And finally, proceed to the tail. We bend a small piece of mesh and fix the solution. Give a little grab, and form the same as the wings. 7) We let our swan dry a little, and transfer it to a safe place, protected from natural factors. In a couple of days, the decoration can be used for its intended purpose!
 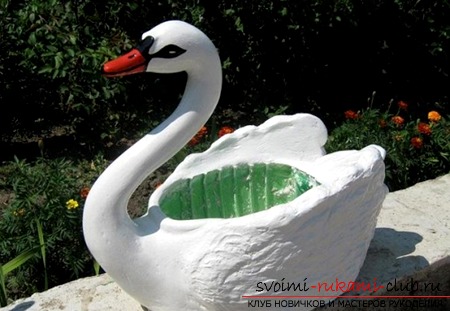 Next, consider an example of a crafts for the garden with their own hands in the form of a ladybug.
 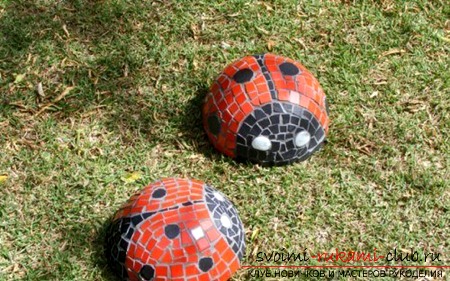 For ladybird, we will need: - Dumb in the form of a hemisphere (for example, an old ball); - Solution; - Ceramic mosaic. 1) Mix the solution (in the ratio of sand to cement 3: 1 and dilute with water). 2) Pour the resulting solution into the mold (for better adhesion into the mold, you can put pieces of reinforcement or wire, this will avoid cracks).
 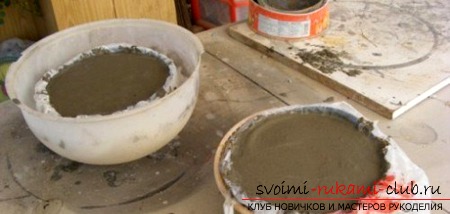 3) After a couple of days, you can remove the workpiece from the mold.
  4) If the workpiece is not smooth,it is necessary to make a grout surface, after which you can proceed to delineate. 5) We glue the mosaic with glue for tiles, glasses are suitable for eyes. Let's consider examples of handicrafts for a garden with own hands from the most widespread junk - plastic bottles. 1) Pink flamingo
 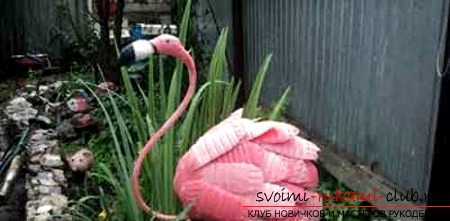 For flamingos we will need: - Plastic bottles; - Piece of hose; - 3 metal rods. 1) First we need to make two holes in the first plastic bottle: one for the legs and a hole for the neck in the lid. 2) We fix the metal rod in the lid, giving it an S-shape. 3) The remaining bottles are painted with pink paint, preferably acrylic. We cut feathers from them. For feathers, on the average, 7 bottles are needed. 4) On the "body" flamingos make a lot of small cuts, the size of sufficient to ensure that the notches included feathers: the cuts will be larger, the feathers will be more dense. 5) We put the hose on the metal frame of the neck and also paint it in a pink color. 6) You can choose the material for your head at your discretion - you can use cement, putty or even cut out of wood. 7) We fasten in the lower part of the flamingo "legs" - metal rods 1 - 1.2 meters long. We paint with a pink paint. And finally: an article for a garden of old tires. Consider how to make a snail.
 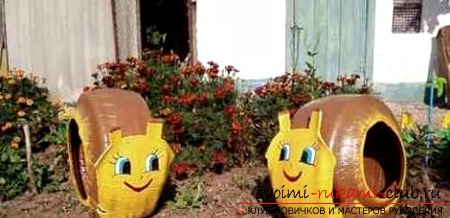 We need: - tire; - a piece of chalk; - some gasoline; - water-based paint. 1) We cut the tire in such a way that a continuous strip is obtained (during the cutting, wet the tire with soapy water, so cutting will be easier). 2) We paint the head and horns with chalk and cut them out. 3) Degrease the surface of the tire with gasoline for subsequent staining. 4) Color. 5) After painting, wrap the tire in the shell, attach it with screws or wire. 6) Draw a beautiful face. That's all, the hand-made is ready! This is only a small part of the ideas for handicrafts for the garden! Fantasize, create, do not be lazy - and your garden will be transformed beyond recognition!
Comments
Related posts:
 Crafts for garden and garden with own hands
 Create original handmade crafts for your home and garden yourself
 Create a figure for the garden of the tire. Lessons for crafts are free.
 Master-class in the technique of facing: sunflowers with their own hands on the 2015 Competition, crafts for the garden with their own hands
 Interesting autumn crafts for kids with their own hands, crafts for kindergarten from vegetables, cones, leaves and much more with photos and descriptions.