Preparation of simple crafts for the New Year in kindergarten - children's crafts
At a time when the first snow falls on the street,and your child has a New Year's mood, it is necessary to think up such an occupation that will allow him to spend time with benefit and teach something new. Special master classes from craftsmen are designed to tell the most subtle, interesting and unique approaches to needlework that can be applied in practice.
Preparation of simple crafts for the New Year in kindergarten - children's crafts
 Children are often very curious andfamiliarity with new themes of needlework, different from their previous works may interest the kids. Only now, it is necessary to choose an artifact that will initially turn out to be a child intriguing, and the result will be appreciated. For example, you can prepare beautiful Christmas toys, or prepare souvenirs for a gift to your close people. We will consider the variants of the most interesting and non-ordinary variants of souvenirs, which can be hung on a Christmas tree, put in an apartment or give to relatives! In addition, the child learn new qualities. New Year's boat
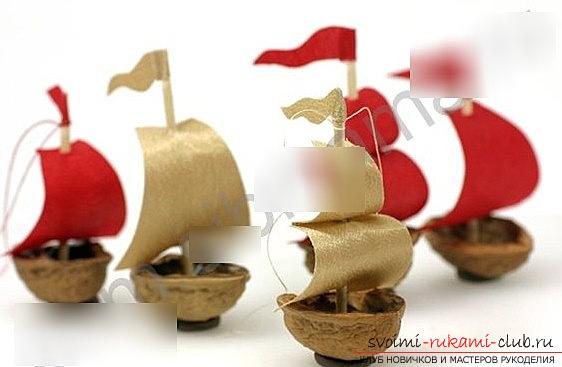
 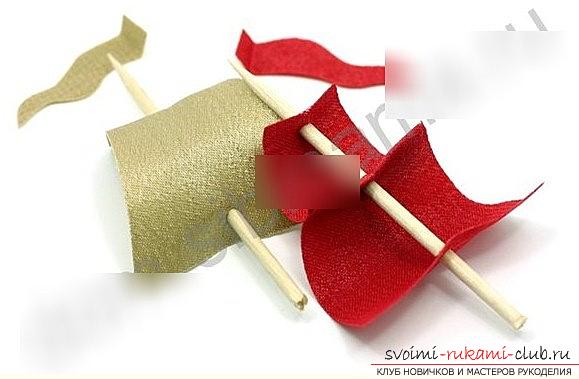 Many children like beautiful boats and sometimes notget yourself involved in the process to make a small vessel. But, with the help of the simplest materials (without any designers or additions), a boy can build his own boat, which can be hung on a Christmas tree, or used as a toy. The creation of such a toy is suitable for a child of six years and older, and for children of three years and older you can entrust the creation of individual components of the work.
- Prepare the fabric that will need to be processed with gelatin
- Alternative to fabric - thick paper with a color background
- Awl
- Scissors
- Skewers made of wood or skewers
- Walnuts (More precisely, their shells)
- Hot glue
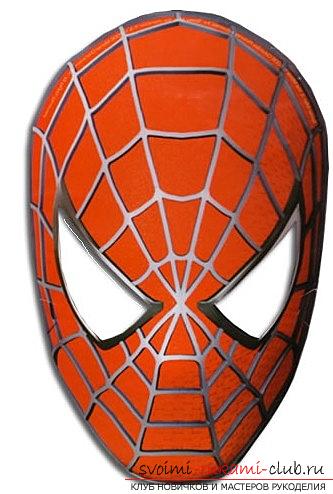
This modest set should be enough forIn order to build our New Year's miracle. Initially, you need to prepare a sail. The size of the sail will depend on the size of the walnut shell. Depending on the experience, you can make your own mistakes. In our ships used shells of small size, because the sail will have a trapezoid with a base of 4 centimeters, 1.5 centimeters on the top, and 4.5 centimeters for the height of the trapezoid. To get a double sail option, it is necessary to increase the height of the trapezoid, for this you need to expand by 1.5 times. Then, we make a cut from the fabric of sails, on paper, and also small skewers. 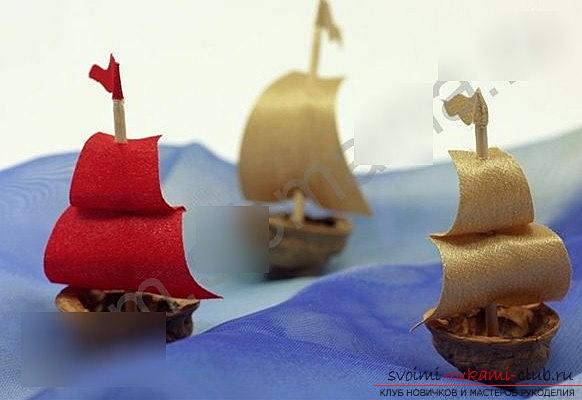 With an awl it is necessary to pierce the holes inthe right places where the mast will pass in the future. Then, it is necessary to put the sail on the match. The mast will be formed from a piece of skewer on a wooden base. The size must be chosen in accordance with the shell of the shell. With the help of hot glue, you must first put a checkmark, and then, glue the match and fix it on the shell. Then, hold the mast until it is secured with adhesive. To the boat could stay on the table, you need to use a small lump of plastic. Often the question also arises, how is it necessary to treat the tissue with gelatin? To do this, take three tea spoons of this substance and pour it into 200 milligrams of cold water. Then, wait for the tincture to stand for an hour. After that, we heat it in a special water bath. The mixture should be stirred until all the lumps are gone. The main thing - do not bring to the boiling point. Also, as an alternative, soluble gelatin is ideal. Mask of Spider-Man! New Year's events are an opportunity for the child to express his favorite preferences for creating his own costume. Very often, children want to look special on such a holiday and therefore, as the main costume, they select popular heroes. But, it also very often happens that the costume of the necessary hero is difficult to find. On the one hand, there may not be such stores where popular versions of the costume are present, or they do not fit in size, or maybe at all - are very expensive. In this case, you should take the work yourself and think over your own version of a unique and interesting costume. But, what interests children most of all? Of course, we are talking about super heroes. Popular comic books and fantastic cartoon characters attract children from a small age. Now there is not a small number of animation studios, like Marvel and DC, which are developing popular characters. Surely you've heard of the Super Men or the X-Men? But, such suits are harder to find. Let's try to make a special gift for our baby and prepare a mask for one of the main characters in the comic book universe - Spider-Man!
- Prepare the necessary amount of plasticine in order to make the workpiece
- Adhesive substance PVA
- It will be necessary to take water to divorce the adhesive backing
- Knife for processing plasticine
- Rolling pin for rolling plastic
- Newspapers, old
- Sheet of paper, clean
- Brushes, paints, fat cream
Form preparation 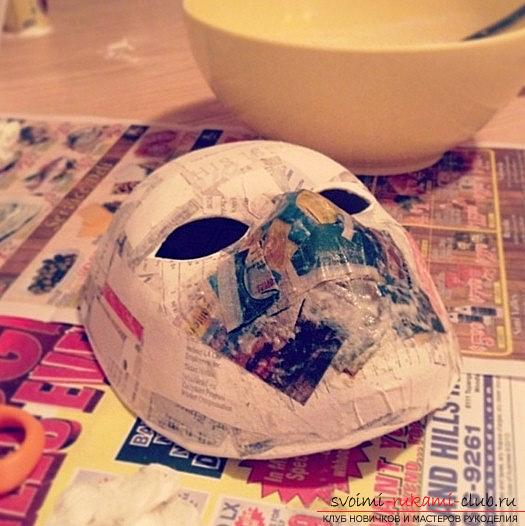 It is necessary to take a large amount of plastic,which is sure enough for your work. Plasticine should be thoroughly processed with the help of kneading and then roll it out. A variant of a round metal ball, or bottles of glass without facets, is suitable. Rolls the clay to an oval shape, so that the thickness of the clay reaches a size of 1-1.5 centimeters. After these procedures are done, it is necessary to try this oval to the face, thus - form outlines for the product. We create the shape of the nozzle, we plan the elements of the forms for the arrangement of the eyes. Then, after the basic sketches are completed, it is necessary to cut out the eye holes to cut off any excess plasticine residues at the edges. After the process of forming the basic forms of the face, it is necessary to periodically level the plasticine surface using a ball of metal.
 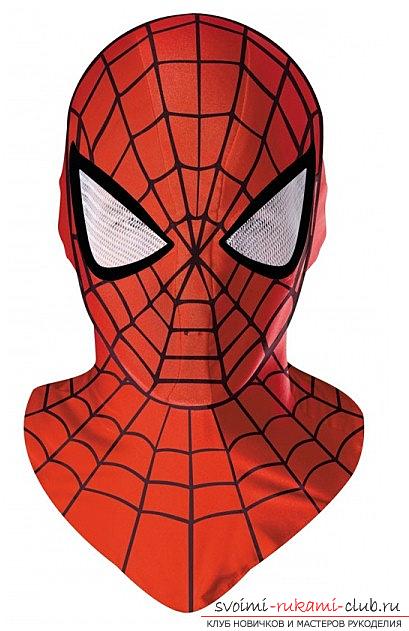 Next, try on our product to produceMeasurements, and also correct the product in the right places to get the desired shape. If the workpiece is small in terms of height, you do not need to worry. We build the forehead part using the remnants of plasticine. We make the same layer in thickness as for the workpiece and apply it to the right place to get the necessary element. We glue the edges together. We level the product with your fingers. You must also try on the mask. Then, level it, delete the parts we do not need. Then, we equalize the edges and adjust it to the size of the baby's face. We try to make it so that the thickness of the mask's shape has a size that will be the same across the entire workpiece. To obtain the necessary volume of the mask, you need the part that is formed by the NAD eyes - to process. We roam it on the edges. Do not forget to make a cut in the shape of a V on top of the forehead, from the edge to the center. Then, try on the mask element again. We give the necessary shape for the eye sockets, we check that the shape is the same. Then, check the eye level. The distance from the nose should also be checked. Remember that the eyes should be slightly larger than ours. (For the Spider-Man). Drying the mold We send the product to the Freezer until fullfinding forms and fixing the result. It should be enough for half a day, so that the elements are well frozen. Then, we make by mixing the materials of PVA glue with water, in a ratio of 2 to 1. Using a brush, the entire blank should be smeared with the help of fat cream or Vaseline. It is necessary to do this in such a way that the paper is fixed on the workpiece. After, it is necessary to take an ordinary newspaper and tear it into small pieces to process the workpiece. After, the pieces of the newspaper must be moistened in our mixture of glue and put on the workpiece of the plastic. Cover evenly each area of the mask. Then, let's dry each layer and after, apply the second one. It is desirable to form five to eight such layers using intermediate drying. It is not important that a paper protrudes beyond the edges of the plasticine blank. It is necessary to paste several additional paper elements to the most vulnerable spots. For example, on the bridge of the nose or near the holes, the edges of the mask. After we apply all the blanks of the layers, we make the sticking with white paper. It also needs to be torn to pieces. They are also dipped in a liquid with glue and we apply the solution with a brush. The paper will be fixed evenly, over the entire surface. When the elements are glued - wait until the product dries. Now, the mask needs to be decorated in the style of a spider man!
Comments
Related posts:
 Master class of children's crafts for the New Year - a collection and master classes of works
 How to make evening dress for the new year in the Greek style with your own hands?
 Earrings made of polymer clay for the new year - a form of snowflakes and a master class
 Crafts made of natural material in the garden. Fairy yourself
 TOP 15. Children's handmade bird with their own hands.