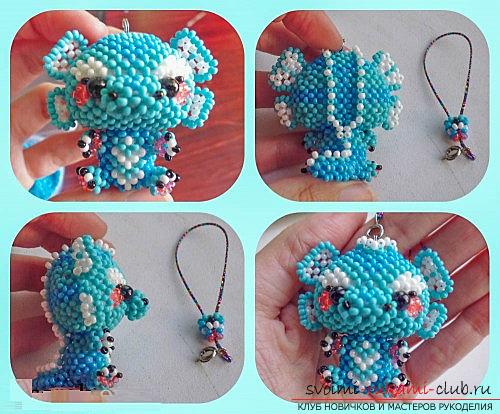
Two free master class on weaving of beads toys Bezubik and water dragon.
Everyone in childhood had a favorite toy, withwhich it was impossible to leave. Plush rabbits, little fur kittens, plastic ducks, every kid found something of his own. And these magic dolls, little animals and other soldiers became heroes of the most incredible, fantastic and fabulous adventures. A lot of such stories are reflected in modern animation. Colorful and colorful works tell of amazing events in which even dragons are heroes. There are infinitely many stories about them. Dragons are an integral part of many legends and myths of antiquity. Babylonians, Sumerians and many others believed in the existence of dragons. These mythical animals were on the emblems of the Romans and the Vikings. In China, the dragon was a symbol of the emperor. And of course there are many fairy tales so beloved by little girls about the kidnapping of the beautiful princess by the dragon and the beautiful knight releasing her. Dragons do not always personify evil, it's enough to remember a wonderful cartoon about the dragonless toothless. It is the Night of Furies that will be dedicated to the first master class on the creation of toys from beads. 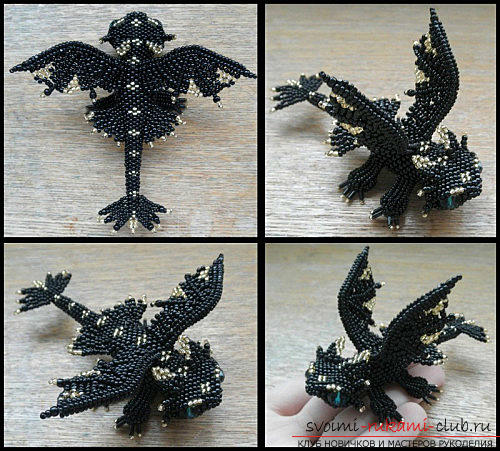 It will take:
- Beads 8/0, 10/0 and 15/0;
- Two beads for the eyes;
- Bugle (it will be claws);
- The line is 0.10 in diameter.
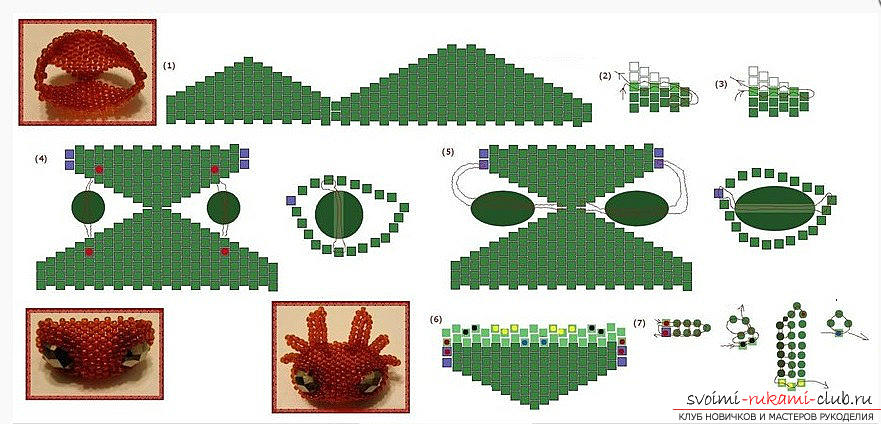 Head. For a convenient piece of fishing line, put on 44 beads and connect with a ring. Weave three rows in the technique of mosaic weaving. Following the instructions in Figure 1, perform two triangles. For them it is necessary to decrease the rows, as suggested in the figure (points 2 and 3). You can weave any option, but under paragraph 3 is an easier to braided option, it is suitable for beginners. The smaller triangle is obtained from eight rows, the larger one is made of 11. The last row of the big one can not be interlaced, it will be connected by the ends of the triangles to form the muzzle of the dragon. Eyes. After connecting the face, weave a single large oval bead into the place of the eyelet according to the suggested variants in the figure (points 4 and 5). It does not matter how the fishing line will pass across or along the bead, the main thing is that the eyes are densely and evenly placed in the eye sockets. Following the figure (paragraph 6) weave 4 rows. For weaving the ears use the Ndebele technique.
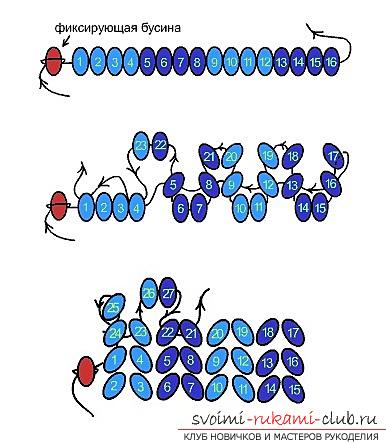
- A little lesson on weaving in this technique. To string a bright bead on the fishing line (it will be fixative, and in the future it will not be necessary, it can be cut off). To dial up after 17 pcs. beads. Introduce the tail back to bead No. 16, then to bead No. 13, to dial 2 beads and to introduce a fishing line into bead No. 12. To string 2 beads and pass the tail to bead No. 9. Add 2 more pieces. Bead and pass the tail in bead No. 8. Etc. To complete and reverse, thread beads No. 24 and 25, pass the line in the opposite direction to bead No. 24, then pass the line in No. 23, dial No. 26 and 27, pass the line through No. 22 and 21. And so on. up to the desired length of the web.
The weaving continues. In the figure in point 6 are marked with the points where the ears are attached. Smaller ears woven from 3 rows and 1 bead on the tip. Big ears are woven from 7 rows, at the top are 1 bead and then another row along the edge. This is shown in paragraph 7 of the figure. sew the ears to the head of the toothless tooth. 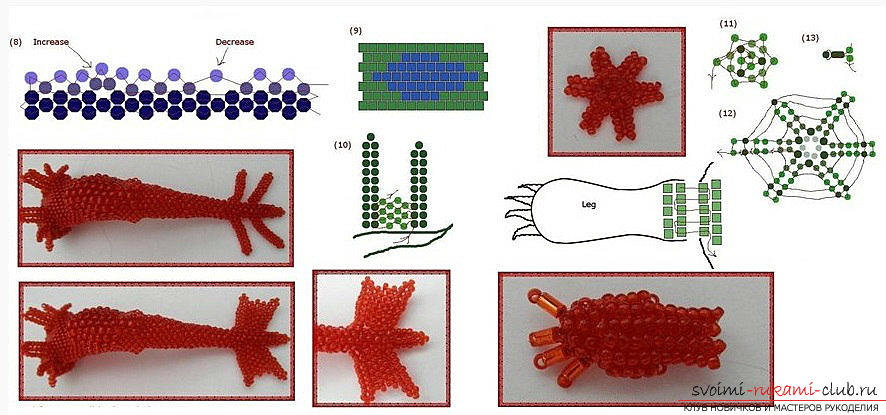 Neck. Continues mosaic weaving. The figure in paragraph 8 shows the reduction (it is necessary to do them four times). The adjustments make 2 symmetrically on the two sides of the neck. Then there will be no ugly distortions and protuberances. The next row to weave without deductions. In the next again, 2 decreases from each side of the neck. Then weave 8 rows without any penalty and the neck is completed. Corpuscle. It can be weaved in several ways. The first is to carry out four symmetrical increases in one row, then row without additional increases and again with increments. The second way is to use beads of a larger format, in the figure this is item 9. If we weave such beads, then the body will turn out with a bend. Tail. Weave like a neck. First four rows usually, then one with a decrease, four without deductions, again one with a decrease, etc. While the tail will not be thin in the right measure. The end of the tail is weaved in Ndebele technique (in the figure it is point 10). It takes two parts, consisting of a column of 10 rows, a column of 9 rows and a mosaic connection between them. Paws. Weave the workpiece as shown in paragraph 11, then add a large bead and weave in the Ndebele technique (paragraph 12). Claws made of bugles. After all four legs are woven, they must be attached to the calf in any suitable place.
  Wings.
 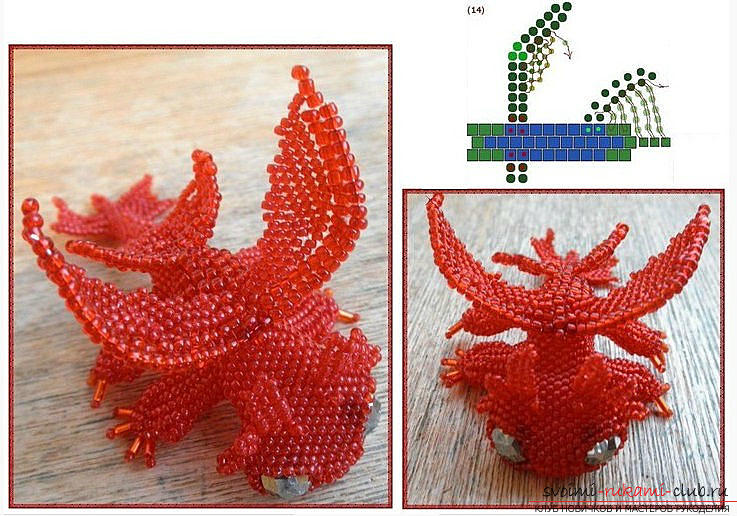 Weave in the technique of Ndebele 20 rows of largebeads. Then make a bend, for this, thread on one side two, and on the other one bead. Weave another 6 rows, weave one bead for the tip, go back along the two beads to the place where the wicket blade starts. Weave from small beads according to the drawing (item 14). In the wings you can use a wire instead of a line (where you weave from a large bead), then their swing and shape can be changed. Wings to sew in that part of the back where weaved from a large bead. Small tail wings to weave in the same way. The beginning of the 10 rows of Ndebele. Both wings are weaved with small beads. The number of beads and attachment points can be adjusted independently. This will depend on the desire and creative eyes of the needlewoman. The next charming dragon lives not in the sky, but in the sea. Sea Dragon.
 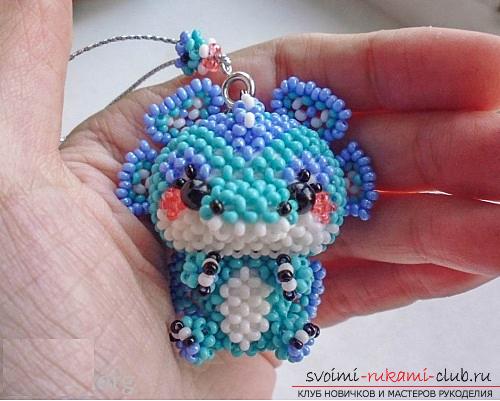 The following weaving schemes can be retainedand use it in the future as a model for creating your own beaded creations. The main thing to watch closely the numbering and the number of beads. Materials:
- Black, blue, turquoise, white, pink beads (need good calibration and high quality);
- Black beads 6 mm (for the eye);
- Material for packing;
- Cutting line 0,3 mm;
- A small ring for connection;
- Shnurochek for a key ring with a carbine.
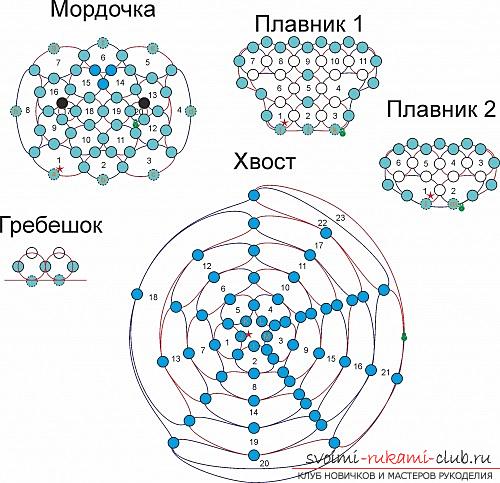
Perform the weave as indicated in the diagrams. All ranks are numbered and it is important not to get off. An asterisk marks the beginning of the work, the letters on the beads indicate beads already interwoven, through which you need to skip the line or thread again. They come across several parts of the circuits, and they are the same in all the drawings. Head. 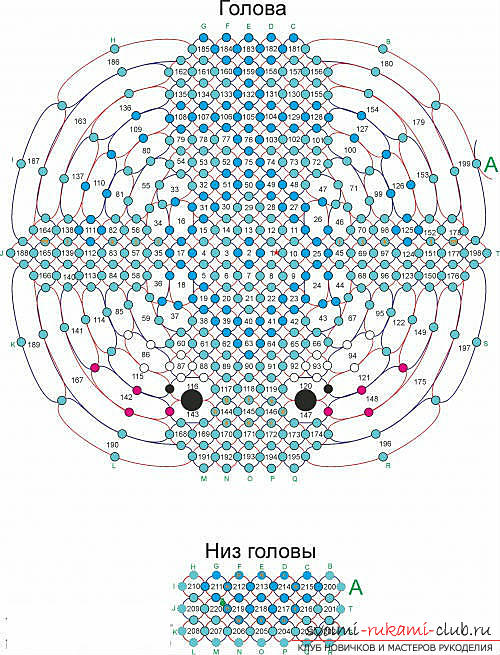 The work begins according to the scheme, following the figuresRows on the length of the line is 2.3 m long. The connecting ring, to which the carbine clip will cling, weave in the second row. After the head is bound up to the beginning of the bottom, it must be filled with stuffing material. Weave the bottom. The symbols A-T are marked with beads, to which the following rows will be attached later.
 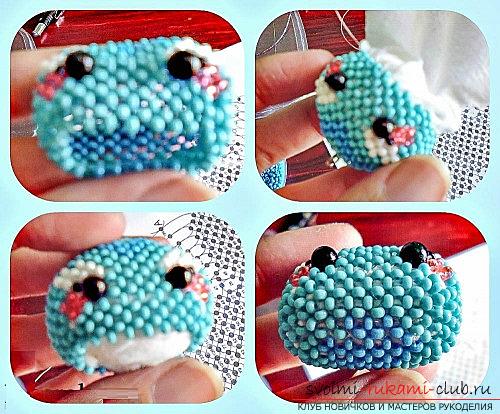 Taurus and legs are weaved according to sketches. Tack and tie the tail.
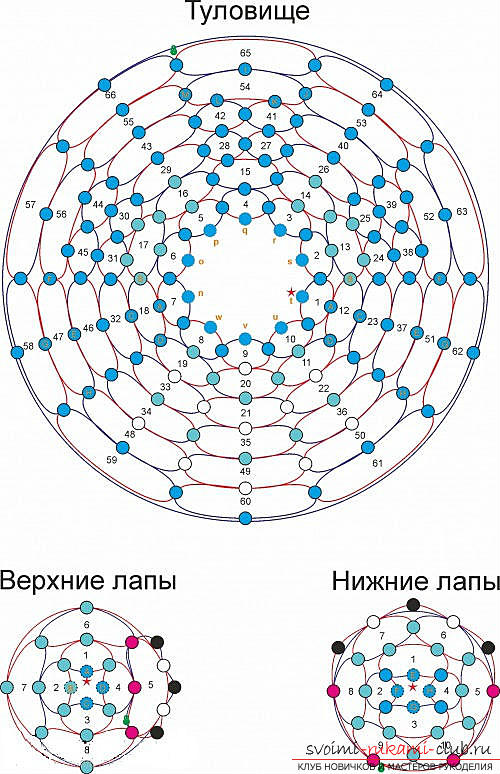
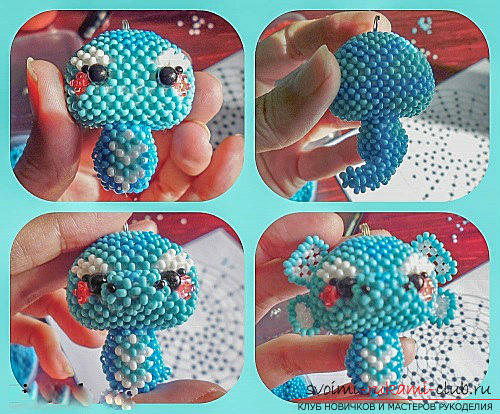 Cut a line of 70 cm to weave the body and head. Fill with packing material.
  According to the schematics, weave the remaining parts, attach them to the head and the calf. Lock the cord for the key fob and dragon is ready.
