
Useful tips and lessons in beaded floristics, tips and patterns of weaving.
In the first part of the article on beaded floralit is told about materials and tools. Several ways of attaching the wire are suggested, if the end is interrupted. It is told about the parallel way of weaving of petals and leaves of various forms. In the sequel, we will propose several more methods of weaving petals and talk about other various tricks and nuances of creating colors from beads. In addition to the parallel method of weaving, there is also a "coral". It is also called the needle method. Performing products in this way is easy enough, but great care and attention is required. There should be no gaps in the branches of the branch. The length of needles may be different. 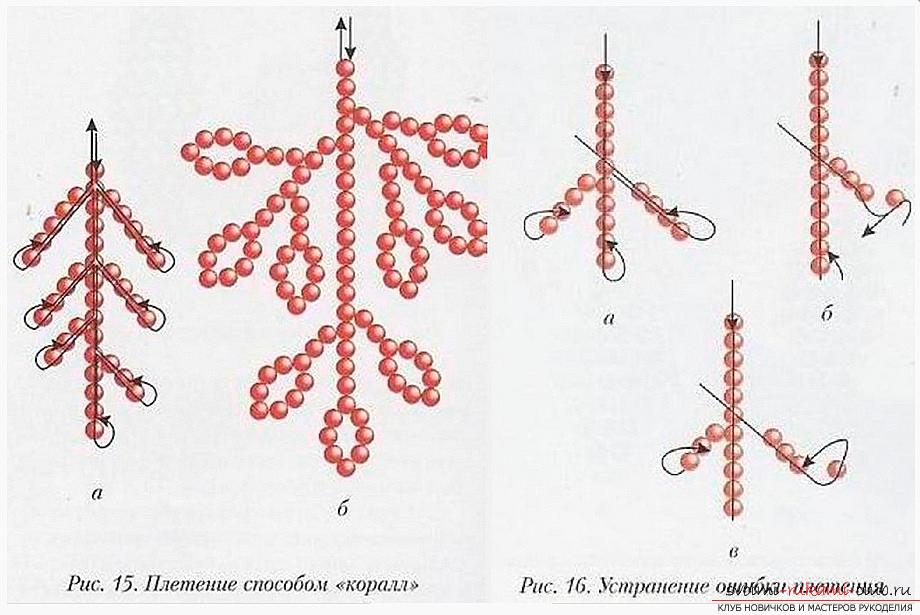 String on a piece of wire 15 beads,skip the last and pass the wire through the remaining 14 beads in the opposite direction (see Figure 15a). The course of weaving branches is also shown. The ends of these branches can be made in the form of leaves from loops (see Figure 15b). Complete them with large beads, risins (oblong form of beads), glass beads. You can use beads of contrasting color. For those who are just starting to work with beads, twigs can look like they are torn off. This can be eliminated. The last bead is stretched slightly, the loop widens, the whole row is moved all the row to the main branch, pressed with the fingers butt and again the wire is tightened (see Figure 16a, b, c). The next method of weaving petals and leaves is called French or arc. It is divided into axial and without axial.
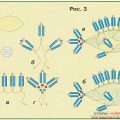
  To create a lobe by this method (axialweaving) it is necessary to take a piece of wire about 60 - 70 cm in length. Measure 13 - 15 cm and twist the loop. On a short tail to string 5 beads (this axis and it can be of different sizes, but in this case 5 beads). At the very tip, make another small loop. At the large end of the wire, thread a couple of beads more and make a wire turn, tightly screwing it in the place where the beads on the axis end (at the top). String again a couple of beads more than the axis and make the turn already at the bottom (see the picture). In this technique, there is nothing complicated. You can twist not only round, but pointed petals. Just arcs need to be fixed from above at an angle of 45⁰. Of course, that there is no need to measure a protractor, it will be enough to have your eye. French without axial weaving is even easier. It's enough to look at the diagram and everything will become clear.
  Arc braiding, or rather, its varietyallows you to create beautiful patterned, relief petals. This is achieved by changing the formation of the upper part of the leaf (for petals it is rarely used). The first three steps to perform, as in the axial version. String beads on the base and make two arcs. Then thread the beads on the working wire, the number of which will be several fewer than in the first arc, for example, 14 beads are threaded on the axis, 16 beads in the first two arcs, 11 beads will be in the next coil. Proshochku pass through the bead of the first arc, where these 11 beads end. Now thread 15 beads and make a turn around the bottom edge of the axis. Run low from 11 and 15 beads on the other side and weave further, performing the last 4 steps, changing the number of beads in the low (see the picture).
  Just picking flowers in a bundle is too much.trite and ordinary. Real florists necessarily arrange bouquets with pretty twigs. In the beaded floristics, "needles", "pellets" and "paws" are used.
 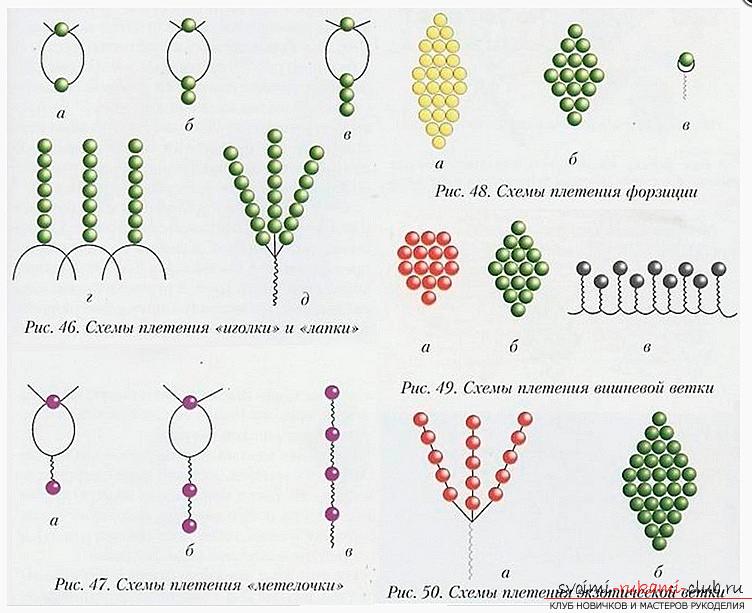 For "needles" for a piece of wire of 15 -20 cm inlength string 2 beads (green color). Then weave with a parallel weave, crossing the wire tails in each bead. It turns out one bead in each row (see Figures 46a-c). For "legs" it is necessary to connect three "needles" together (see Figure 46d, d). For "broomsticks" use the same method as for "needles", but the beads should be separated by wire twists, equal in length to the bead (see Figure 47a-c). When you have already mastered the weaving of petals and leaves on ready-made drawings, you can try to create a petal yourself. To begin with, of course, it will be necessary to draw a sketch to it. Figure 1 shows how different petals fit into the rectangle. In order to make such a scheme yourself, you need to draw out a contour of a real leaf or a petal with a pen or a pencil on paper. Pay attention to which of the above options, it looks like the most. Now we need to draw a rectangle, inscribing a petal in it, observing its proportions. Now you need to calculate the number of beads for each row. This is mainly applicable for parallel weaving. The number of beads can be calculated in several ways. Make a low bead and attach it to the picture on one side, determining how many beads fit in the row. Do the same with the other side. In order for the error of counting to be as low as possible, string 10 cm of beads on the fishing line and calculate how much space is occupied by 1 bead.
 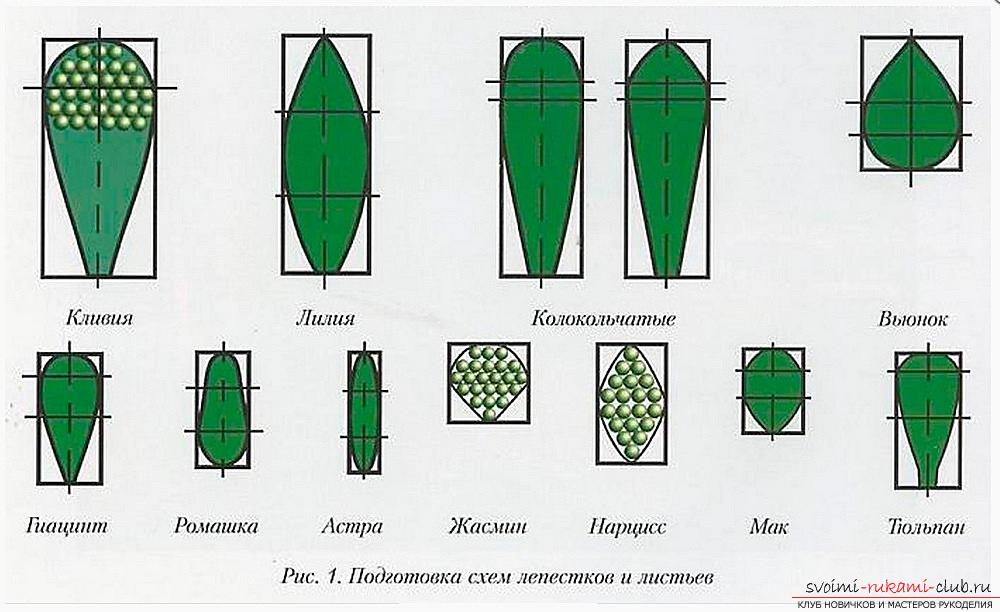 To make the contour line smooth, the difference in the tworows should not be more than 2 beads. In other cases, the wires will be noticeable, and the contour will be stepped. After you already know how to weave different petals and leaves and create details of arrangement, it's time to think about making all this into one harmonious composition. So, some flowers are already woven. It's time to compose them into a bouquet. Here are some rules for arranging flowers from masters of florists:
- The dark shades of the vase will perfectly emphasize the light green tones in the bouquet, make them brighter and more expressive.
- Conversely, if the greens are dark, then choose a light shade of the vase. The dark bouquet is simply lost.
- In order to simplify the task of giving a bouquet of volume, we must weave flowers of various heights.
- It is very important to create compositionsflower compatibility. If you have woven a kind of living flowers, then you do not need to mix in field and garden vases or to spring flowers, add autumn leaves. The best combination of plants is one of temporary and seasonal conditions.
Artistic taste inherent in needlewomen, be sure to tell you the best combination. Very often when creating a composition, it becomes difficult to fix the colors in the chosen vessel:
- Too light a vase can be heavier, adding to the bottom of pebbles, croup or sand. Now she will not overturn the gravity of the flowers.
- If according to the plan the flowers occupy a certainposition, then you can use a piece of plasticine or kenzan (it is used by florists to fasten colors in low vases). It is easy and simple to stick stems at a certain angle.
- In order to disguise the places where flowers are attached, beautiful stones, shells, coconut mesh, lap rope, colored paper, ribbons and much more are used.
If the flower arrangement is conceived as a walldecoration, then as a basis you can use wicker plates, baskets of straw or willow twigs. In advance, consider the arrangement of colors in the picture, determine the fixing points. Attach all the details of the craft with the help of small pieces of wire. Flowers can serve not only as an element of the decor of the room. Graceful bouquets will be excellent boutonniks, brooches, ornaments of a hat or handbag. The main requirement for such compositions is a very strong grip of colors with each other and with a barrette or a pin for a brooch. the ends of such colors should be very neat and short.
Comments
Related posts:
 Lessons of weaving from beads by the method of hand weaving, the scheme of work with a canvas, the description of various nuances of weaving
 Animals from beads: lessons and patterns of weaving with their own hands (video)
 Free schemes of weaving different fish and seahorses from beads.
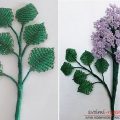 How to make a lilac branch of beads, step-by-step photos and a description of several techniques of weaving for beaded floristics
 Schemes of weaving with beads - flower of violets with own hands, scheme for weaving