A useful master class on how to make a brooch with your own hands
Brooch is a beautiful, unique decoration. Since ancient times, women all over the world have enjoyed this beautiful decoration. Today you can buy a brooch in the accessories store, but it's best to make it yourself. Such a brooch will become your property, and maybe even a family value. 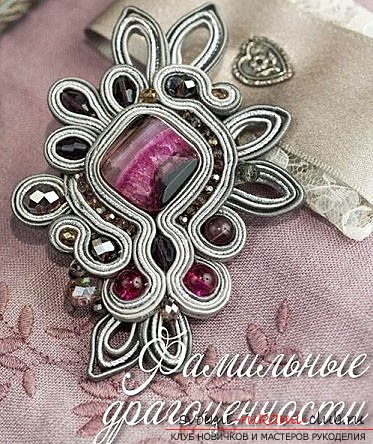 Materials for the manufacture of brooch: • Finishing suction cord; • Natural stones of suitable shades and sizes; • Beads; • Beads; • Threads; • Glue; • Fittings; • Scissors; • Pliers; • Needles. So, let's get to work. Cut four identical segments of the soutache (soutache - a flat thin woven silk colored cord) silvery. We advise you to think in advance of all the shades used fittings and cords. We fix the center in all layers of soutache with the help of thread and needle.
  Now we plant a central stone of beautiful shape and sew among the ribbons. Fix the bottom, helping yourself with pliers, if the needle is difficult to pass.
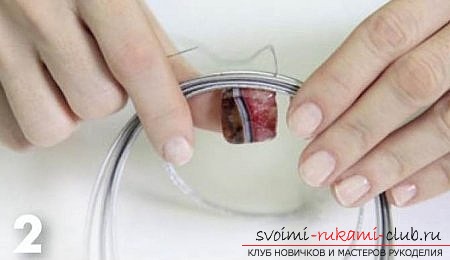
 After fixing the bottom, put the next stone on the thread and sew it between the layers of the soutache. If the edges of the soutache are sprinkled, they need to be smeared with glue.
  Next, we sew two more beads along the sides of the central part and lead the ends of the soutache back. Also fix glue.
 Now we give the volume of the central part of the brooch -we enclose it with beads, suitable in color. Cut three segments of the soutache to 15 cm. Further from the edge of the segment, we recede 3 cm and fix the thread and needle on the folded layers of soutache. We do the same with all the segments.
  Now the finished parts are sewn to the main part,thinking through the pattern. We take pearls or rhinestones and put on one between the length of the soutache and the main detail, sew one bead. We sew a stone at the end of the beaded path and fix the end behind the main part. On both sides of the brooch we sew the beads and create the pattern we need.
  We make individual loops of different sizes: four with stones and six air loops. All loops must be of different sizes and with different stones.
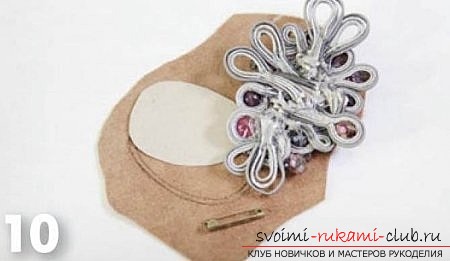
  Now we are lining up the brooch and all the ends are very neatwe remove back, closing the reverse side of the brooch. First, cut out a small piece of cardboard-base and glue so that it does not go beyond the edges of the resulting brooch (cardboard is needed to level the surface). Now on the cardboard glue the workpiece from the skin of a slightly larger size to close the base. We fix the clasp on the skin. Our designer brooch is ready! Everything, the brooch is ready. She will decorate your clothes or serve as an excellent gift!
Comments
Related posts:
 This master class with the scheme will teach how to make earrings from beads with your own hands
 Master class of beads with patterns of weaving will show how to make earrings yourself.
 The master class will teach you how to make an odd bit of an asterisk of threads with your own hands
 This master class with the description will teach you how to make your own heart-postcard.
 Master class with photo and description will teach you how to make your own hands a Christmas ball on the tree