How to weave wisteria from beads, master class with detailed photos and description of the weaving
Everyone who has ever seen beautiful and gentleclusters of wisteria and inhaled its sweet aroma, was fascinated by this wonderful plant. It is very often used in landscape design because of beautiful flowering bunches. The beautiful liana got its name from the Greek word "glycos", which means "sweet". In the culture of Japan, wisteria is almost as popular as sakura. Even the sacred mountain of Fujiyama has a name consonant with flowers. According to the Japanese legend, gods and goddesses live on the mountain. One of them is Sangen, the goddess of flowering flowers in the trees. She lives on a sparkling cloud, located above the crater of the mountain. Chinese tradition says that in a small village lived a girl with marvelous braids. Her hair was so beautiful that jealous goddesses envied her, whose husbands stared at the braids of a mere mortal. And once the envious goddess ordered the dragon to destroy the girl. At the same moment, when this happened, the dragon began to turn into a trunk of a creeper. In anger, he wanted to incinerate everything with flame, but instead of fire from the mouth appeared amazing flowers. Their clusters were as beautiful as the braids of a girl. The needlewomen could not resist such a beautiful creation of nature and in this article we suggest you to weave wisteria from beads.  Required:
- Beads 11/0 (white or milky, pinkor light purple, lilac or dark pink color and dark purple beads), the clusters of wisteria come in different shades, so you can experiment with flowers;
- Beads 11/0 are light and dark green in color;
- Wire (thin for weaving, medium for strengthening and a segment thick for the stem of the creeper);
- Floral tape is brown (you can take a brown paint);
- Yarn;
- Podstavochka;
- Glue;
- Clear nail polish.
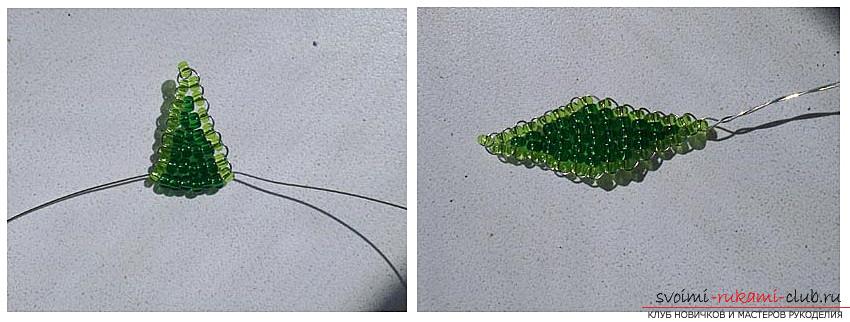
We begin the weaving with bunches of lianas. We will use loopback technology. It is good that beads for it can be slightly different in size. For loops, the calibration of the beads is not so important. Loop technique is one of the simplest in beading. For each brush, we need a piece of wire 1 m long. Thread a dark purple bead onto a piece of wire. Move to the middle and twist the loop. This is the lowest part of the future cluster. Now we will work first with the right, and then with the left halves of procrastination. We make loops, increasing the number of beads and changing the color. In some eyelets you can mix shades of beads, for example, dark purple and just purple. Focus on the photo. Between the eyelets should be a distance of not less than 7 mm. Execute exactly the same loops with the second half of the wire. And now we begin to twist the halves between ourselves from the central dark purple little loop to the dairy large. Now you need to deploy them face to face. When all the eyelets are turned, we slightly bend their outer edges, this will make our branch fluffy. 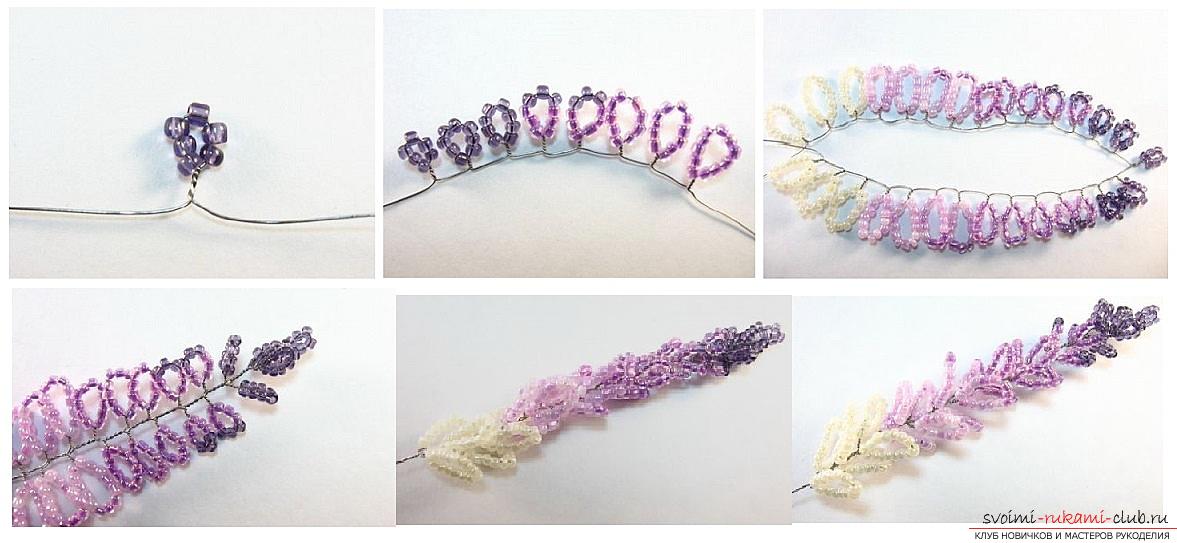 The number of such branches will end updepend on the splendor of the whole plant. You will need at least 40-50 pieces. The ends of procrastination can not be cut off, we will need them to create twigs. Now we will weave the beads from the beads. To do this, you will need a parallel weaving technique. It will already require a quality and well calibrated beads. If the beads are different in size, this can lead to skewing of the product. For each leaf, you need a piece of wire about 25-30 cm in length. We begin the weave with 1 bead of light green color. This will be the first row. For the second row we need 2 light green beads. Wire tails must be crossed inside these two beads. For this, we put them on one of the tails, and then we pass the second tail through the beads. For the third row you need 2 light green and 1 dark green bead in the middle. Weave just the same. Weave another 5 rows, each time increasing by 1 the amount of dark green beads. Light green each time will be 1 on each side. When there are 2 light green and 6 dark green beads on the wire, it is necessary to begin to reduce the beads in the rows, just as we have increased. The result is a diamond-shaped leaf. The number of leaves will also depend only onYour desire and imagination. But the quantity should not be less than 40 pieces. Now the most interesting is the assembly. Our flower twigs must be twisted together several times (2-3) to make bunches. Leaves too, twist up to 5-6 pieces together. Now we add up the cluster and a bunch of leaves so that the wires look in one direction. Twist them and bend the leaves aside. Focus on the photo. Now it remains only to attach the bunches and leaves to the middle wire. You can make 2-3 branches. Then we attach the workpieces to a thick wire. All the branches wind the flora with a ribbon of brown color. You can cover with a clear varnish, so that the stem shines. Stick the wisteria on the podstavochku.
Comments
Related posts:
 How to weave an orchid of beads, a detailed and step-by-step master class of French axial technique of weaving flowers from beads with a lot of photos and a description of the work
 How to weave white orchid from beads, master class with photo and description.
 How to weave a kitten from a bead: a master class and weaving schemes
 This master class of weaving from beads will tell you how to weave the earrings yourself.
 How to weave sakura from beads, detailed master classes with step-by-step photos and descriptions.