Master class for beginners in embroidery in gold. A simple description of the tools and materials for working in this technique.
In this master class for beginners, we will describe all those tools, fixtures and materials that are used for embroidery in gold.  For embroidery with gold you need:
- needles,
- thimbles,
- scissors,
- a whiff,
- shilze,
- Embroidery frame.
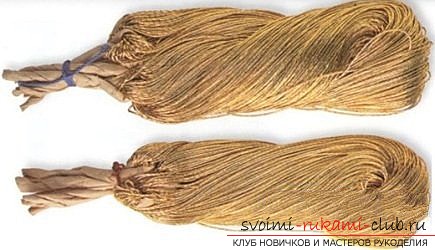
Needles. You need to have several needles of different length and thickness for different threads and fabrics. Scissors. For cutting threads on embroidery, small or medium scissors are convenient, and for cutting fabrics - large. Thimbles. In gold embroidery, both the right and the left hand (left bottom, right upper) work almost equally, so it is necessary to have thimbles for both hands. You can use metal and plastic thimbles, the main thing is that they fit exactly to the size of your finger and be comfortable. Vityake is a long (usually 23 cm) coil made of solid wood, on which gold or silver threads are wound and which these threads are guided along the pattern of embroidery (Figure 1). Thanks to the thread, the threads do not come in contact with the hands, do not lose their gloss and avoid excessive friction. The first layer on the veneer is made of cotton or linen thread, so that the golden thread does not slip over the coil. At the end of the cotton thread, tie a gold thread and wind it over simple threads. 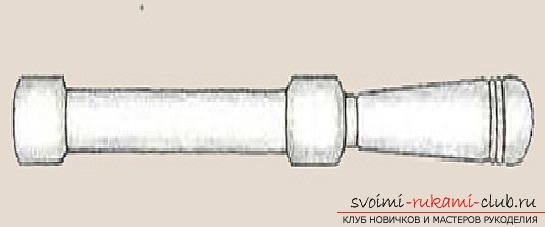 The Schilze consists of a handle that is screwed in orinsert an ordinary needle (Figure 2). Using an awl, pierce the place on the fabric where the stitch should begin or end. If the fabric is soft, then you can do without shillz. But on the fabrics (leather, suede), where each unsuccessful puncture leaves a trail that spoils the work, it is necessary first to pierce with the awl the place where the stitch is to be made.
 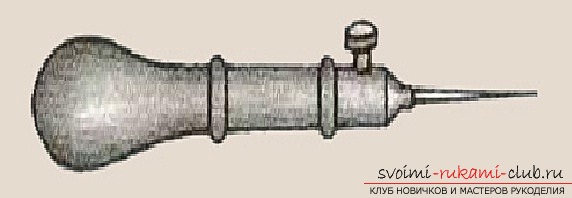 In addition to the vitaika and schill, many gold embroideriesuse a bone or wooden spatula (made of solid wood). She propped up or lifted the edge of the golden seam to achieve an even line. Very convenient for work combined with a shovel shiltsa, that is when on one side an awl, and on the other hand - a wooden handle, ending with a miniature spatula. To perform gold embroidery work, you must have a strong embroidery frame. The main purpose of the hoop is to hold the fabric in a stretched state to prevent embroidery from contracting. The hoop is round and rectangular. In the round frame are usually embroidered small miniature work, not exceeding the internal size of the hoop. In gold embroidery this is a small panel, brooches, patterns for small handbags, etc. Round hoops consist of two wooden hoops, one of which is slightly smaller than the other in diameter. The most suitable for sewing with gold, the so-called Swiss round hoop (Figure 3). Their inner hoop has a handle and a screw, with which the embroidery frame is attached to the table. Since both hands are involved in the embroidery process, the embroidery frame should be secured. For softness, the inner ring is wrapped in a thin cloth, then the cloth is laid on it and a big ring is put on. If the embroidered piece of fabric is smaller than the hoop size, then it is pre-grown by sewing on all sides the fabric. The embroidered pattern should be in the center of the circle.
 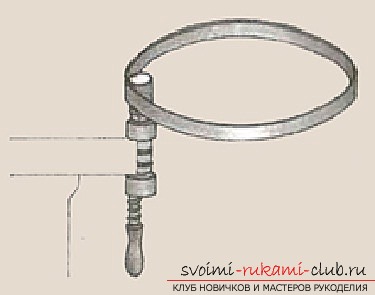 For gold embroidery,rectangular embroidery frame. All the details of the hoop are made of dry, light wood without knots and well polished. The embroidery frame (Figure 4) consists of two main longitudinal laths (1) with nailed or glued strips of fabric (6), two flat cross bars (2) with peg holes (4), two round or square thin but sturdy sticks (3) or metal rods that are inserted into bags (pockets) with slots (5) for ropes.
  Basically, the fabric is damped on the basis (shared),but there are embroideries in which the interlacing of the threads of the fabric and their direction is unimportant. These include sewing on cardboard (in smooth and gold sewing) - the cardboard keeps the form. The embroidery fabric is sewn to the strips of fabric of the main strips (1). Here it is necessary to pay attention to the fact that the fabric was positioned equally with respect to the middle and edges of the slats. To do this, note the middle on the fabric of the slats and on the product. And when they are braked, combine them. On the nailed strips of fabric (6), this mark can be made permanent. Then the stitching cloth is sewn with a "back needle", "stitch" or sewing machine sewn to the side pockets with slits (5). The seam should be smooth, without any distortion. It is better to make a preliminary. When braking, the corners of the fabric are sewn to prevent the material from crawling and not mowing at the corners (side bags at the intersection are sewn to the main strips or vice versa). First, the side strips (2) are inserted into the main strips (1), then pegs (4) are inserted into the holes on the strips (2) from all four sides, adjusting the tension of the fabric. The sticks (3) are inserted into the side pockets and with the help of the ropes that are threaded in the pocket pockets, the fabric is pulled to the desired state (Figure 5).
 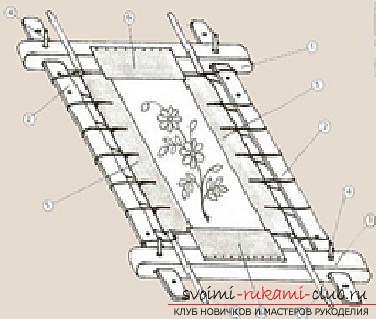 Stretch by the ropes on the left sidethe hoop is usually made from the top down and the rope is twisted counter-clockwise, that is, it is inserted into the pocket of the pocket from under the hoop. On the right side of the hoop the tension is made from the bottom up, the cord is also passed from under the hoop, but clockwise. With this braking, the rope is easily pulled, if the tension of the fabric decreases during operation. You can do it in another way, but the main thing is that the rope in all cases is cut into the pockets from under the hoop. Surplus ropes are wound on the end of the cross bar and fixed. The tension should be strong so that the fabric does not sag. Usually after a few days of work, it weakens. With the help of a rope the fabric can be tightened. Wearing a cloth, it is important to stretch it evenly so that it does not warp. In some hoops, the main bars (1) are made round. These hoops are used for large works, which, as they are embroidered, are wound on round bars. In order not to spoil the fabric and work, the bars must be perfectly smooth.
 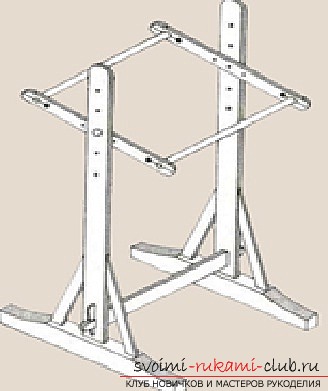 For work, the hoop is mounted on specialstands or racks. The rack shown in Fig. 6 can be used both for hoop mounting and for fabric blanking. It consists of two vertical racks, fastened at the bottom of the crossbar and a rotating rectangular collapsible frame. The frame includes two transversal strips with holes into which are inserted two longitudinal round sticks. On this frame, you can fasten the embroidery frame with a woven cloth, tying them to the longitudinal sticks. When working, you can turn the embroidery frame with the frame on the reverse side and return to its original position without any special efforts. When you flatten the fabric in a rectangular frame of the rack, the frame can only rotate slightly, at a slight angle, since the ropes that stretch the fabric in the longitudinal direction are wound directly onto the cross bars and prevent the hoop from rotating completely. The height of the embroidery frame can be adjusted with holes in the vertical racks. The hoop can be placed on two identical chairs or table with the same height. The height of the supports should be as follows. So that you can work without slouching. As a rule, the hoop is placed slightly above the level of a regular table. When working, it is necessary that the light falls on the left. This is due to the fact that embroidery is made with two hands - the right hand on top, and the left hem on the hoop. Threads. Previously, for gold embroidery, gold of various grades was used: dragged, spun, beat, filth, and rigmarole. Depending on which artistic task was performed, those or other types of threads were chosen. The braided gold is a thin gold or silver gilded wire. This type of thread was used until the XI century. Along with the waxed gold, a very fine gold was also used, which was very hand-crafted on thin flax, that is, the flax thread was wrapped in a thin gold or silver wire. This thread was called a spinner. Gradually, pure gold was replaced by cheaper gold, that is, heavily gilded silver, dragged or less steeply spun on twisted raw silk. After the XVI century, the use of pure gold in the embroidery became quite rare, and was replaced by gilded silver, spun on a yellow silk thread in the color of gold, so that, with less dense spinning, the color of silk differed little from gold. In everyday life before Peter's time such gilded threads were called gold. It was used in gold embroidery and twisted gold - strings of gold and silk threads. Such a thread was called a filigree. In addition, gold sewing was used to beat. This is a thin, flat metal (gold or silver) strip. The embroidery was beaten in the same way as the golden thread. Beating matted, shiny, faceted, corrugated and colored. Sewing gimp - a thin metal wire, tightly entwined in a spiral, was already known in the XIV century. Gold and silver threads were imported to Russia mainly from the East. At the beginning of the 17th century, at the royal palace in Moscow, the production of gold and silver yarn and gimp was opened. It was led by German masters, but already in 1623-1630 the Russian master of drawing Yuri Yakovlev was mentioned. In 1785 in Moscow, S.A. Alekseev, great-grandfather of the great director KS. Stanislavsky (Alekseeva), a gold - canning factory founded in 1862 as a trading house "Vladimir Alekseev" was founded. The factory went to the stage until the revolution. Its products at various times have been awarded a number of medals at exhibitions in Russia and abroad. In 1900, the factory received the highest award "Grand Prix" at an exhibition in Paris for a quality, thin, soft gold embroidery thread, the best in the world. It was bought by the USA, France, Germany. In modern gold sewing, artificial threads are mainly used, so often this type of needlework is called gold embroidery, and threads - gold. Fabrics. Most gold embroidery works are done with a lining cloth, that is, the main fabric is superimposed on the auxiliary (duplicating) fabric. If the embroidered fabric is light, then the lining serves as a reinforcing material so that there are no distortions, compressions, tears. Without lining, the metal thread can easily tear the fabric. For linen fabric, linen cloth, canvas, and board are usually taken. They are strong and last longer. For gold embroidery in ancient Russia, and in subsequent epochs, expensive fabrics were most often used. As a rule, before the beginning of the XVIII century, these were imported fabrics from the countries of the East and Western Europe: taffeta, stone, brocade (altabas and aksamit), velvet, satin. All expensive imported fabrics in Russia bore the name of PAVOLOC. Especially appreciated aksamit (Old Russian name from the Greek "examiton", which means "six-lined") - a precious fabric of manual production, woven in silk background ornamentation from a spun silver or gilded thread. Most often these are fantastic stylized images of animals and birds in round medallions. In the Armory Chamber is kept the sacrament of the Patriarch Nikon, a monument of the XVII century. It is sewn from a very rare expensive fabric - a double looped axamite, specially brought for the patriarch from Italy. At the beginning of the XVIII century in Russia began to develop its own silk weaving, and by the middle of the century Russian silks were not inferior in quality to European ones. Modern gold embroideries, depending on the purpose of the embroidered thing, use a variety of fabrics. It is silk, brocade, taffeta, satin, moire, cloth, velvet, suede, leather. For a long time in the past remained rich, embroidered with gold and silver clothes, decorated with pearls and precious stones. In our time for gold embroidery use is not so expensive jewelry. This is the beads, sequins, bugles, rhinestones, pearls (mostly artificial). Sewing is often decorated with braid and cord.
Comments
Related posts:
 Master class on creation of a unique bouquet from sweets for a holiday. Photo and detailed description of the work
 Master class on making toy tildes - Hare. Detailed description with photo for beginners
 Rabbit, the most popular doll of Tilde. Master class with the original pattern of this toy.
 How to crochet a poppy flower of lilac color? Detailed description of the stages of work, a list of materials and step-by-step photos
 This detailed master class with a photo and description will teach you how to make origami for beginners - an origami-crown made of paper.