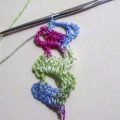
A master class on knitting a baby cap for newcomers. Photo, description and diagram of knitting
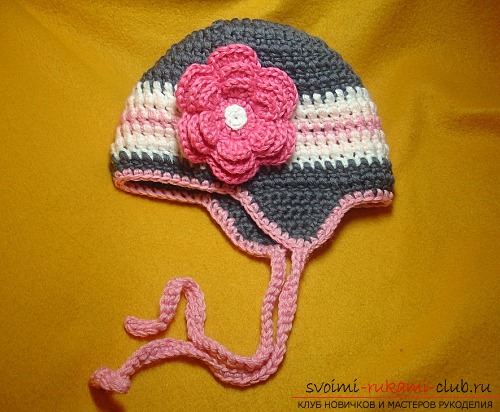
We bring to your attention a master class oncrochet beanies for girls. The cap is made for a child, with a head circumference of 48 cm. Its height is 18 cm at the front and 20 cm at the back. It is suitable for girls aged 1.5 to 3 years.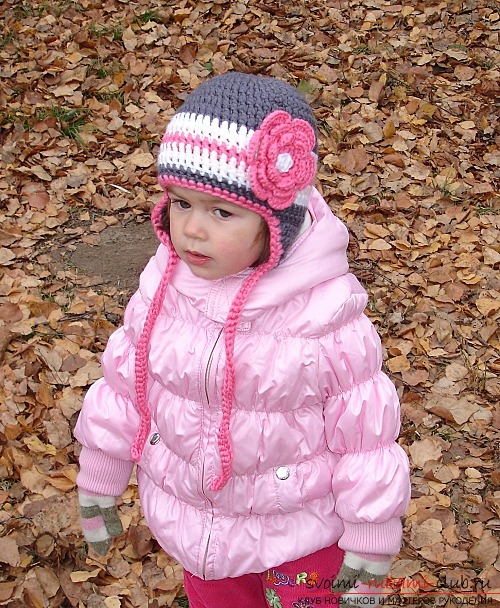 For work we will need:
- yarn, 4 colors - white, gray, peach and pink;
- hooks N4 (for the cap);
- hooks №3,5 (for the flower);
- scissors;
- needle.
Let's proceed: From the 1st to the 8th row, we knit with gray thread, the 9th row - white, the 10th row - the peach, the 11th row - the pink, the 12th row - the peach, the 13th row - the white, 14 line-gray threads. The 15th incomplete row, like the ears, is knitted with gray threads.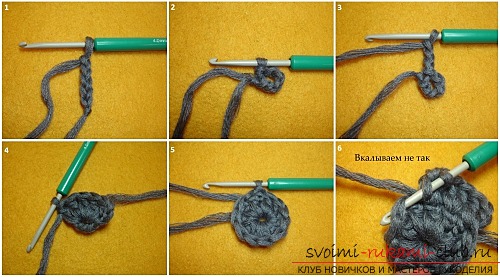 We type 5 air loops (usually start with 6vp, but we will specifically reduce their number, so that the hole on the vertex is smaller). We connect our chain in a ring with the help of a half-tube. Then we knit in a circle. To raise the columns without the crochet the next row, do not forget to tie 3 air loops. 1st row: we knit 12 stitches with a crochet. In this case, the hook can be pushed directly into the air loops, or you can just in the middle of the ring (we, the second option). 2 nd row: from the tops of the previous 12 columns we knit 24 columns with a crochet, that is, from each column we fix 2 new ones. Pay attention, we use the so-called "deep puncturing" method: we introduce the hook not in the half loop of the column of the bottom row, but slightly below it in its upper part. This method will not give the pattern of our cap a skew. 3 rd row: 36 columns with a crochet, i.e., 2 bars from each second column of the bottom row.
 4th row: 48 columns with a crochet (an increase in each third column of the lower row). 5-th row: 48 columns with a crochet, without any increase. 6th row: 48 columns with crochet, no increase. 7th row: 54 columns with crochet, i.e. add 6 columns (here we make an increase in every 8th column). We advise you to periodically recalculate the number of your columns in order to avoid mistakes. Starting with the 8th row, we do not add any more columns, until the end of work we have their constant number - 54. We knit the rows from 8th to 14th, remembering to change the thread colors. Then, conditionally divide our cap into parts: 22 columns with a crochet - the front part, 10 columns - on the ears, 12 posts - the back. The beginning of one of the ears will be located at the place where the rows meet (where the air lifting loops were constantly loosened).
 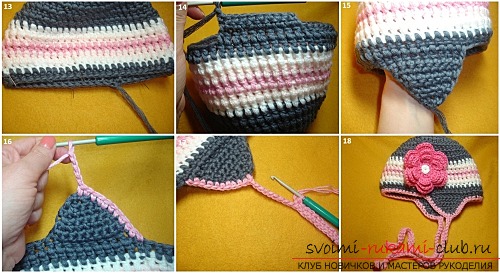 We knit the last incomplete row of columns with a crochet: From the beginning of one eyelet on the back to the beginning of the other eye, ie. the front 22 posts we do not bind. Thus, our back part will be longer by one row - just to cover the cervix. Turn knitting and begin to knit ears. Then we knit not in a circle, but in turning rows rows without a crochet. The method of "deep puncturing" is not used. One eye - 10 bars. The ear is knitted like this: 1st row: 10 sticks without crochet. 2 nd row: 10 columns without crochet. 3rd row: 8 columns without a crochet. 4th row: 8 columns without a crochet. 5th row: 6 columns without a crochet. 6th row: 4 columns without crochet. 7th row: 2 piles without a crochet. Cut the thread and pull it out of the loop. The second ear, we knit just like that. Now we tie a cap: with pink thread we knit along the edge of the column without a crochet. When we reach the tip of the eyelet, without breaking the thread, we turn to the knitting of the ties: we have tied 43 air loops and returned back with columns without a crochet. We continue the strapping. After finishing the work, we hide the excess threads neatly. To decorate the cap, we knit any flower. It is best to place it in the place of docking the rows: first, it will give a "zest" to the cap, and, secondly, hide the possible blemishes of knitting in this place. Everything, the hat is ready. It remains only to wash it, and you can dress the child for a walk!
Comments
Related posts:
 Master-class on crocheting with photo and description will teach knitting of children's pinets
 Master-class on crochet of children's dresses, handbags and hats according to the schemes with description and photo for free
 Master class for crocheting an openwork braid with a photo - scheme and description
 Master class with detailed description and photo knitting for babies mittens crocheted.
Detailed description of crochet fun funny children's slippers, master class with photo
Master class with detailed description and photo knitting for babies mittens crocheted.
Detailed description of crochet fun funny children's slippers, master class with photo