We make new clothes in our summer wardrobe with our own hands. Pattern of a fashionable dress with a smell without difficulty. Instructions and photos
The dress must lie in the wardrobe of any businesslady. It should be simple and at the same time refined and elegant, but it is emphasized strictly for the office or business meetings. Deep, beautiful smell is not inadmissible dress code, because the neckline, if necessary, can be draped with a light scarf or special top. In order to properly model the sewing of the presented dress model, you will need a special pattern, which you need to build by individual measures. You will also need a pattern of the narrowed sleeve of this base. Let's start sewing the original dress with a smell in the office style. Changes on the backrest should be minimal. It should be noted the approximate length of the future product. The photo shows that the length of the dress will be just above the knees. If you are satisfied, continue sewing. A new bottom line should be drawn. The silhouette of the skirt will become slightly narrower, only by 1.5-3.0 centimeters. Darts on the shoulder lines do not need to be done. However, if you have a stooped figure, and the fabric you picked is not at all elastic, then it will be better to perform them. The shape of the shelf is needed for the construction in expanded form. On the shelf, in addition to the bottom line and narrowed silhouette, there are other modifications. Mortar chest dips should be transferred from the shoulder line to the side. The lower area will have the width of the smell to the far corner of the tuck solution. The edge will become vertical. 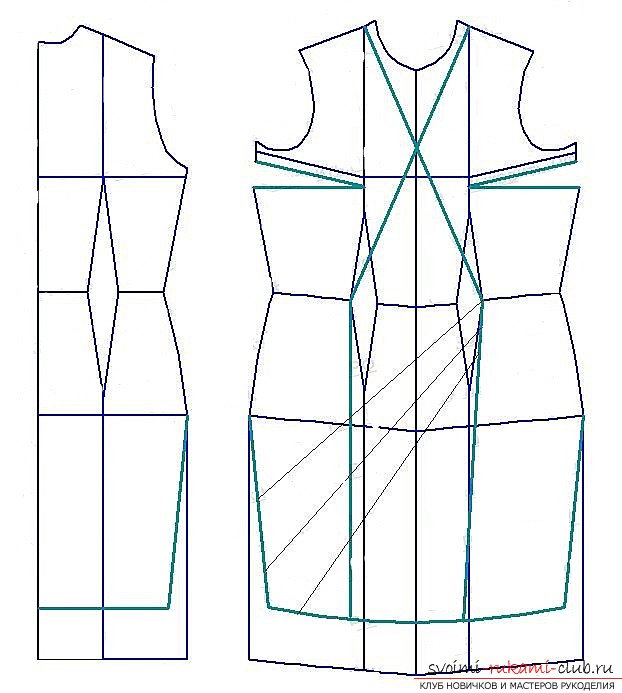 The upper part at this width will have an angle,which is slightly sloping to the center line, just as much as the skirt is narrowed. The shelves will begin from closed solutions of breast darts along the neck line. Do not forget that you need to adjust the width of the neck on the back of the part. The depth of the decollete depends directly on the shape of the odor, or rather its upper region. In the presented case, they are held directly. It will result in a relatively shallow neckline, which is good for a business woman (the intersection turned out approximately four centimeters above the chest line). For a more volute cutout, the lines should be drawn with concave smooth lines. Now on the top part will be carried out direct laying folds. There are three in total. The left half of the shelf should be cut along previously drawn lines of folds. Obtained parts must be moved to 5.0-8.0 centimeters (the value is twice the required depth of folds). As a result, the shelf will be made up of two parts - left and right. The back will be cut out only in one with a folded specimen. The collar of the presented dress with a smell is created in the form of an incomplete stand, which ends somewhere at the level of the clavicles. It is cut out as a rectangle. Its length is the length from one clavicle to the opposite through the entire back. The height of the collar is the two required heights of the rack already ready.
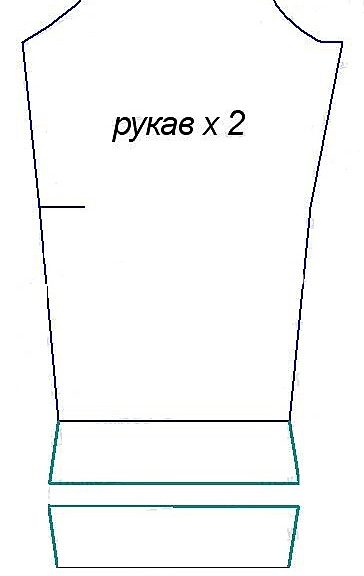
 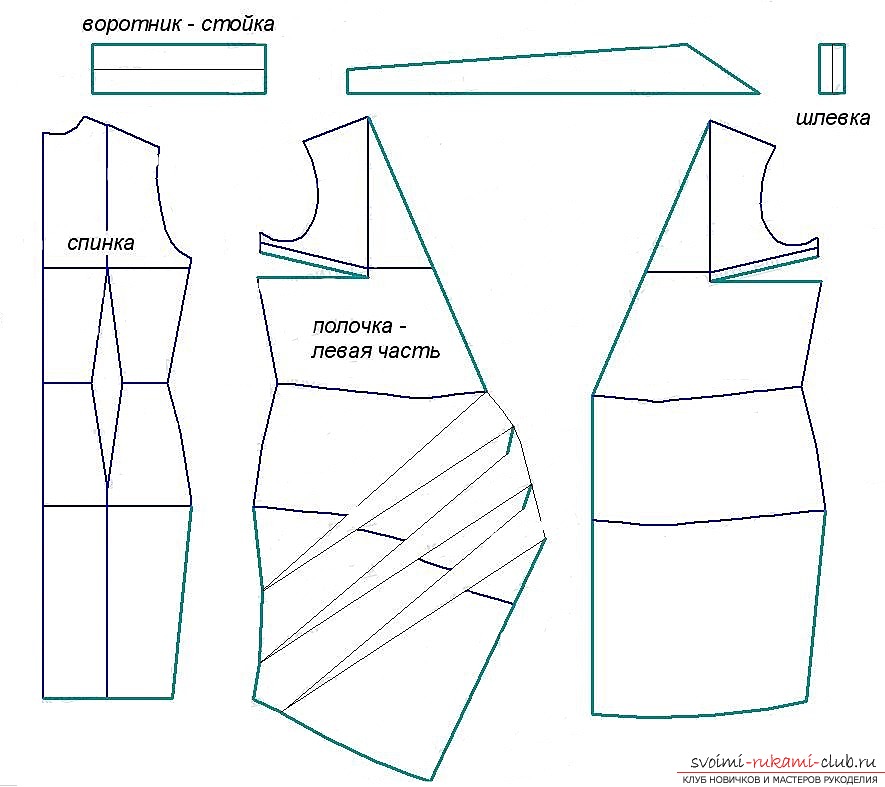 Moreover, such a dress has its ties inform a girdle. It can consist of two parts, which are connected on the back and tied in the form of a bow on the waist line. If you use one piece, then the dress will be tied with a bow that has one loop. The shape of the belt is shown in the picture. Each part of the girdle can be tailored with a fold or two symmetrical halves. The belt has its own width - one, and length - three to four centimeters in finished form. On the pattern of the narrowed sleeve, the dart closes on the elbow. Special sleeves are made on the sleeves of the product. They will get a little flared - for 1-2 centimeters. The length of the lapel is five to seven centimeters. The lapel must be duplicated in order to process this cuff-flap in the future. When cutting, do not forget about the allowances for seams. On the back and on the two halves of the shelf, the darts will be closed. On the back are thallium, on the shelf - breastplates. In the left area of the shelf, the folds along the odor line will be folded so that the length of the two parts becomes the same everywhere. Folds should be simply stabbed or fixed with a special line on the allowance. Lateral and shoulder seams are sewn. If the cutout was decorated with straight lines, then processing will take much less time, and therefore it will be much easier. On two lines of a smell the allowances are turned on the wrong side. If the neckline was decorated with concave lines, then you should still trim the obtacks. Do not forget that it is necessary to sew an incomplete stand along the line of the neck. Then it should be glued nonwoven. The exception is the allowance for seams. Then everything bends along in half. The allowances should be folded inward.
 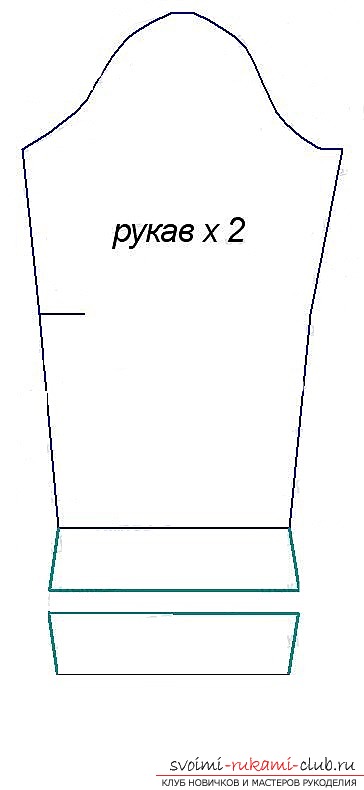 In this condition, the rack needs to be ironed. For reliability, you can still outline the allowances, each to the right side. After that, the rack will be placed over the neck in such a way that the allowance is inside. Since on the shelf the allowance is tucked inside out, the stand will crawl a bit on the product itself, literally by two or three millimeters. In this state, it must be swept, and then must be stitched. Short sides should also be stymied. This option is possible. All sides of the rack will be stitched on the same interval. The cuffs of the sleeves are required to impose facings on the faces. At the same time, the allowances of the obtacks must be bent outwards. The cuff and obtachku will be better glued with non-woven linen, except for allowances for seams. Thus, the imposed obtachki are spread over three sides, and then they are turned out. At the end they need to be ironed properly. After that, you can lay a machine stitch along the four sides of the cuff, but the distance from the edge should not change (one or two millimeters), or you can fix only the not stitched side. Then the bottom seam of the sleeve is sewn, but now the sleeves can be stitched. The lower edge is turned, for this purpose a special secret stitch is used. Now it is necessary to make a final fitting and determine the exact places of fixing the smells. In these areas, the lower right half to the left will be attached. The upper part is sewn from the inside with a button at the waist, and on the bottom - the eyelet, on the edge of the smell. At the place where the upper left side is fastened to the lower one, you should sew a loafer, and on the top - a belt. A dress with a smell for business meetings is ready!
Comments
Related posts:
 We make our wardrobe more diverse. We make a pattern of a simple dress base with our own hands. Simple diagrams and photos
 How to build a pattern of a long dress for a woman with your own hands, using step by step instructions with a photo and description.
 The original design of the pattern of a stylish dress-transformer. A beautiful outfit for a beautiful woman. Photos and instructions
 Best photos: summer shower in the country with their own hands. Drawings and dimensions.
 Completely free of charge and without difficulty we make the original Christmas tree with our own hands. A simple instruction with a lot of photos