
We make new clothes in our summer wardrobe with our own hands. The pattern of the original tselnokroenogo dress without difficulty. Instructions and photos
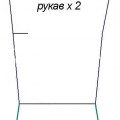
To sew such an airy and elegant dress is notwill be a huge effort. You just need to give enough attention to this activity, so that you have excellent results. Sewing the dress will take less time, since the sleeves are all-in-one, they need to be sewn, but the rest of the dress does not need to be bothered for long. The pattern of this outfit is very quickly modeled, because with a seamless product it's easier to work. During the construction, it is also necessary to form absolutely all darts in the folds. The skirt-bell with pleats at the waist gives the floating effect of the dress. To sew such a dress with a sleeve is best of thin and air chiffon with a floral pattern. To prevent the fabric from appearing, you can sew a lining on the wrong side or wear such an outfit on top of a shirt on thin straps. The pattern is built according to own standards, in other words you have to substitute your values to achieve the right result. Let's start modeling a dress with a sleeve. To begin with, it is necessary to construct the upper half on the panel. To do this, close the breast tuck and move it down. Then cut the cut on one side of the chest tuck. The breast tuck is best glued together, aligned on the sides. Simulate the bodice. 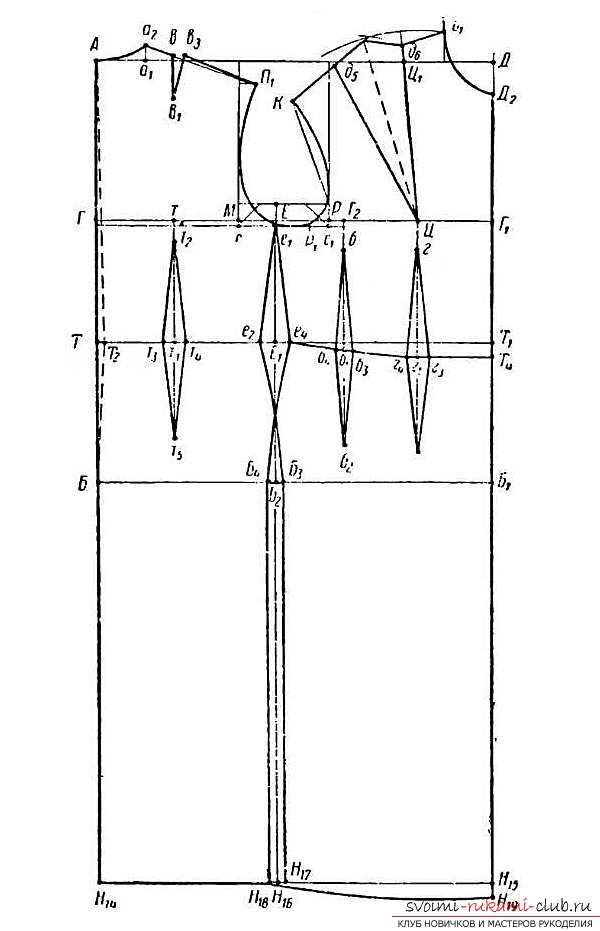 Line the shoulder of the front part to extend by 5centimeters. Create a slightly curved line on the curve, lifting the shoulder by half a centimeter. From the bottom of the armhole measure one centimeter. In the form create a new feature of the armhole. Now you should correctly model the back. By constructing the sleeves, you can begin to cut out all the patterns. A thawed dart on the back does not need to be done. Let's proceed to the formation of the skirt-bell. The presented outfit uses a skirt-bell. For proper modeling, you need two measures:
- Waist circumference - 72 centimeters;
- The length of the skirt is 55 centimeters.
Data are given as an example, becauseEach woman has a different body composition, so the information may differ significantly from the standard. Therefore, please note that maybe you will have to modify the pattern a little, so that the dress will perfectly fit the figure. To cut a skirt follows in such a way that not to touch the upper half. Cut it out with an oblique thread. Before cutting, you must correctly calculate the length of the upper half and the bottom of the dress. Also measure the length of the sleeves, so as not to be mistaken. Do not forget to leave allowances for seams and freedom of fit. TIP! If you want to simplify your task, then instead of chiffon use a cloth called thin coarse calico or use any other fabric. Allowances for seams should be made at a rate of one and a half centimeter, and on a bottom - 2 centimeters. Let's start sewing a tselnokroenogo dress. Perform all shoulder seams (sweep and mend). Connect the right side seam. Process all allowances on seams. Perform the right side seam on the skirt. Pripuski again handle. Make the top and bottom of the outfit. The allowances should also be processed in such a way that a crochet for inserting the gum around the waist is obtained. Before that, leave about 2 centimeters open to pass the gum. On the left side of the dress, you can sew a secret zipper to facilitate the dressing process. Retreat only 5 centimeters from the armhole. Lower the dress and tighten it. Allowances along the neck of the sleeves should also be processed, tucked and stitched. Adjust the length of the elastic band so that it does not tighten the waist, sew the ends together and tighten it in the kuliska. Open the stock section sewn. In addition, you can create a belt, which will have a width of about 6 centimeters and a length of about 200 centimeters in finished form. The dress is ready and you can wear it. Both on business meetings, and on romantic walks. Now consider the second model of a one-piece dress with sleeves. This outfit is perfect for a cool autumn season or winter season. Correctly selected accessories can only complement the elegant image. The main "highlight" is a wide stylish belt, the selection of which is yours. For such a model is best suited fabric, which has an average density. In the composition of matter there may be a small amount of elastane. 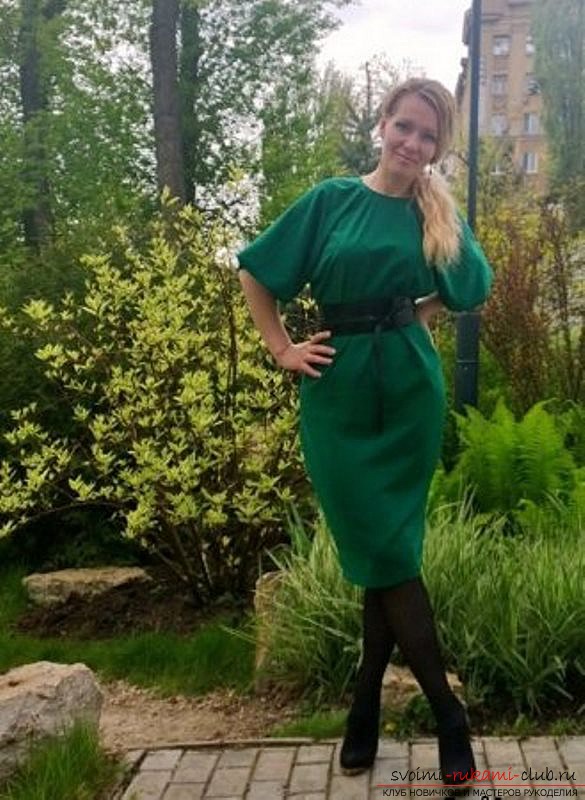 In the presented pattern there are already allowances forseams in the size of 1 centimeter. To begin with, you should build a pattern of the top half or top in other words. Do not forget about the marks that need to be left on the central area of the back and front halves. The next process will be obatachka. It should be placed on the center of the front and back halves. To strengthen the matter, it is necessary to glue the obtacle with a special substance. You can use a double. Now we need to cut the skirt. Fold the matter into four layers along the share direction of the thread. You can sew a belt with your own hands, if there are no alternatives. To do this you will need a small piece of fabric, which should also be folded four times and cut to your size. In the end, you should get a belt, in which the length will be two and a half meters. After all the necessary elements are cut, you can begin to stitch. It is best to start with the obtachki, which should be processed on the overlock or manually. Align all the labels on the fabric with each other. Connect the obtacle with the top of the neck and secure it with pins. It is worth noting that the edge of the neck will be slightly larger than the size of the obtachka. This is necessary in order to beautifully arrange the folds on the front half of the dress.
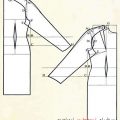
 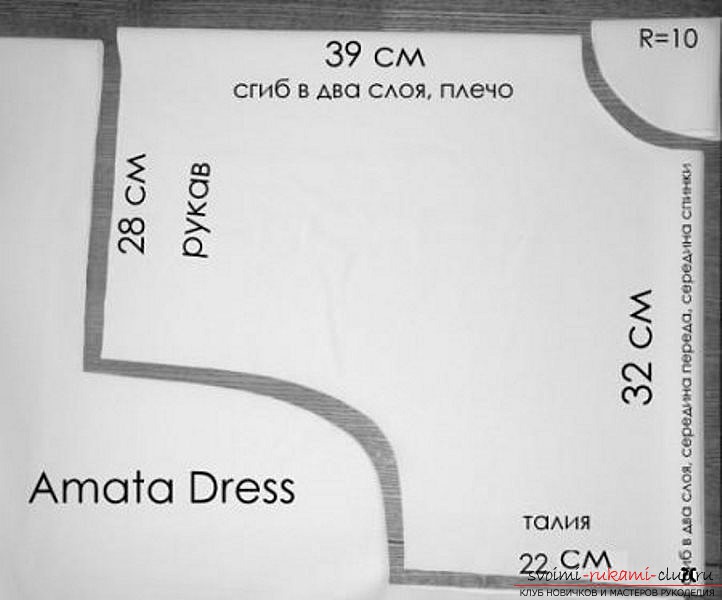 So, you got a top with beautifulwrinkles. The back of the product will be without darts. Sew the obtacle to the neck, but retreat from the edge of the product five millimeters. To ensure that the obtacle does not turn out in the finished dress, you should make a notch. On the front side, the obtusement with the neck should be made with a special stitch, which can be done with the help of a so-called foot. The line should be located at a distance of two millimeters from the very edge. The resulting seam should be well stripped and ironed. For the presented version of the outfit, the part of the work that was done was the most difficult, now only the finishing and finishing stages were left. To sew the side and arms, you should use the overlock. Pre-clip the sleeves with the front and back halves with each other. The edges also need to be treated with an overlock, but first tilt the edge of each sleeve by one centimeter.
 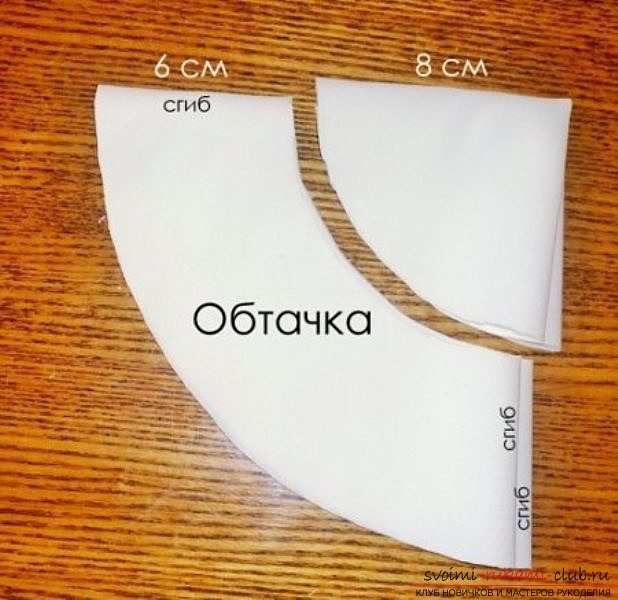 This must be done for the gum. It is better to choose a hat type. Thread the ribbon. It was the turn to do the bottom half of the dress. Make lateral seams and tuck the bottom edge of the skirt a couple of centimeters. After that, you can begin to sew the lower and upper parts of the dress, combining all the side seams. The resulting joint must be ironed and smoothed the allowances on the sides. The dress can be safely tried on, and if nothing needs to be adjusted, then wear it with pleasure. If you want, you can sew a belt, it will not take long. This outfit is perfectly combined with a romantic mood or a strict business style. The dress can be worn at work or on dates.
Comments
Related posts:
 We make new clothes in our summer wardrobe with our own hands. Pattern of a fashionable dress with a smell without difficulty. Instructions and photos
 We make new clothes in our summer wardrobe with our own hands. Pattern elegant festive dress without difficulty. Instructions and photos
 We make new clothes in our summer wardrobe with our own hands. Modern patterns of peasant dresses without difficulty. Instructions and photos
 We make new dresses in our wardrobe with our own hands. A pattern of elegant, gorgeous Raglan dress is easy. Instructions and photos
 A new pattern of Greek dress. We make beautiful dresses together, prepare for a hot summer. Simple instructions and photos