Knitting pattern of the original warm plaid with a pattern of braids for the house with detailed descriptions and photos for free.
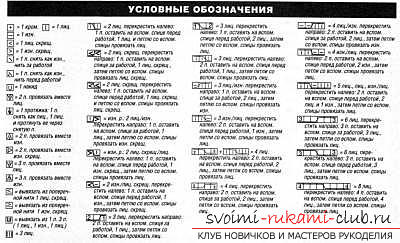
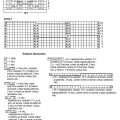
Knitting a warm blanket with a pattern“braid”In this article, we offer you a master class on knitting a warm blanket with a “braid” pattern. It is made of natural wool (merino). Its size is one hundred twenty-six by one hundred eighty-two centimeters. In order to make such a blanket, you will need: 2.2 kg of “Big Wool” brand yarn in a beige-gray shade; classic knitting needles number nine.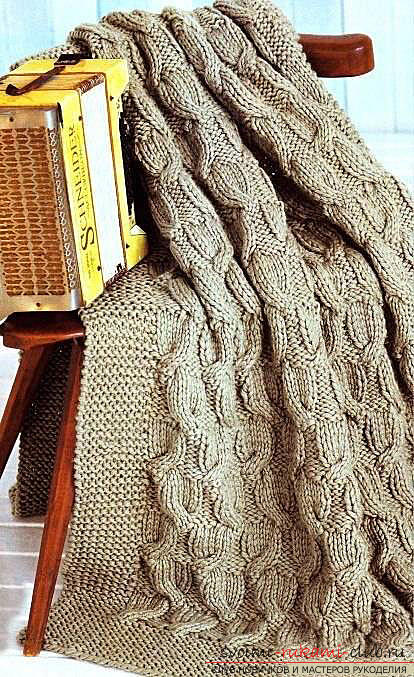 Pattern specifics: 1.Garter stitch pattern: knit the front and back rows with front loops. 2. Front surface: knit front loops in all front rows, purl loops in back rows. 3. Braid pattern: the number of loops should be a multiple of seven. Knit according to the diagram. Front rows and the first back row are shown. In the rows that are not shown, knit the loops following the pattern. Repeat the loops of the rapport. Do the first and second rows once, then repeat from the third to the twenty-second rows, finish with the twenty-third and twenty-fourth rows. After the second row, the number of loops should be a multiple of nine.
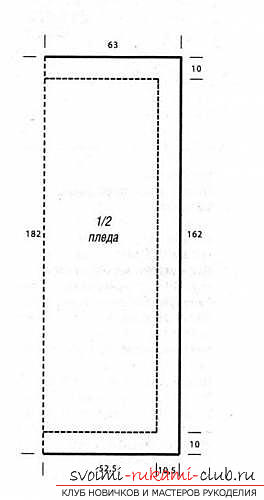 Determine the density of knittingWhen the pattern"garter stitch": nineteen rows of nine and a half loops equal the size of the fabric ten by ten centimeters. With the "braid" pattern: twelve loops in fifteen rows equal the size of the fabric ten by ten centimeters. Work progress With knitting needles number nine, create one hundred and eighteen loops and knit to create a strip of ten centimeters (nineteen rows) with a garter pattern, you need to start with one purl row. After this, we continue knitting in the following manner: edge loop, nine loops of garter stitch (for the right strip), ninety-eight loops of the braid pattern, nine loops of garter stitch and finish with one edge loop (for the left strip). Pay special attention: edge loops must be created in the following manner: at the beginning of the row, you need to remove one loop as if it were a front loop, passing the thread behind the fabric, and at the end of the row, knit one loop as if it were a front loop. After the second row, one hundred twenty-six loops or a total of one hundred forty-six loops should remain on the knitting needle in the middle of the braid pattern.
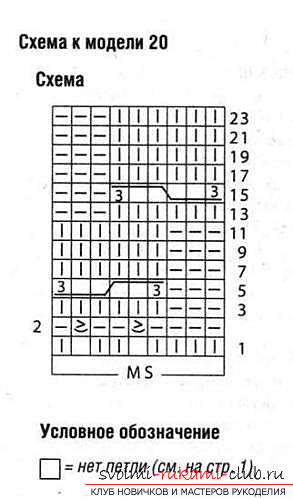 Considering that the patterns used in thisproduct, different density, then it is necessary to create a shortened view of the rows. As a result, the pieces of fabric that are made with the garter stitch pattern will have a slight stretch in height. To do this, we need to turn the fabric in the seventh and seventeenth rows of the pattern at the beginning of the row after the strip on the right side, creating one yarn over. Then knit nine loops with garter stitch and finish with one edge loop, then turn the product, knit an edge loop again, nine loops with garter stitch, make one yarn over, knitting it with the next loop together. At the end of the row, knit nine loops with garter stitch and finish with one edge loop, then turn the product, make one yarn over, knit nine loops with garter stitch again, make one yarn over, knitting it with the next loop together.Having knitted one hundred and sixty-two centimeters (two hundredforty-four rows) from the beginning of the strip, it is necessary to knit in all rapports two by two loops together with the front one. In total, one hundred and eighteen loops are obtained. Ten centimeters (nineteen rows) from the initial row of the strip, it is necessary to close all the loops with purl ones. That's it, actually! Your warm blanket is ready to warm you!
Comments
Related posts:
 Knitting with knitting needles of an original dress with a pattern. Detailed diagram with photo and description for beginners
 Knitting with knitting needles of a female pullover with an openwork pattern. Detailed diagram with photo and description for beginners
 We knit with knitting needles an effective women's pullover patterned with leaves according to the scheme with a detailed description and video, which can be downloaded for free.
 Knitted female blouse-sleeveless shirt with her own hands. Knitting pattern with a detailed description
 Knitting pattern knitting sweater with a pearl pattern. Detailed description with photo for beginners