A log table of birch logs with your own hands
In expensive designer boutiques and catalogues nowYou can see a lot of original furniture in the now fashionable rustic style. But there is a much cheaper way to get such an exclusive - do it yourself! A few basic tools, available materials and a day off - that's all you need to create your own coffee table from birch logs! Why birch tree?Of course, you can use any kind of logs. But birch is easy to handle, has a nice appearance, smooth texture and light colors. And most importantly, birch trees grow very quickly, so you don’t have to worry about harming the environment for the sake of a coffee table.
 34 birch logs were used in this projectlogs, each 8-14 cm in diameter. Wood can be purchased at sawmills and specialized stores. You will also need: plywood sheets for the base of the table of the desired size, wood glue, plaster, screws, wheels, a saw, a screwdriver, a spatula.
 Cut a square or square table base out of plywoodRectangular. In this project, the base is 84cm by 60cm. Build a plywood box measuring 70cm long x 46cm wide x 40cm high. The box will be attached to the middle of the bottom base, 14cm from the edges. If your table dimensions are different, just remember that the bottom plywood protrudes above the box by a distance equal to the diameter of the logs. A 70cm long x 46cm wide tabletop will cover the box. Attach the box with screws or glue with wood glue.
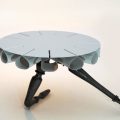
 The birch logs are already prepared and cleaned in advance.from knots and have the same length. Using wood glue, glue each log to the plywood box as shown in the photo above. For extra security, screw a screw into each log from the inside of the box.
 Screw the lid of the box on.
 Saw a couple of logs into pieces 2-3 cm high.For this table you need 40 of them, and you can make a couple more as coasters - coasters for cups and glasses. Glue each one to the tabletop with wood glue.
 You can leave the tabletop as is, or you canfill the space between the fires. Finishing plaster for walls of the consistency of thick sour cream is suitable for this. Apply the plaster to the countertop with a spatula, and then remove the excess from the surface of the fires. Let the solution dry.
 Attach the casters to the bottom of the table. You can coat the entire log table with a layer of clear wood polyurethane. Done!