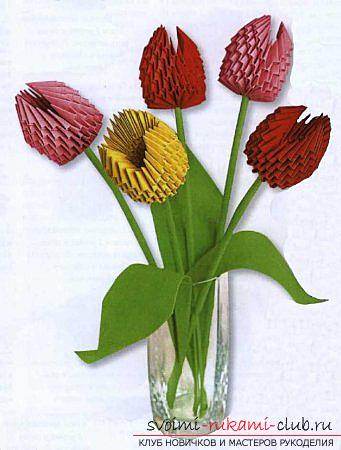
To make a tulip flower or a whole bouquet in a modular origami technique you will be helped by schemes
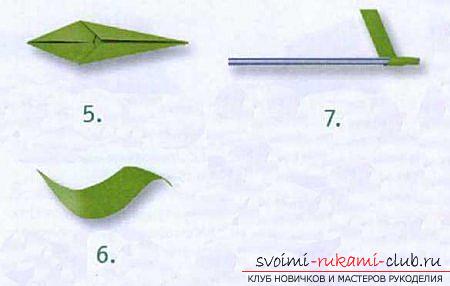
Modular origami tulip flower - beautifula gift to loved ones and an excellent interior decoration. Modular origami of flowers allows many gardening enthusiasts to realize their flower dream in reality at any time of the year. Color sheets of paper in combination with free time are an excellent basis for creativity. Pleasure yourself with a beautiful bouquet Everyone knows that in the early spring after daffodils a look pleases the tulips. Unfortunately, their flowering does not last long. Fortunately, their charming beauty can be embodied in three-dimensional figures of paper. Assembling tulips refers to origami of an average level of complexity. Beginners can easily master the manufacturing technology, and then proceed to a more complex technique of assembling different colors. In the meantime, we'll figure out what a modular origami flower tulip is. To produce one flower, you need to prepare 105 basic modules. As a stalk, a straw for drinks and green paper for making leaves will be used. To begin with, we will perform the simplest step in this assembly - we will produce the flower stem. To do this, take a strip of green paper with a width of not more than 1 cm. From the wrong side, glue is applied to the surface of this blank, the strip is wrapped around the straw. See the diagram.  Next, let's start making leaves. To do this, take a sheet of paper 15x15, add on the diagonal lines and unfold it back. The edges of the sheet are bent to the middle. Then fold the edges to the center on the other side. Such manipulations must be done with all layers of the workpiece. To express the veins of the leaf, all the folds are well smoothened. The workpiece is turned over. By winding the edge of the sheet on the tip of the pencil it will be possible to give this element a curved shape. See the sheet manufacturing scheme.
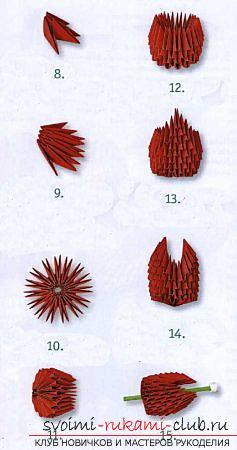
  We managed with a simple stage. Now we proceed to the more responsible task of assembling a bud of a tulip. Its assembly is carried out according to this scheme.
  First, three elements are connected. The module on the left side will become the basis for the first row, and on the right side for the second. It is necessary to make so that in the second and third row there are 4 basic modules. Only then you can start assembling the third row. To form bud height, we perform three rows of 15 pieces, each row is closed in a ring. Now in the work skills of accuracy will be necessary - it is necessary to turn out the rings. As a result, the short side of the modules will be turned outward. Another take 30 modules for making two identical rows. Let's start making petals. Between the lobes let's free space in two corners of the modules. We start to collect a petal from 4 blanks, we reduce their quantity to one. So it turns out in one flower three petals. Modular origami tulip flower can be made from modules of different colors. At the end of the assembly, the bud is connected to the stem, to which the leaves are already attached. The photo shows what an amazing composition comes out.
  It remains to send the tulips to the vase and enjoy their beauty.


