
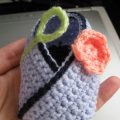
Knitting pinets. Master Class!
Master class on crochet knitting from kriksite (Riga).  baby booties at the age of 0 -3 months [3 - 6 months]. Hook No. 3.5, these are the strings:
  We knit the soles Begin with the heel, type 7 [8] 1 row (wrong side): st.b / n in the second loop from the hook and in each following loop: 6 [7] st.b / n 2 - 14 [16] are obtained: 1 st (for lifting), rotate, st.b / n in each column of the previous row: 6 [7] 15 [17] series: 1 st, turn, 2 st.b / n together, 2 [3] st.b / n, 2 st.b / n together: 4 [5] 16 [18] series: 1 st, turn, 2 st.b / n together, 0 [1] st.b / n, 2 st.b / n together : 2 [3]
  Do not cut off the thread and continue knitting, 1 stp., do not turn the work along the first edge, knit 19 [20] st.b / n, then 6 [7] st.b / n heels, 19 [20] st.b / n along the second edge and 2 [3] st. b / n socks, connect with the first st .: 46 [50] That's what turns out, this is our sole:
  The thread is fixed and cut. The top part (sock) and the sides of the pins. We type 7 [8] 1 row: st.b / n in the second loop from the hook and in each following loop: 6 [7] 2 row: 1 stp, turn, 2 st.b / n in the first column of the previous row, 4 [5] st.b / n, 2 st.b / n in the last column: 8 [9] 3 - 9 [10] series: 1 st, turn, st.b / n in each column of the previous row: 8 [9] ] The thread is not terminated, 11 [12], etc., mark the last loop (for the cuff), tie another 11 bp, turn and connect with 9 [10] next: 22 [23]
  Then we knit in circular rows. 1 circular line (front side): 1 st, 9 [10] st.b / n along the first edge of the sock, then 6 [7] st.b / n, 9 [10] st.b / n along the second the edge of the toe, 22 [23] st.b / n (in each vp around), the connecting column in the first column of the circular row (this row begins to bend down): 46 [50]
  2-4 row: 1 st, st.b / n in the same first column into which st.b / n was just joined in each column along the circle, connecting column to the first column of the circular row: 46 [50]
  5 series (connecting circle): 1 stp, take the sole and the second part and connect both these parts together st.b / n, connect, fix the thread and cut.

 Cuff
Cuff  1 row: attach the thread in the marked place, art.b / n in the next 10 [11] bars; st.b / n in each column of the free edge of the nose; st.b / n in each column to the end of the circle; connect to the first column of the row: 30 [32] 2 rows (with holes for the ribbon-string): 4 bp. (it is considered as the first st.s / n plus 1 bp), let's skip one st.b / n, * st.s./n in the next item, bp, skip the next step; repeat from * to the end of the row, connect it to grated vp. initial 4 air loops
  3 rd: 1 st, st.b / n in the same place where they connected, (3 bp, st.b / n in the next st.s / n of the previous row) in a circle, 1 stp, connect. 4 series: 1 st, st.b / n in the hole of the first three vp, (3 stp, st.b / n in the next hole from the 3vp) in a circle, 1 vp, connect
  5 row: also as 4 row.
  A source
Comments
Related posts:
 Master-class on crocheting with photo and description will teach knitting of children's pinets
 Knitted booties are slippers. Master Class!
 Master-class: knitting crochet crochet description, scheme for the 2015 contest, knitting crochet skirt
 Knitting with knitting needles for children. Description and photos of the pinets on the sole with funny ears
 Video lesson for knitting pinets - a master class with a description