Facial long (extended) loops - two ways
In the traditional version is consideredlong loops or else they are called elongated loops in one embodiment. In this case, either loops are considered, which, when knitting, remain on the wrong side or on the front side. In this case, alternate the rows of rows: a row of long loops, a row. Especially for you, I prepared two options for how to knit elongated crochet loops and each option can be knit in two ways - it turns out four ways! After studying the lesson, you will be able to perform the “elongated loops” pattern, which will look much more effective, the loops will be more frequent and, therefore, more natural. Where are used elongated loops! Scourers can be the simplest example! Yes, yes those, washcloths! Hats, mittens, scarves, toys, anything can be done either using long loops as the main pattern, or to decorate the edge like a fringe! Hats, made with a pattern of "elongated loops" resemble fur. So, now we will consider how facial loops are tied up! Any long loops of the face they or purl, if this is the first row, performed in the pattern, begin to knit over the row performing the role of the base. Finish also fixing near. In my version, the base is a series of single crochets. lifting  For long loops you can useimprovised tools: a spatula, a ruler, an even stick (like mine) or a finger. It is the thickness of the tool used depends on the length of the loop forming ruffles. If you decide for yourself to use short loops, a finger will do, but if they are long, then you need to find something suitable. How to knit elongated loops using a wand, a ruler, a spatula 1. Wrap the thread around the wand (I have the direction - towards you, it may be convenient to wrap in the other direction), bring the hook to the first loop of the row by pressing the thread, i.e. working thread we get for hook
  2. We put on the hook, tighten the loop on the stick so that the stick moves freely in the loop and after that we grab the working thread
  3. We pull the working thread on the front side (to itself)
  4. Once again, grab the working thread and pull it through two loops on the hook
  5. So on the wand you can impose a few loops, and then remove. As a result, we will get such elongated loops
  How to knit long loops using the finger of the left hand 1. Move the working thread with the thumb of the left hand (for the left-handed right)
  2. We put the hook on the next loop of the row, while the working thread is under the hook, look closely at the photo
  3. Grab and pull the working thread on the front side
  4. It turns out such a loop. The stick and the finger I chose are the same in thickness and therefore the loops are the same.
  Try which option suits you best! After tying up a whole range of such a strip
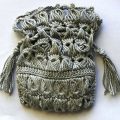
  If you knit in a circle (as in the photo above), thenThere are no problems with the implementation of the following series. In each row, you simply lift with the help of an airy lifting loop, if necessary, fix the previous row with single crochets and continue to knit using facial elongated loops. But what to do when knit with the rotation of the canvas! We will consider this in the next lesson: See you in the new lessons! Be always up to date! Be the first to know about new products! Subscribe: