
Shebbi-chic postcard for the new year - design of scrapbooking postcards and master-class
Works in needlework very often come to us onhelp in a variety of situations, even when we need to prepare a beautiful gift in honor of the New Year. This applies to postcards, which have not lost their relevance. New and modern ideas for the creation of handicraft products offer us full opportunities for developing and improving the possession of scrapbooking, as well as the opportunity to get acquainted with new styles of decoration. Our idea will differ from all other postcards by its new style, with the help of which it is made.
Shebbi-chic postcard for the new year - design of scrapbooking postcards and master-class
 Shebbie chic is a style of scrapbooking thatincludes the elements of "aging" and scuffs, but slightly different from the vintage of its special style of decoration. This version of the postcard, made in this style will be an excellent specimen for the gift, or for the competitive work. In addition, you can get acquainted with the main directions of the shekbike chic. The decorating style of the postcard will convey the whole connection, as if the postcard passed through many years, but still retained its impeccable and unique style. Registration of New Year's Sheba-cards and materials As always, to design such a postcard we will need special material, with which we will design the product. I'll have to go through the boutiques to buy all the necessary design elements, as well as prepare the material for work. In addition, for the design of the exquisite handmade crafts of the New Year's greeting card, she needs a step-by-step lesson that will tell about all the subtleties of "aging" and improving the external design qualities of the postcard with your own hands.
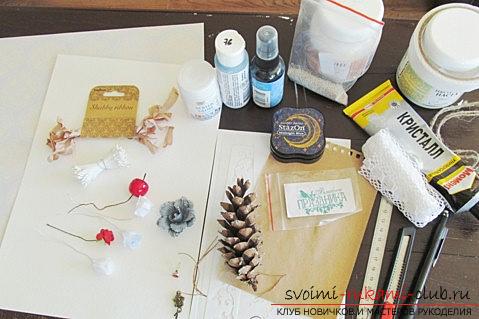
- A sheet of watercolor paper will be required.
- Also it is necessary to take a sheet of scrap paper
- It will take kraft paper
- Prepare a primer of acrylic
- You will need a modeling paste
- Also, it is necessary to prepare a stencil with curls
- Requires white acrylic paint
- Spray with paint also does not hurt
- It will take a white lace
- It will take a ribbon in the style of "Shebbie"
- Also prepare paper flowers
- You will need a shisha, it can be found in the forest
- Artificial berries, fruits
- Stamen
- Decoration in the form of brads with a crystal
- metal pendant
- Glue in the gun and moment-glue
- Stamps and Stamps
- Beads in micro version
Procurement basis 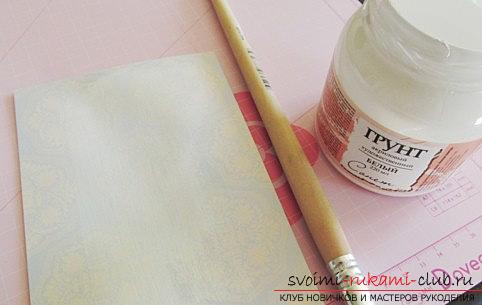 For those who could not find all the materials forcrafts, it is recommended to use the services of imagination. Surely you can make flowers yourself using paper or cloth. Also, spray paint spray can be replaced with diluted acrylic paint or watercolors in the right color. The inscription can also be made without dies. But, the more there is, the better the effect. To begin with, you need to prepare a piece of paper from the watercolor, which we cut out with a knife for layouts, as well as a ruler. It is necessary to form a rectangular shape 26 by 18 centimeters. In this case, this will be the basis for the work. Next, we make the creasing in the middle of the product and add up our future postcard. The base 13 is 18 centimeters. Further, using kraft paper, we cut out the sheet 12 by 17 centimeters in the form of a substrate for the product. Using scrapbooking paper, we cut out the sheet in a smaller size - 11 by 16 centimeters. All this is applied for the basis, in order of excision. We measure the sizes, we make equal angles and sides. Preparing the background Next, we form the color for the postcard. We will take the tones of blue, white, brown with accent on red tones. Also, you can use other options for decorating flowers for the new year. We use blue paper from scrap to cover it with a primer in the right places, where you need paste for modeling. Primer is needed for those actions, so that the paper is not spoiled by glue, or paint, spray. Further, it is necessary to fix the stencil with an adhesive base, and then, using a spatula, we make a paste of the paste for modeling. We remove the shape of the stencil, wash it in water (hot). Further, after the curls from the paste dry, take the acrylic paint and make them tint.
 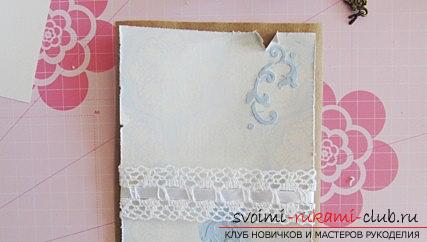 After the paint has dried, usinga knife in the sharp side, rub the edges of the scrap paper, as well as curls. Thus, the aging goes out the way we want. Next, cut a piece of lace, using a length of 15 centimeters. After that, we fold along the edges of the paper, and also fix it with the help of glue-moment. In the next stage we need a sewing machine. You need to sew paper for scrap to paper for crafting. After, with the help of a spray, we make a nasal pincher, dots, and also using white paint - we form splashes. This will require a toothbrush. After, we wait until our product dries.
  Decoration "Chebby" We form the decor. We take a bump and using ribbons for a chebby, we form a bow for it. For the flowers we make the twisting of the stems, winding them on a stick. Then, we need to attach our installation to the postcard and remember the location option that will suit us. We will make a photo, so as not to forget. After putting off decorating in order to beautiful background option to fix on the base paper.
 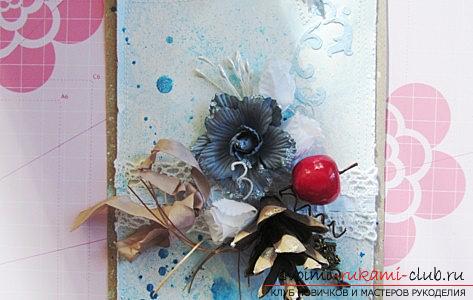 Use the glue of the moment. Next, we form the decor. To do this, you need a gun with glue. Also, add a small rough rope to the product. We form a variant of the dies, and then decorate with the help of brads. Create the effect of "torn edges." The installation is attached to the postcard. After, with the help of a microbiaser, we form the composition of the design. Fix glue, Remove unnecessary. So, prepared a postcard!
Comments
Related posts:
 Decoration of a gift card for a girl - a scrapbooking technique with her own hands
 Double Christmas tree card for the new year - postcard and master class with photo
 Making an owl quilling for a postcard on a teacher's day - a master class
 Scrapbooking a New Year's card-envelope with your own hands - a step-by-step master class
 Modern New Year's decoration of a card with own hands - scrapbooking and technology