Double Christmas tree card for the new year - postcard and master class with photo
New Year's holidays always creep veryclose and sometimes it seems that it is very difficult to notice them. After all, when after a summer period there is a very depressing season of autumn, the only thing we need is in magic. But, as a rule, magic should be created independently. Making your own postcard is a worthy occupation during the new year. It is possible to please close people, and also to add to the holiday atmosphere even more unique magic of gifts and fascinating hand-made articles.
Double Christmas tree card for the new year - postcard and master class with photo
 There are many ways to formown gift with their own hands. In particular, we are talking about postcards. This is a small magic that one person can give to another. Undoubtedly, anyone will be pleased to receive a postcard made by themselves. In addition, this is a great way to improve your skills in scrapbooking and applications in general. Most of the elements of the postcard allow you to think through its logic and accordingly - depending on the flight of your imagination, the appearance of our postcard can change. Parents have taught us since childhood that the best gift is a gift you made yourself. And although many will be burdened by buying expensive things for their relatives, it is possible to think over the gift option, which does not have to be used as an object for everyday life, an important thing or a desired object. For example, a postcard. It has a very modest function of decorative decoration. But, if you look deeper, you can notice that everything is much more complicated. The decoration of the postcard conceals a whole set of details, which are worth paying attention to. The main thing that you should spend your time on is designing a beautiful and unique postcard. It is necessary to choose a new and modern idea in order to surprise your loved one. Materials and work
  We have such an idea in stock! It is very simple to make it, just buy the necessary material, put yourself in the workplace, make coffee and start our work!
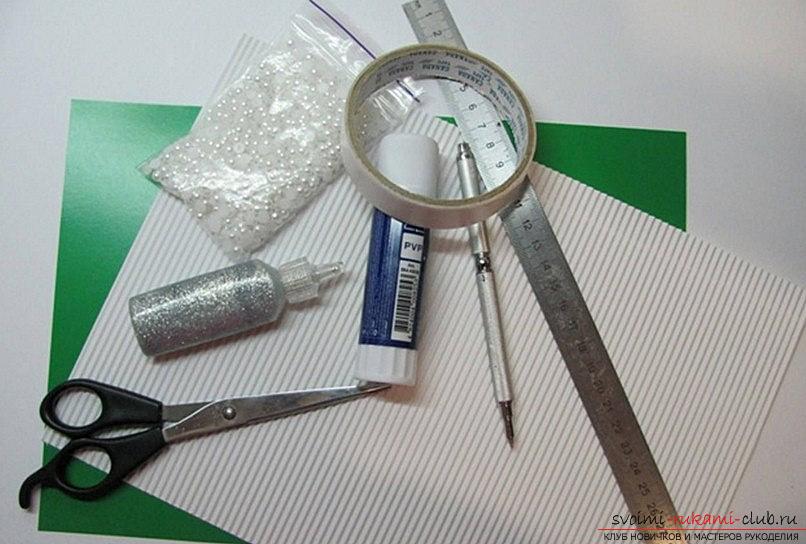
- We will need white corrugated cardboard material
- Also, take a green cardboard with a two-sided color
- Moreover, we need an element of a pencil-glue
- Take also Scotch tape (bilateral)
- You will need a ruler for measurements
- Take the Pearl
- Also, prepare scissors for work, take a tool for creasing.
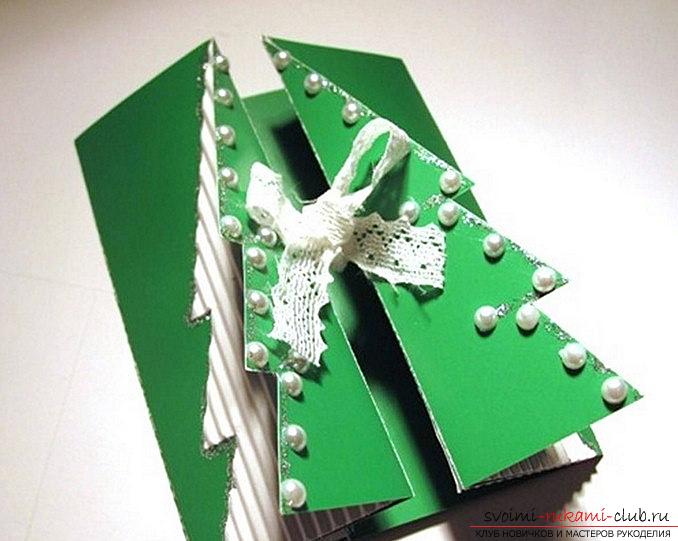
Let's start our work. First of all, you need to take a piece of cardboard and lay it with a wide side towards you. Then, starting from the bottom corners in the leaf, we arrange the opposite sides for the tree in sizes of 5 centimeters (base) and 10 centimeters (in width of the base) - 5 centimeters and 4.5 centimeters. Also, we conduct special perpendiculars, which will equal the length by 13 centimeters (this position of height for the future postcard) for each of the points. On the side, we trace the tiers, where our Christmas tree will be formed. Geometric forms of herringbone After, we use the basic lines torecreate the measurements we need. To do this, take a pen that does not write, or a tool for creasing. Then, the workpiece must be cut out. After, we bend it in the right lines of the base. Using white corrugated cardboard, we prepare 4 elements for the Christmas tree at the base for 4 and a half centimeters. Also, we form a small strip in the width of 2 centimeters and a length of 13 centimeters. Also, make a small heart - the decorative object of our leaflets. After, it is necessary to take lace material in order to attach it to our New Year's postcard. This element will serve as a decorative addition to the scrapbooking technique, will be able to distinguish and separate the appearance of the postcard. We take our white part of the Christmas tree and attach it to the upper part, we also need to symmetrically fix the decorative elements of the analogs on the postcard. Then, it is necessary to glue the remains of the corrugated Christmas tree for the outer finish of our work. The appearance of the Christmas tree Children can also participate in creating the appearance of picture postcards. Any action for this postcard is easy to learn and try even the smallest, but under the careful guidance of the parents. Perhaps this will be their first step in needlework! In addition, this set of step-by-step instructions provides the opportunity to "get to know" all the traditional scrapbooking methods. Well, in the end, any child can independently create real miracles. After all, the postcard is also a small miracle, right? Further - we make out a postcard at own will. We took and zadekorirovali each edge with the help of balsams. Also, we added an element of halves of pearls. Also. it is highly recommended to prepare a beautiful inscription for the postcard. It can be done with paper of a different color, also use special contours that allow you to highlight and improve the external properties of letters. Also, the letters can be processed with the help of glitters, or add glitches to their outer part. Also, you can make a small border in the form of a stroke.
Comments
Related posts:
 Step-by-step master class on creating a decoupage for candles for the New Year.
 Master class with photo and description will teach how to make a decoupage of bottles of champagne for the New Year
 Postcard for the new year, made by own hands. Photo postcards and suitable ideas.
 Gift card for Christmas exchange with own hands - master class
A master class of New Year's crafts made by themselves - a Christmas tree crocheted.
Gift card for Christmas exchange with own hands - master class
A master class of New Year's crafts made by themselves - a Christmas tree crocheted.