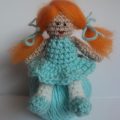
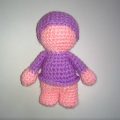
A detailed master class with a description and a photo will teach you how to crochet a doll in a dress.
Dolls crocheted are diverse, and noneof them is not repeated. So, each doll as a person is individual and interesting in its own way. After all, for each of them, they invent their own image and costume. This master class shows how to tie a doll to a crochet.  For a doll we need:
- yarn (three colors);
- hook;
- sintepon;
- half-beads;
- glue;
- needle;
- wool;
- a needle for stitching.
We knit the head and body of the doll together. We will start with beige yarn. This color we will have the skin of the pupa. You can take white yarn as a skin color. First we make an amigurumi-ring. And we perform six columns without a crochet. And further we will have increases. We knit six rows and perform six additions in each. A total of forty-two loops. Four ryadochka knit further without changes. In the following rows we will perform six decrements and get only twelve columns. And again, we will reduce, but there are only two. Tie two ryadochka. This is for the cervix.  Now we need to take the threads of the color of the future dresspupae. In this case it is purple. We perform two increases from different sides. Next, perform six increases and knit ryadochek. Again, perform six increases and tie two ryadochka. Again, perform six increases. And in the other row there are only two additions. Outcome: thirty-two loops. We knit the row behind the back of the loop.
 And we perform nine rows without changes. After that, we stuff the body. In the neck, you can insert a wire so that the head is well held and not hanging, or just very tightly stuffed it. We fold both sides of the calf and simply sew the stitches together.
  We return to that row, which we tied at the back of the loop. We fasten the thread and knit for the front part in a circle two ryadochka.
  We perform eight increases. We knit a dress of the length you want. You can make it long or short. Here you can not even count ryadochki, and knit by eye. Below we make a binding of white yarn. We perform five air and one column without a crochet in the second loop, skipping the first one.
 Now we will make legs and handles. We start the legs with lilac yarn. First in the amigurumi-ringlet we perform six columns. And in the second row we perform six increases. And we knit five rows. We attach beige thread, and lilac torn. We knit eight rows.
  Beige thread make amigurumi-ring. And we will execute further six columns in it. In the second row, we perform two additions. In the third we tie a finger, consisting of five unburied stitches with a crochet. We just make a crochet, insert a hook into a loop and pull a working thread through it. Repeat four times at the same point. And only then we bind everything together at one time. We knit the row till the end. We perform one decrease in the next row above the finger. We knit nine rows. We carry out in the tenth three adjustments.
  We sew the legs with a needle to the place where we sewed the underbelly of the pupa.
  Handles we sew to the place where they are supposed to be. And we'll tie the white collar for the dress. For this we will perform eighteen air loops. We skip two and in the third we execute a column with a crochet. And further to the end we will carry out two such posts in each loop. Let's unfold and execute three air, we will make a picot and we will execute a column without a crochet, having passed one loop. And we will repeat to the end.
  Now take the wool, which is designed forfelting, and make her hair a doll. We poke a needle for felting in the middle, to attach the hair and make a parting. Glue attach eyes-half-beads. Here such doll is received after connection of all details!


