We knit crochet toys amigurumi with our own hands with detailed descriptions and photos.
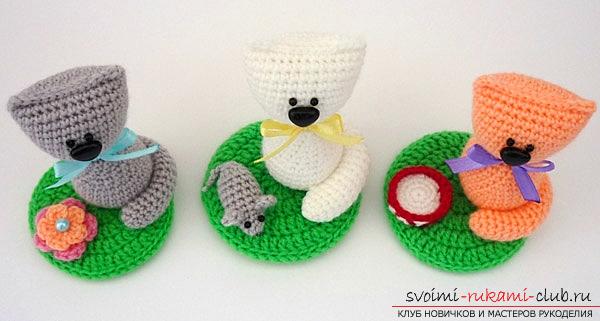
Make a wonderful present for your kidsvery simply - try to tie them crochet charming seals with your own hands. After you try to link any of them, you'll want to make them as much as possible! In this master class we will knit three amigurumi toys, each of which can boast of its own highlight! Rather, throw home a bustle and grab for knitting such cute toys! 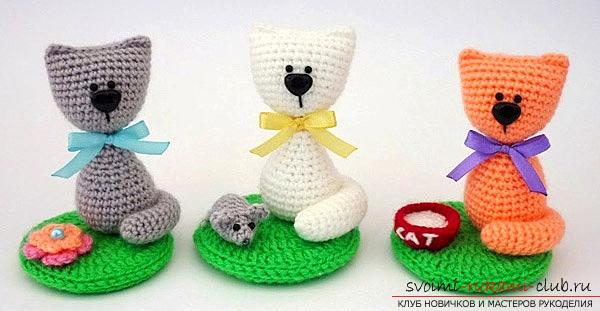 You do not need too much, just enough to buy:
- yarn "Pekhorku" (density 200m / 50g, 100% acrylic) of gray, orange, red, white, green and pink colors;
- eye-beads - eight pieces;
- hook number 2;
- filler;
- thin satin ribbon of blue, lilac and yellow flowers;
- a spout - three pieces;
- thick cardboard;
- thread;
- bead-bead;
- Needle;
- scissors.
Every detail will begin with amigurumi rings. We knit a gray cat. Head. It knits from the bottom up. 1st row: knit with amigurumi rings = 6 loops; 2nd row: one column without a crochet (sb), one addition = 12 loops; 3 rd row: one sbn and one addition are repeated six times = 18 loops; 4 rd row: 2 sb and one addition are repeated 6 times = 24 loops; 5-rd row: six times we repeat this combination - 3 sb and one addition = 30 sts; 6-13 rows: 30 sb = 30 loops; After that, the thread is cut off. 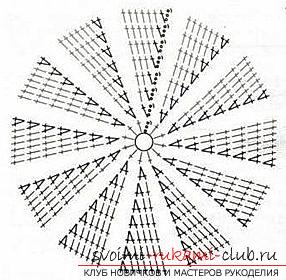 Muzzle. Sew your nose and eyes-beads. The head is stuffed with filler, the hole is doubled, the halves are connected by three rolls. After this, a series of connecting posts is fastened and again we knit three sb. As a result, you will have small ears. Again cut the thread, fix it and hide it. Torso. It is knitted in the same way as the head. 1st row: knit a ring of amigurumi = six loops; 2 rd row: one sb and one increase = 12 sts; 3 rd row: one sbn and one addition is repeated six times = 18 loops; 4-rd row: 2 sb and one addition are repeated six times = 24 loops;
  5th row: repeat six times 3 sb and one addition = 30 loops; 6-10 rows: 30 sb = 30 loops; 11th row: one column and one addition are repeated ten times; 12th row: 20 sbn = 20 loops; 13th row: four knit 3 sb and one decrease = loops; 14th row: 16 sbn = 16 loops; 15th row: four times are repeated two sb and one decrease = 12 loops; 16-18 rows: 12 sbn = 12 loops. The trunk is filled with filler. The thread is fixed, the tail is left for stitching. Knitting the tail. His knit follows from the tip towards the base. 1st row: start with the amigurumi ring from 5 sbn = 5 loops; 2-nd row: five times we knit one sb and one increase = 10 loops; 3 rd row: twice repeat 4 sb and 1 increase = 12 sts; 4-10 rows: 12 sbn = 12 loops;
 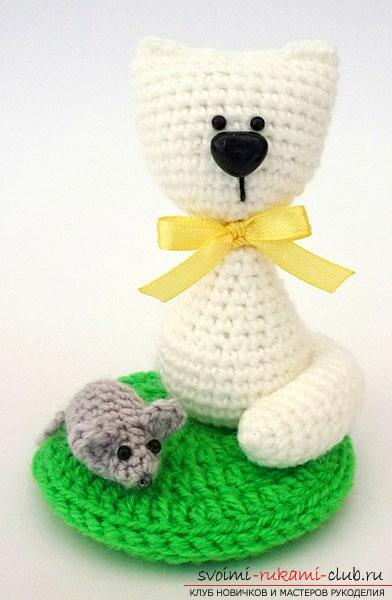 11th row: twice repeat 4 sb and 1 decrease = 10 loops; 12-17th row: 10 sbn = 10 loops; 18th row: twice repeat 3 sb and 1 decrease = 8 loops; 19th row: 8 sbn = 8 loops; 20-rd row: twice repeat 2 sb and one decrease = 6 loops. Do not over-tighten the created tail with filler and pull off the hole. Fasten the thread and leave the tail for sewing. We collect the cat. The assembly is made from the previously made details. The head is sewn to the trunk, the muzzle is formed. On the reverse side, a tail is sewn to the body, which forms around the torso. Take a satin ribbon, form a bow and tie his cat. Similarly, white and orange cats are knit. It is knitted with two circles of amigurumi from four rows of sb. The thread is fixed and cut off at the first circle. Then a cardboard circle is inserted between them and two pieces are joined together with a row of half-columns. At the same time, it is necessary to grasp only the inner walls of the loops of each mug. Thread, as always, is fixed, cut off and hides. Similarly, two additional glades are knitted. Misochka with milk. Knitting begins directly with the bowl itself. 1st row: a ring of amigurumi is sewn = 6 loops; 2 rd row: one sb, one addition = 12 loops;
  3rd row: one sbn and one addition are repeated six times = 18 loops; 4th row: two sbns and one addition are repeated six times = 24 loops; 5th row: behind the back wall 24 sb = 24 hinges; 6-7th row: 24 sb = 24 loops. After that, the thread is fixed and hides. The inscription "CAT" is embroidered. Let's go to knitting milk. 1st row: a ring of amigurumi is sewn = 6 loops; 2 rd row: one sbn and one addition = 12 sts;
 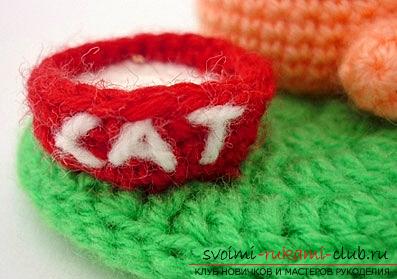 3rd row: six times one SNA is repeated and one addition = 18 loops. The thread is fixed and the tip for sewing is left. Now you can sew the milk in the bowl. Let's start knitting mice. 1st row: a ring of amigurumi is sewn from five sbn = 5 loops; 2 rd row: one addition, one sb, one addition, two sbn = 7 sts;
 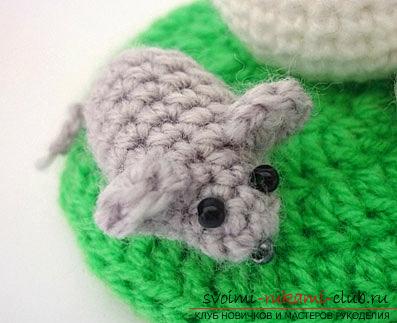 3rd row: one addition, two sbn, one addition, two sbn, one addition, one sbn = 10 sts; 4-7th row: ten sbn = 10 loops; 8th row: five times we repeat one decrease = 5 loops. With the help of a filler, a mouse is stuffed, the hole is pulled together, the tail is knit from the seven in. The thread is fixed and hides. For the design of the ears we sew in the necessary place in 1 loop: one connecting column; one sb, one semicolored with a cloak, one sbn, one connecting post. The thread is fixed and hides. When you knit a mouse, sew her nose and eyes. The turn came the flower.
 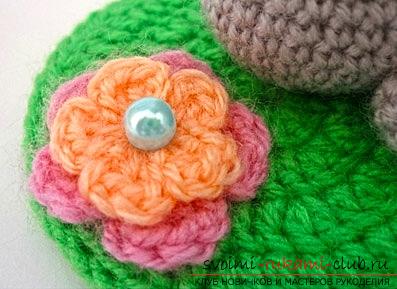 It is made up of two layers: upper and lower. The first of them will contain petals and it will fit from the columns with a cloak. The second one is a column with two cloaks. A bead is fastened to the room. Now proceed to collect the composition. One of the glades is sewn or gluedwith the help of hot glue a cat and a bowl with milk; to another glade - a cat and a mouse; to the third - a cat and a flower. That's all! You have crocheted three amigurumi toys. Perhaps you want to diversify them or expand them - everything is in your hands!
Comments
Related posts:
 How to tie a horse amigurumi crochet with his hands with a step-by-step description and photo.
 Cat crochet in the technique of amigurumi with his hands - a detailed master-class with a detailed description and photo.
 A lesson on knitting teddy bears with their own hands with a step-by-step description and photo.
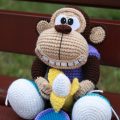 Master class on knitting monkey amigurumi crochet with their own hands with step-by-step description and photo.
 Master class on knitting monkeys with amigurum crochet for beginners with step-by-step description and photo.