Knitting of different kinds of loops: facial, purl, edge, double and triple, with and without crochet, provided with detailed description and photo
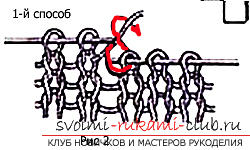
Learning to knit different kinds of loops with knitting needlesthe way to start studying all possible methods of knitting knitting needles, you should agree on the accepted cuts. So, the working spoke in the right hand will be denoted by PC, and the auxiliary spoke, which we hold in the left hand, is denoted BC. This condition is relevant for the right-hander, but for the left-hander everything will be the other way around. To all variants of loops, two illustrations are offered: for the left-hander (right) and for the right-hand man (left). We begin studying the loops. Face tab (illustration 1-4). The first variant (illustrations 1 and 2). Thread behind the working cloth. RS is inserted in front of the loop on the aircraft away from the aircraft to the PC. Next, grab the working thread and pull through the loop on the sun a new loop, the front. We remove the associated loop from the sun. As a rule, in the process of knitting patterns use the first version of the face loop. If necessary, the instructions in the instructions are marked accordingly. 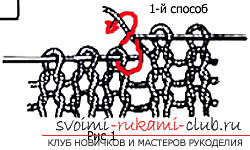
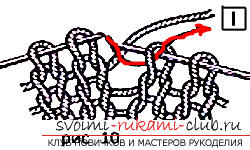
 The second option (Figures 3 and 4). Thread is at work. RS is introduced into the back of the loop on the aircraft. Then grab the working thread and pull a new loop through the eyelet to the sun, then remove the associated loop from the sun.
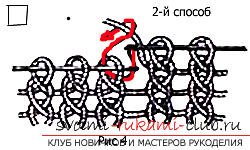
 The original loop (illustration 4-7). The first option (illustrations 4 and 5). The thread is in front of the knitting. The RS is introduced to the side of the aircraft from the DC behind the working thread under the front of the loop on the aircraft. Then grab the working thread and pull a new loop through the eyelet on the sun.
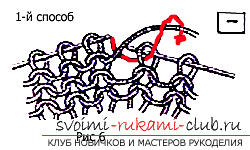
 The second option (Figures 5 and 7). The thread is in front of the working cloth. RS is inserted behind the working thread behind the back of the loop on the aircraft in the direction from the aircraft to the PC. Then we grab the working thread and pull a new loop through the eyelet on the sun, which is the back one.
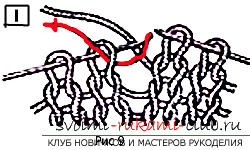
 Remove facial, the thread is at work (illustration 9 and 10). RS is introduced into the loop on the BC, as during the knitting of the front loop by the second variant, and is removed, without tying, on the PC.
 Remove front, thread before knitting(Figures 11 and 12). We introduce the RS for the work string into the loop on the BC, as during the knitting of the front loop by the second variant. Then remove it, without tying, on the PC.
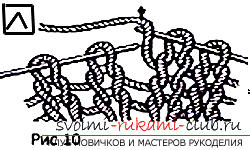
 Cape for a tight or openwork type of binding(Figures 10 and 11). Nakid is a loop from a working thread on the PC. When the face loop follows the crochet, then the thread is thrown on the PC (see illustrations 10 and 11). If the backstrap follows the backing loop, then we thread the thread ahead (see illustrations 20 and 21). The face loop from the broach (Figures 12 and 13). The thread is behind the canvas. We enter the PC under the broach through the eyelets. Then grab the working thread and pull out a new loop.
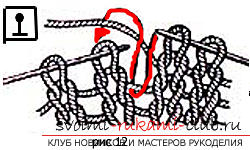
 Make the wrong loop from the broach(Figures 14 and 15). The thread is placed before work. Introduces the PC under the bottom of the broach. Next, between the loops pick up the work thread and pull out a new loop.
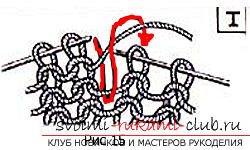
 Edge tab (illustration 16 and 17). In order to obtain a smooth and tidy edge of knitting, you need to knit the end of the loop at the end of all rows with a backing loop. The first initial loop of each row is left unbrushed, but we remove the PC with a twisting of the eyelet in such a way that "braids" from the loops form on the edges of the knitting.
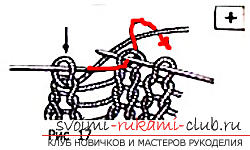
 The face loop, removed with a cape (illustration18 and 19). The thread is behind the knitting. We perform a cape on the PC and insert it into the loop on the sun, similarly with loosening the face loop with the second option. After that, remove the loop on the PC without tying.
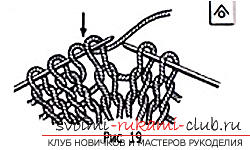
 Wrong loop, removed with a cloak(Figures 20 and 21). The string is placed before knitting. Again, we make the cape on the PC and insert the loop in the sun as well, as in the process of knitting the back loop the first option. Remove the loop on the PC without tying.
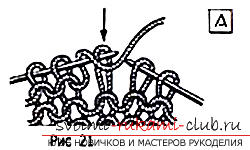
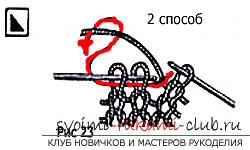
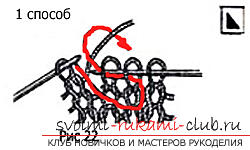
 2 facial loops simultaneously connected on the left(Figures 21 and 22). The string is located behind the working cloth. PC is introduced simultaneously in 2 adjacent loops on the BC, similarly with the knitting of the facial loops in the second variant, after which both eyelets are tied with a face loop. Bound loops are removed from the sun.
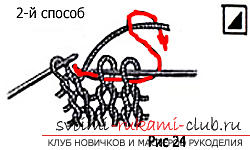
 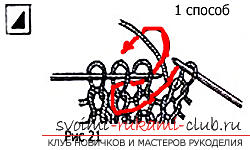 Two face loops together, connected on the right(Figures 23 and 24). Thread is at work. RS is introduced simultaneously into two adjacent loops running on sun as well as in the knitting process the loop face the second embodiment, whereupon the two tabs provyazyvayutsya front eyelet. The loops we tied are removed from the sun. 2 loops together purl (first option). The string is placed before knitting. RS is introduced simultaneously into 2 loops on the sun, similarly with the knitting of the inferior loops first option. Next, both eyelets are tied together with a back loop, and removed from the sun. 2 loops at the same time in the wrong direction (second option). The thread is in front of the working cloth. MS introduce simultaneously two loops on the aircraft as well as in the knitting process the loop backstitches second embodiment, whereupon the two tabs together provyazyvayutsya purl loop. In the end, we remove the associated loops from the sun.
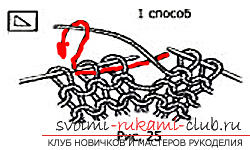
 Three eyelets simultaneously facial. Thread for knitting. The PC is inserted simultaneously into three adjacent loops on the sun, similarly with the knitting of the front eyelet with the second variant, and then we sew all the eyelets together with a face loop. After that, we remove the knitted loops from the sun.
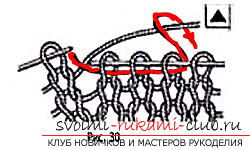
 Three tabs together purl. The string is placed before knitting. We introduce the PC simultaneously in 3 consecutive loops on the BC, as during the knitting of the back loop the first option and we sew them together with the wrong loop. In the end, we remove the eyelets from the sun.
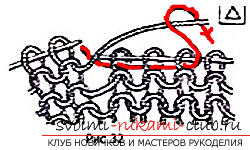
 A few cloaks in a row for an openwork type of knitting. When immediately behind the napkin follows the face loop, thread the PC back and forth a certain number of times. When behind the cap is the back loop, we thread the thread backwards on the PC a specified number of times.
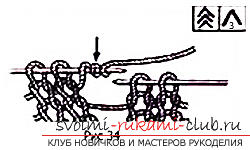
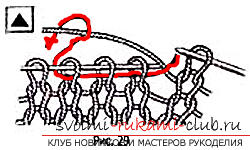
 Cape, two facial loops, a cape worn onknitted loops. The thread is behind the knitting. We make a cloak on the PC and alternately we sew the two face loops with the first option. Sun pick up the cap on the front and throw it through two knitted loops. As a result, the loops will be stretched out through the cloak, spaciously hanging over the knitted loops.
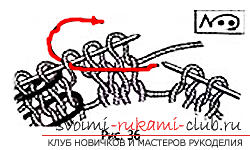
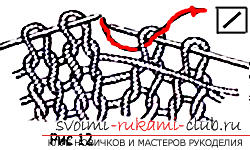
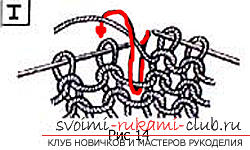
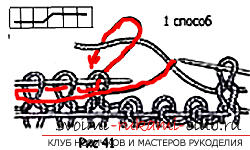
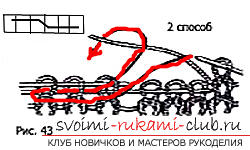
 Groups of loops are swapped in places by facial. The string is located behind the working cloth. The first group of loops (their number in groups is denoted in diagrams) is taken off on one more spoke - an additional (DS) and left before knitting (in another case - for knitting). Alternately, we sew the front first version of the loop of the 2nd group on the aircraft. We remove from the sun knitted loops, and then alternately we sew the front first version of the loop with DS and then remove them from there.
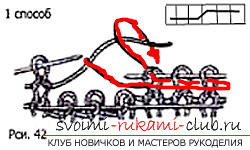
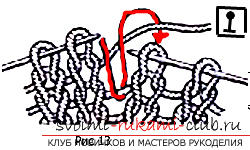
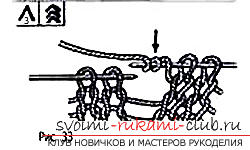
 Two front, the second loop on the first. We have a thread for knitting. The first option is tying two facial loops. We introduce the BC into the second loop on the PC and with its help pull through the second loop the remainder on the PC first. After that we remove the 2nd loop from the sun. The thread is in front of the canvas. We knit two purl loops first. We introduce the BC into the second loop on the PC and with its help pull through the second loop the remainder on the PC first. We remove from the sun the second loop.
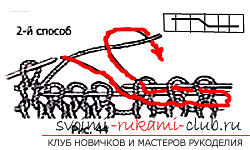
 From three loops we untype three facial. The thread is behind the knitting. We introduce the PC simultaneously into three loops and we sew the front one with the first one. We do not remove the knitted loops from the knitting needles and make a cloak in the direction from the rear forward and knit the second face loop in the same way and from the same 3 loops. Remove the knitted eyelets from the left knitting needle (for the left-hander - with the right knuckle). If you want to connect 5, 7, etc. from three loops, then after the loosened loop again we make a cap and once again we sew the front loop. Remove from the spoke knitted loops. As a rule, in diagrams, the upper number indicates from which number the loops will have to be knit, and the lower number - how many of the loops will be obtained.
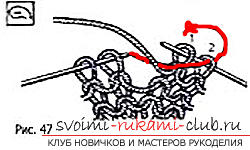
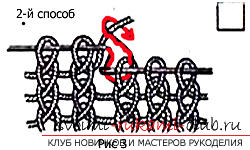
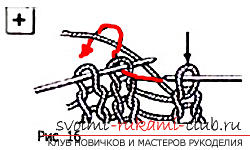
 Wrong crossed. In the process of knitting crossed loops, the thread must be placed before knitting. The right needle is inserted "on itself" into the eyelet on the other spoke. Then grab the thread in the direction of the arrow and pull the loop on the wrong side of the knitting. We leave the new loop on the right knitting needle, and remove the loop of the previous row from the other knitting needle.
Comments
Related posts:
 A detailed lesson for beginners on the set of knitting needles for different types of loops for socks, socks, scarves and much more with detailed descriptions and photos for free.
 Knitting different types of collars with a rack and without a rack, tracery, chalet and others on the charts with detailed descriptions and photos, you can download them for free
 Knitting with a short pullover with V-neck with detailed description, diagrams and photo for free
 We learn to knit several kinds of "pearl" pattern with knitting needles to create original sweaters, sweaters with diagrams, detailed descriptions and photos for free.
 How to tie two-spoke slippers, seamless for beginners, with detailed descriptions, photos and diagrams for free