A detailed lesson for beginners on the set of knitting needles for different types of loops for socks, socks, scarves and much more with detailed descriptions and photos for free.
13 way to create beauty: we learn how to make a set of loops on knitting needles. We start the manufacture of a product with knitting needles using a standard procedure - a set of loops. There are many variants and ways of dialing the loops, which in their harmonious connection will help to create a beautiful thing for you with your own hands. It should be noted that each version of the loop set has its advantages. Each of them can provide this or that pattern to your product, as well as the appearance of the edge of the canvas. Having studied various variants of a set of loops, you can correctly and rationally design knitwear, while avoiding the performance of unnecessary tasks. So, let's begin our lesson. The first way. A classic variant of typing loops. It is the most popular kind of set of loops when knitting. Most often it is used at the very beginning of the mating process. Having chosen this method of knitting, the needlewoman can, after the creation of the 1st row, begin to make the cloth with the pattern she liked.  At this time, you need to put a thread from the glomerulus inthe left arm. The end of the thread that hangs, should have 2 times the length, rather than the necessary width of your future product. Next, you need to circle the arrow on the clock near the thumb of your left hand and leave it on your index finger. The ends of the thread should be clamped in the palm of the left handle (photo 1, B). Then the 2 knitting needles, which are put together, should be inserted into the eyelet, which is located on the thumb. In this case, it is necessary to pick up the thread located on the index finger and stretch it through the loop lying on the thumb (photo 1, B). Next, you need to reset the eyelet from this finger and help him and the cushion of the index finger to fasten the loop formed on the spoke (Figure 1, D). It is necessary to lower the knitting needles down, while holding the created loop with the help of the index finger of the right hand. Next, create a loop similar method (photo 1, D). To ensure that the chain does not wrap around the spoke, all subsequent new loops need to be held with the help of the index finger on the right hand. 2nd method. Corded. With this kind of knitting, the edge of your canvas will look decorative. This kind of set of loops is advisable to use for mohair items to strengthen the lower edge of the fabric. By choosing this method of knitting, you can after the creation of the first row begin to make a cloth with a pattern you like.
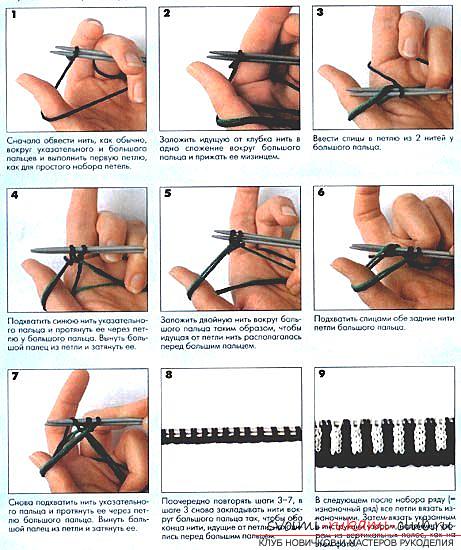
  The eyelets of the first row are made of the main thread, andchain of the lower edge - from a more voluminous thread. To create a more voluminous thread, it is necessary to fold the main edge from the skein 3 times (photo 3, A). The yarn should be positioned in such a way that the main thread is located at the tip of the index finger of the left handle, the volumetric one is at the tip of the same large hand, and loop A is located at a distance between these two fingers (Photo 3, B). We connect the 2 spokes together and pass them through the loop "A", drawing it under the main thread (photo 3, B). A loop A, created from the main thread, forms the first loop of our set on the spokes.
  Need to move the spokes down, whilegently holding the index finger of the right knob with the index finger. We further conduct the binding in a similar way (photo 3, D). 3rd method. This kind of set of loops will provide a good stretch for the edge of the fabric, so you can use it both in the first stage of knitting, and when expanding the fabric, when you add a large number of loops. By choosing this method of knitting, you can after the creation of the first row begin to make a cloth with a pattern you like. Most often, certain difficulties in using this type of set are caused by determining the length of the thread tip to create loops. In this way of dialing, the unoccupied edge will be needed only to create the 1st loop, made with the 1st spoke and the traditional method.
  Next, you need to take the spoke with the eyelet in the left hand,and in the other hand - a spoke that is free. The loop is created with the help of a facial mating, and then it is necessary to arrange it on the left spoke (photo 5, A). The loop that was stretched, we again put on the left needle (photo 5, B). As a result, there will be two loops on this spoke. The second loop is also created with the help of a facial mating method, and then it is left to the same spoke.
  That loop, which was stretched, again we put onthe spoke on the left. In the same way, we make a set of all the loops we need. 4th way. This type of creation of loops will provide a good shape, thanks to a small stretch. They can be used both at the initial stage of knitting, and with the extension of the canvas, when you add a large number of loops, and even when creating a buttonhole under the buttons. By choosing this method of knitting, you can after the creation of the first row begin to make a cloth with a pattern you like.
  In this kind of set also a free tip to usIt will only be necessary to create a first loop made with a 1st spoke and a traditional method. Then you need to take the unused spoke in the left hand, and in the other - the spoke, where the loop is made. We draw the thread of the main thread on the knitting needle on the left. Immediately, we take the grip with the right knitting needle behind the other, then we draw the thread into the loop located on the right knitting needle (photo 6, B). As a result, the spoke on the left will acquire the 1st loop. Again, we hold the thread of the main thread on the spoke to the left and loop it through the loop to the other. Then the number of loops that you need, you need to create on the spoke on the left, and on the right all the time there should be one loop, a relatively long one, through which it will be convenient to draw a thread. Completing the tying, we move this loop from the right to the left knitting needle. The fifth way. Option "Bulgarian". With this type of loop creation, the edge of your product will have a relief structure. This is achieved by means of a set of loops and the first 3 rows. We begin to apply the desired pattern only after the 3 rows are tied.
  It is necessary to type in a classical way that quantitythe telescope that you need. Leave the thread of the set, the length of which will be 2 times larger than the cloth itself. And then knit like this: First row: we sew two eyelets together with a double thread, grabbing the back threads; Second row: with the help of the main thread we create a facial mating; The third row: we make all the loops using the wrong knitting, and we create the broaches by working with the eyelets. 6th way. The so-called "edge with a fringe." This kind of kit is used during the mating of scarves, mittens, when decorating women's and children's things. By choosing this method of knitting, you can after the creation of the first row begin to make a cloth with a pattern you like. Threads are on the left hand, as it was in the standard set of loops. Having combined together 2 spokes, we sew the first loop (photo 1, B, B, D).
  After this, the 2 spokes are looped throughthumb, while capturing the thread from the index finger. Thus it is necessary to deduce threads through a loop on the big finger (a photo 8, B). Then it is necessary to release this finger, and with its help we tighten the knot under the spokes themselves. Then release the index finger of the left hand and put a thread on it. So you need to dial the required number of loops, while adjusting with the help of this index finger the desired length of fringes. The loops that you have connected will be 2-nd (photo 8, B). Creating the first row, you need to double-loop together, like one loop. 7th way. "Sealed edge". This kind of set of loops is suitable for finishing the product. It perfectly preserves the shape of the finished canvas and decorates the initial part of the "floral" pattern and "gum". Density provides the created loops and the 1st row. Patterns "elastic" or "platy" binding we use after we tie the first row of the edge.
  Threads should be positioned in such a way thatthe main thread was on the left index finger, the volumetric one was on the large finger of the left handle, and the eyelet "A" was located in the interval between this finger and the index finger (photo 3, B). 2 knitting needles, which are folded together, must be inserted in loop A, under the main thread (photo 3, B). The loop A and the central string on the spokes form the 1st loop of the set. To create the 3rd loop, you need to insert the needles under the triple string from the inside of the thumb (photo 9, B), and then remove the loop. We perform a set of loops alternately: then from the outer, then from the inside with respect to the left thumb. The result is a row of loops, which are arranged in pairs (except for edge loops). To get openwork mugs, you need to knit one row, applying the facial loops, but do not forget to create a crochet in front of all the pairs of loops, and pair the loops together by knitting together one facial, holding the back of the thread. The 8th way. "Thickened fringe". This kind of initial creation of loops is used when knitting scarves, mittens, for finishing products for women and children. By choosing this method of knitting, you can after the creation of the first row begin to make a cloth with a pattern you like.
  Threads are on the left hand, as it was inthe seventh way of tying loops. However, here after all pairs of loops it is necessary to make 2 capes from the tightened thread (photo 10, B). To create a fringe, we make one row: we bind all the eyelets with the facial ones, and the nacs need to be removed from the left knitting needle. Just they will form a fringe. The ninth way. With this version of the set, the edge will lie flat, without pulling together the knitted fabric. This type of set is used when creating open loops in a product. Externally, this method of typing will be similar to machine knitting. To type the eyebrows, you need to use a string of contrasting shade, which then you delete. To ensure the elasticity of the edge, the knitting must be done with a single knitting needle. The tips of the main and secondary filaments should be folded and tied in a bundle. The spoke should be inserted into the knot under the main thread. This type of set is used in the process of knitting scarves, mittens, for finishing products for women and the smallest. Choosing this version of knitting, you can after the creation of the first row to start making the canvas with a favorite pattern.
  Threads are on the left hand, the main thread -on the tip of the index finger, the side - on the tip of the thumb (photo 11, B). Set of loops is made using the traditional method. Loops on the spoke, will be connected from the main thread, and the bottom - from the side. When the required number of loops is dialed, the side thread can be cut off. If you after the set will immediately follow the pattern of "rubber band", then the first two rows should be created by the "2nd rubber band": the first row: a 1 loop is sewn on the front, then the next one is removed without tying. In this case, the thread must pass in front of the loop that is removed. 2nd row: loops, taken in the 1-st row, we perform facial viscous; tied loops need to be removed. However, the thread must pass in front of the removed eyelet. And already with the third row we use the pattern "elastic 1 * 1". The tenth way. "The edge of open loops". This option is used in those cases when in the future it will be necessary to conduct the binding in the opposite direction. Dials are made by means of two spokes identical in diameter.
  The location of the thread is similar to the 1st option. On the right, we sew the first loop. Then we hold the thread between the 2 spokes in the right hand, then we put it on the spoke (photo 13, A). The thread, which was on the tip of the thumb, is held between our knitting needles and it will remain on the spoke from above (photo 13, B). Then we alternate. If typing is carried out correctly, on the spokes you will get 1 created row (photo 13, B).
  Having completed the set of loops, the needle from below is necessaryTo deduce, and all loops of a bottom will remain on a line from this knitting needle. The upper stitches are used to knit the main pattern. The eleventh way. "Edge with Festoons". To implement this set, you need to use a crochet and a thinner knitting needle. The volume of the needle and the hook is proportional to the size of the festons. Choosing this variant of mating, you will after the creation of the first row begin to make the product liked the pattern.
  A spoke with a crochet should be taken in handso that the location of the hook was directed upwards by the base and just above the knitting needle itself. Next, make eight air loops, using the eyelet with the thumb of the left handle (photo 15, A). The ninth eyelet should be created on the hook itself.
  After this, you need to hook through loops,holding them with two fingers of the left hand. By this principle, we knit all 8 loops. When creating the 1st row using the main drawing, at the center of all the festoons you need to add 2 loops (with napkin). The twelfth method. A common set of loops. It is used to create relief drawings. For the elasticity of the edge, the loops need to be created on 2 spokes, after which the second should be picked up.
 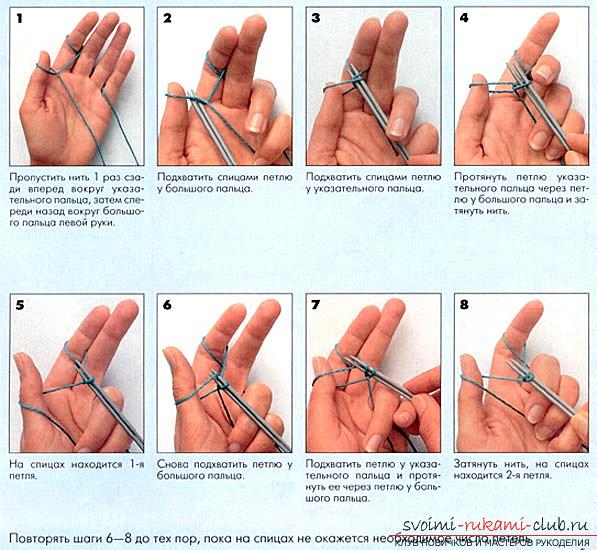 The length of the thread should be one and a half to twocentimeter on each loop and another twenty centimeters to add. The thirteenth method. Cross-shaped edge. Those who want to make the edge of a knitted product in an unusual way, you can advise this type of set of loops. Best of all, it is suitable for those variants of mating, when after the set edge comes the pattern of "rubber band". Having studied in detail the above methods of tying loops, you can at the beginning of the process of knitting give the future product all the necessary qualities.
Comments
Related posts:
 Knitting different types of collars with a rack and without a rack, tracery, chalet and others on the charts with detailed descriptions and photos, you can download them for free
 We learn to knit several kinds of "pearl" pattern with knitting needles to create original sweaters, sweaters with diagrams, detailed descriptions and photos for free.
 Knitting pattern of the original warm plaid with a pattern of braids for the house with detailed descriptions and photos for free.
 Schemes and detailed description of knitting scarves with knitting needles and crochet, photo of finished products, recommendations and advice on the implementation of various scarves, arans, lush columns and many other patterns for scarves
 Learning to set the loops of knitting needles in different ways on a photo-video lesson