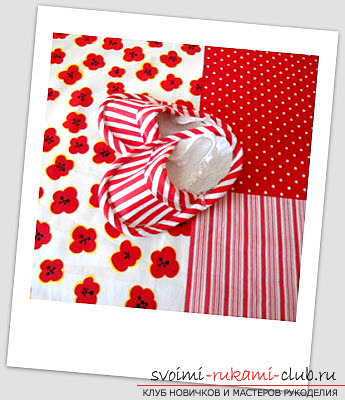
New patterns of original children's slippers, so that your child was always warm and comfortable. Photos and instructions
Every mom wants that in the cold seasonher favorite child did not freeze. Therefore, in order for the baby to safely run at home and feel comfortable, you can sew beautiful slippers with cubs. Use the presented simple and understandable pattern, and follow the detailed instructions for cutting and sewing, understand, even if you are not a professional seamstress. Apply a little effort and patience, and everything will turn out. What materials are necessary for sewing slippers?
- Any fabric, preferably not crumbling. It will be on the outside. Suits leatherette, fleece, wool, felt and so on.
- Soft matter for interior decoration. The main thing is that the fabric is pleasant to the touch. You can use a bike, cotton, flannel, thin fleece and others.
- Rubberized base for making soles or not slippery fabric.
- Thin ribbons.
- T-shirts.
- Scissors, thread in tone to fabrics.
- Ordinary pencil, chalk or soap, or a special marker, which can be applied to markup on matter.
- Paper for drawing patterns.
- Beads to create peepholes, preferably small.
- Threads such as Mulina or Iris. They are used for embroidering the mouth and cheeks.
- Acrylic paint is white. It will be needed to draw a flare on the bears of the cubs.
Patterns must be transferred to blank sheetspaper type A4. Evenly increase the individual parts to the size you need, and then cut the workpieces. Attach the patterns to the fabric base and circle them. Place the patterns on the wrong side. All the elements of the ears, nose and muzzle should be cut strictly along the contour, and the elements of the slipper (the upper part of the base and the sole) are cut out, after making an offset of 0.5-0.8 centimeters from the contour. This distance will be the allowance on the seams. To the main elements of the future slipper should be connected with tailor's pins pattern muzzle and spout, and then sew them strictly according to the outlined contour. You can use a sewing machine or do it manually, using a "wrap" seam or a "back needle" seam. Then thread the Iris or Mulina embroider the area of the mouth and cheeks. In white paint, draw a highlight on the nose and sew a bead eye to the muzzle. Sew the elements of the ears along the edge, and after them, connect the slipper to the main part. 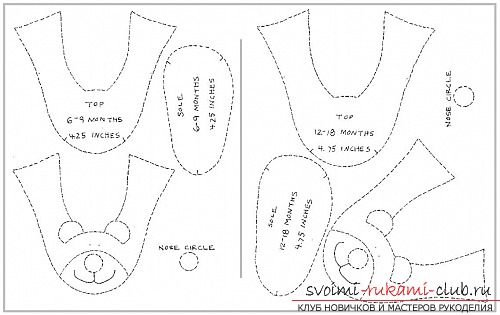 The parties need to combine the externaland lining the main parts. First, sew them along the "upper" area of the future slipper, and then along the bottom edge. Turn out the detail with the front side, straighten it and properly iron the seams. The edges of the main element should be combined, the edges of each tissue must be turned inside. At the end, make a secret seam by hand along the heel. The outer and lining elements should be folded to each other by their sides, sewed around the edges. Just leave a small area not stitched, through it will be turned out the sole of the product on the front side. At the end, sew a hole with a hidden seam by hand.
 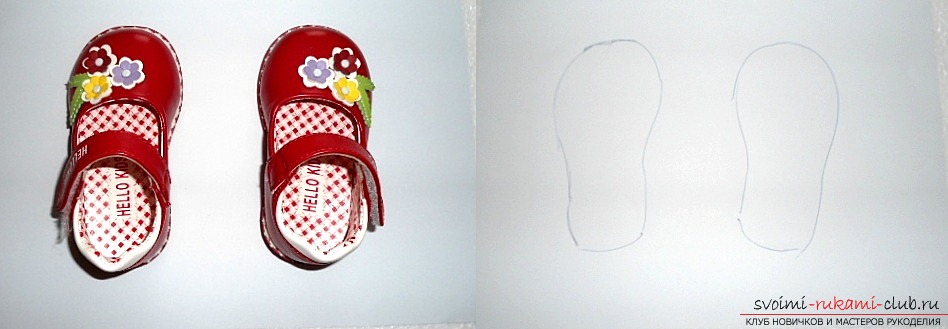 Connect the tailpieces to the tailbands andthe main element of the slipper, put ribbons between them between the strings, and then suture along the edges with a hidden seam by hand. Slippers are cubs ready! Let your child with pleasure wear original slippers! Let's move on to the next model of children's slippers. Each woman can create unique products, simply following detailed instructions and schemes. What materials will be needed during the work?
- For the upper half of the slippers, cuts of dense fabric are perfect. Take a small piece of cloth.
- For interior finishing, a soft matter that does not irritate the skin (soft fleece, wool, knitwear, flannel, and so on) will be required.
- As a sole, one should take any dense matter, but it is preferable that it is completely non-slippery (plashevka, artificial leather, felt, etc.).
- Heater can become a sintepon or hollofayder.
- Prolein.
- Slanting the bike.
- A thin elastic band.
- Scissors, needles, pins.
- Satin ribbon, with a width of 1.3-1.5 centimeters.
- Sewing accessories.
- An ordinary pencil and a sheet of paper type A4.
We proceed directly to creating patterns andsewing. To create the correct pattern of children's slippers, you should take a pair of shoes for your child. Put the shoes on a sheet of paper type A4, and circle each of them strictly along the contour. Cut, this will be the patterns of future children's slippers. The obtained schemes are transferred to the tissue base. From these patterns we create details for the internal finishing of slippers, a heater, a glue and a cloth that is intended for the creation of soles. Add on the contour of 0.5 centimeters. Cut out the right and left workpieces. 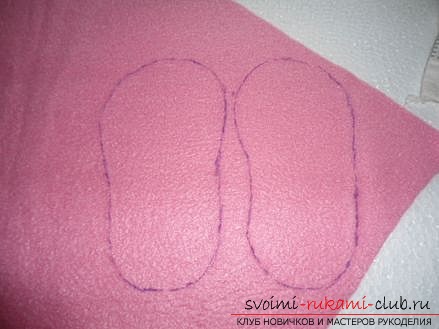 Now you need to create the top of the slippers. Therefore, we place the pattern of the sole on a white sheet of paper, we add one and a half centimeters along the contour, we make an arc-shaped line somewhat less than half the foot. In the lower area of the pattern will be an extension. For the upper half of the slippers, create 2 parts for each product separately. In the end, you get such a set of elements: internal parts 2 pieces, soles of the sole 2 pieces, soles 2 pieces, top of the sneakers 4 pieces. To give the product strength, use a glue (2 parts). Now it is required to connect the part from the glue along with the warmth of the sole, while slowly, ironing everything with a hot iron. Gradually, we connect the internal details of slippers with a heater and sole. The edges should be aligned, fasten them with pins. Step back from the edges of 0.4 centimeters, and make a line on the typewriter. If there is no sewing machine, then sew the seam by hand. Attach the upper half of the sneakers and pin it with pins. You should have a special space for the foot. Measure the sole around the perimeter. We obtain the required length of the satin ribbon. We measure out, and after cutting off the tape for each slipper. We measure the necessary length of the elastic band. The length of each strip must be 5 centimeters shorter than the length of the satin ribbon. Stitch together the satin and elastic bands. The latter must be well stretched. Tapes need to be attached in two places. Do this as shown in the picture. Wrap and iron all the edges of the jam.
 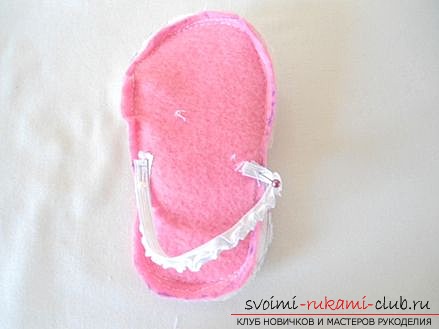 By oblique bake we process the upper area of the slippers. Use the sewing machine, if it is not available, then do it by hand. Handle the sole around the perimeter of the oblique bake. Slippers are completely finished! Your child can run around all day in the house, and his legs will always be warm. Attach a little effort and understand the schemes and instructions, and you can create amazing and beautiful things for your child.
Comments
Related posts:
 Building a pattern of house slippers-moccasins.
 The design of children's fur slippers from sheepskin is simple, with the work on it will cope with every woman
 We are preparing for the best day of your life. Patterns of the best wedding dresses will make the bride the most beautiful girl of the evening. Photos and instructions
 Tips for knitting baby begginers for beginners, using detailed instructions with photos and diagrams
 We make new clothes in our summer wardrobe with our own hands. Pattern of a fashionable dress with a smell without difficulty. Instructions and photos