We decorate the interior: Autumn crafts from straw (38 photos)
Autumn is the time when you want to bring a littlemore warmth and comfort. And even trifles such as do-it-yourself fakes help in this. Some of the most unusual, original and beautiful are fake straw. Straw is lightweight and malleable material that is fun to work with.  Straw Craft Ideas Contents
What can be made from straw?
You can come up with a lot of ideas for crafts, startingfrom simple dolls from straw, which used to be always woven on a harvest festival in Russia, and ending with complex paintings, some animals that can be made with children, decor of flower pots, mirrors and photo frames and other home crafts.  Funny hares made of straw
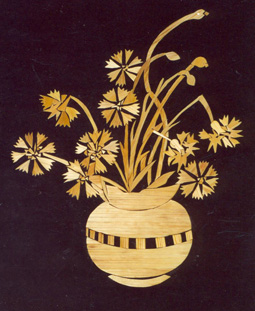
DIY straw bouquets
Bouquets of flowers will look very impressivemade from this natural material. In order to make one such flower, you will need a fabric of your favorite color and discreet threads, wire, paper or cardboard, glue, scissors, ammonia, hydroperit (several tablets) and water.  Do-it-yourself bouquet of straw How to make? First you need to make a solution of water, ammonia and hydroperite. In this mixture, leave the stalks of straw for 6-8 hours, depending on the saturation of your solution. Then thoroughly rinse the straw straws and cut them along the fibers. Gently glue the resulting tapes onto the paper, carefully press them so that there are no bent ends. Then take the second sheet of paper, preferably more dense, and, having previously drawn a stencil on it, press it against the resulting layer of straw stalks.
 From the back, cut some neatleaves and glue patches of fabric to them. Trim the leaves around the edges with threads, sticking them to the glue. After the resulting product dries, cut it out. Then make 6 more leaves and prepare a circle of cardboard. Glue the leaves on the circle on both sides, then pierce the flower in two places and connect all the elements into one composition using wire. The flower can be decorated with ribbons or beads. To create a bouquet, make several of these flowers. Here is a master class on how to make a bell flower from straw:
DIY straw paintings
One of the most popular techniques is manufacturingboth flat and visually voluminous straw paintings. It’s easy to master it yourself, it’s enough to figure out how to do it, although this is a rather time-consuming process. How to make?  DIY painting from straw: boat To create a neat and beautiful picture of straw, you will need, again, scissors, thick sheets of paper (or cardboard), glue, brushes, pencils and, of course, the straw itself. First of all, you need to come up with what you will depict on your “canvas”. Next, lightly draw the main details on paper or take as a basis, for example, pictures from coloring books, books and magazines. Please note that the basics of your picture are not drawn on the paper that will be the basis of the fake, but on any other.
 Then make straw in the way thatmentioned above: dip in ammonia solution, cut the straw with scissors, iron with an iron. Glue the straw to the drawn details, allow them to dry, then carefully cut. After all this, you can safely take a sheet of paper or cardboard prepared by you for the base. We glue the resulting pieces of the picture directly onto the “canvas”, gently press it. The picture is ready! If you want to make it a little brighter, paint it with paints or ribbons.
DIY straw dolls
Making straw dolls is an activity that our ancestors loved to do. In order to make one of these dolls or amulets, you will need toothpicks, wire, scissors and fabric.  DIY straw dolls: brownie
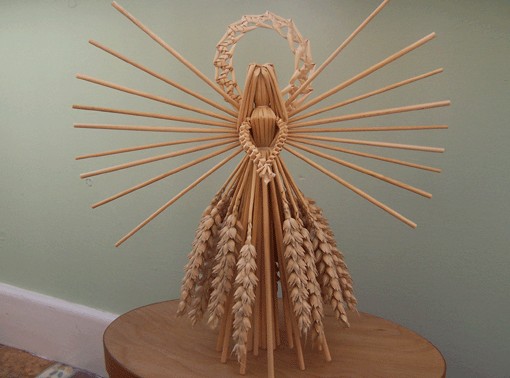
 In this case, neither straighten nor smoothyou don’t need straw. It just needs to be trimmed so that all the straws are the same length. Bend them in half so that the ends remain flat. Determine where your doll’s head will end, and then carefully label it with a wire. Next, form a waist, again bandaging it with wire. If the doll breaks, insert a toothpick like a spine into the knot between the “head” and the “body”. Hands can be made using ordinary braiding from straw pigtails, and with the help of toothpicks - in this case, the straw should be wrapped around the rod. Using the wire, attach the resulting handles to the doll. This will be the final touch - the toy is ready!
DIY straw houses
Miniature houses made of straw,They look interesting and fabulous. And, most importantly, to carry out such a fake is quite simple. To make it, you will need thick paper (or cardboard), glue, scissors, pencils, beads or ribbons for decoration and straws. First you need to make a "frame" of the house, its walls. To do this, take sheets of cardboard or thick paper and draw them in such a way that when glued they form a box.  DIY straw houses

 Designate the door and windows of your house, thengently cut them. Glue the resulting walls into a rectangular box. Then you can proceed to the next part of the work - to glue the house with straw. To do this, measure the length of its walls so that the straws do not turn out longer or shorter. After you have glued the walls of the house, you need to make the roof on the same principle as the box - from a thick paper or cardboard, you should get a triangle. Next, glue the roof with bunches of straw. We connect the roof with the walls - we got a house. In order to make it more beautiful, you can use paints and brushes, additional decorations in the form of feathers that could “peek” from under the straws of the roof. Door and window openings can be decorated with cloth or thin wooden plates.
DIY Straw Crafts: Photo Gallery
 Old folk craft: a horse made of straw
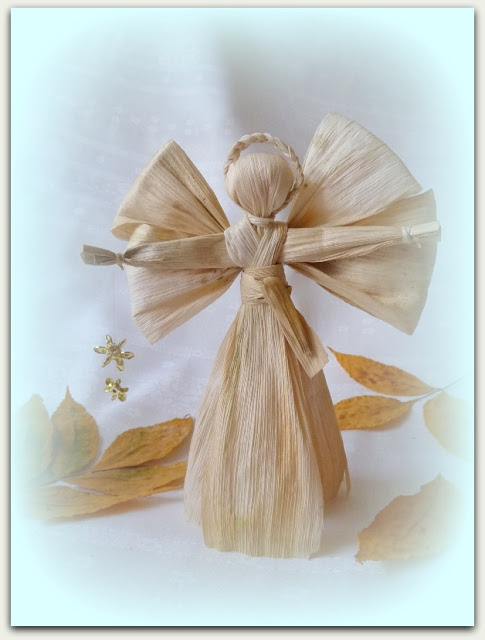


 We also recommend viewing:
Do you like the article? Share on social networks!
Comments
Related posts:
 How to make interesting autumn crafts in school with your own hands with a step-by-step description, photos and videos.
 We create unique autumn crafts made of acorns with our own hands. Original ideas and photos.
 Interesting autumn crafts for kids with their own hands, crafts for kindergarten from vegetables, cones, leaves and much more with photos and descriptions.
 Handicrafts, autumn crafts that can be made from leaves, an autumn glass ball, paintings on the theme of autumn, detailed instructions and phased photos.
 Autumn crafts: What to make of pumpkin and how to decorate it (25 photos)