New Year's decoupage of champagne with their own hands - a master class for a bottle
Decoupage is a needlework, withwhich can decorate any kind of object and improve any detail of the interior. To do this, you will need regular napkins, or special napkins for decoupage. Craftsmen in this craft are for themselves classes on the design of any subject. However, one of the most common types of decoupage is still the decoupage of capacity. 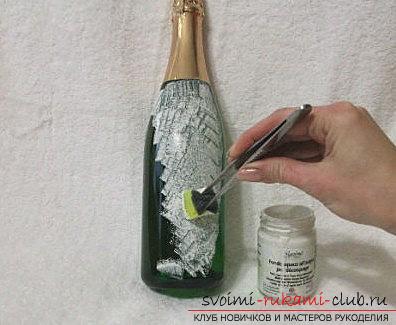
New Year's decoupage of champagne with their own hands - a master class for a bottle
It is worth noting that it is not necessary that you immediatelyget the desired result and certainly, do not prepare to create masterpieces on the first attempt. But, using this lesson and many others for registration, there is already a short chance of getting the desired result. To make decoupage of a New Year's bottle, it is necessary to have a number of products: 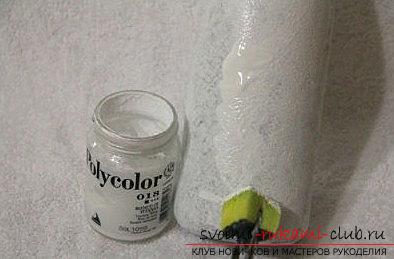 Materials for the bottle
- Necessary scissors for manicure
- PVA glue
- Brush
- Acrylic paint
- Varnish (acrylic)
- Contour (black color)
- Household goblet
- Small napkins with the theme of the New Year
- Sequins, confetti and glyterra.
- The rain, also ribbons.
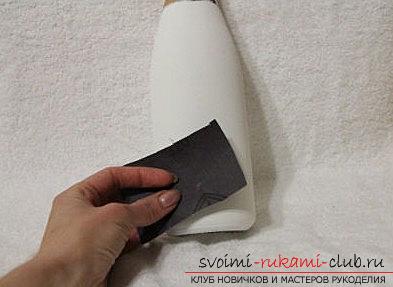 Primer of the product You need to take champagne and wash itit from different labels, with the help of cold water. With the help of foam rubber, we apply a layer of ground from acrylic. Soil can be purchased in special shops for artists. We wait until the paint dries and we apply one more layer of paint. If necessary, apply a third layer to get rid of the transparent spots. Once the paint has covered all the details - you can proceed to the next point. If you see an unevenness on the bottle, you should sand it.
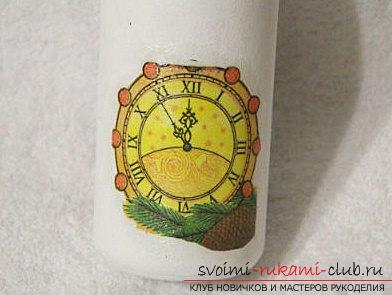 Bottle design Next, we take and prepare the design forour product. We choose kitchen napkins with the necessary thematic drawings. Rvem necessary options for layouts and using scissors, crop them. Fragments must be glued to the bottle with modern means for decoupage. In our case of registration, the tree will be on the front side of the product, in its central part. The new-year clock will be on the back of the product.
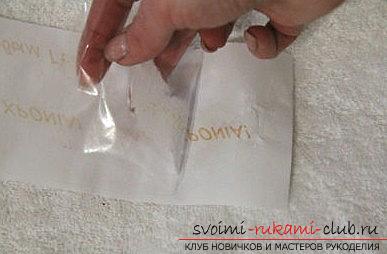
 We will make a gift bottle, therefore it is necessaryto issue a gift greeting. It is necessary to print out special phrases in the desired language and font and make a printout. Use a laser printer. Paper should be thinned using scotch (clerical). Then, the strips of cattle need to be glued on the back of the paper. Carefully tear off the scotch. With the tape, the paper will go away and after that, only the layer with the inscription will remain. The hand must be torn off the inscription and glued to the bottle with PVA glue. Finishing the appearance of the bottle
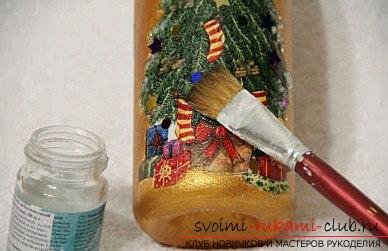
 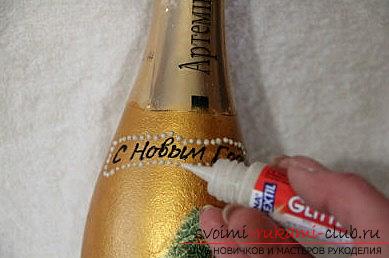 Using an acrylic outline in black, the letterscircle and wait until they dry up. Letters should be slightly above the surface of the bottle. Then we cover the bottle with our background. Using a foam sponge, we put on the bottle a gold color of acrylic paint, in a uniform layer. Next, you need to fill the places where there are small holes. Next, we wait for the paint to cover the necessary surface. It is also necessary to paint over and inscriptions. Now, using the elements of the drawing, we createsketching. Using the black outline, we'll fix the letters. We will outline them with the help of precise contours. Further, they will become convex. Draw the details on the dial of our watch. Using glitter, we put points around our texts. Then, we wait until everything dries, and the printout boundary disappears. Next, applying a paste of crystal to add snow. After that, apply the paste in those places where there is a lower edge for the foil. Instead of making toys for drawing, we glue confetti of brilliant color. With the help of lacquer, this element will be well intercepted. For black letters, we apply glitter with shiny elements. The bottle should be covered with a small amount of a layer of glossy varnish made of acrylic. All, dry the product and give it to a loved one!
Comments
Related posts:
 Master class with a description and photo will teach how to make decoupage of a bottle of champagne with your own hands
 New Year's decoupage of bottles with their own hands - a gift to friends and a master class of decoupage
 Master class with photo and description will teach how to make a decoupage of bottles of champagne for the New Year
 Decoration of bottles and decoupage with tights with their own hands - master class
 Decoration and decoupage by shell - master class of decoupage bottles with their own hands