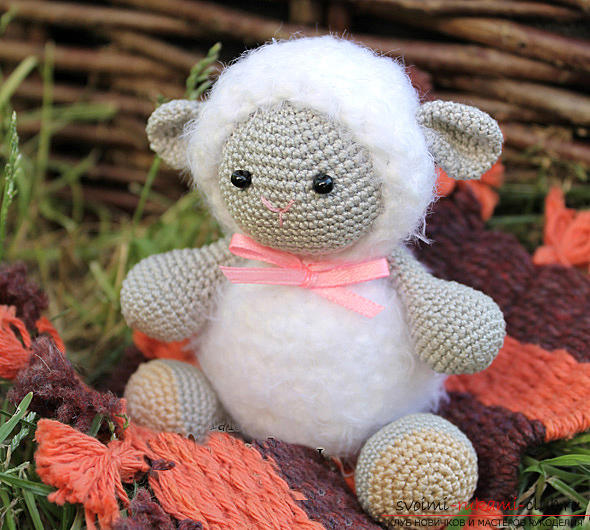
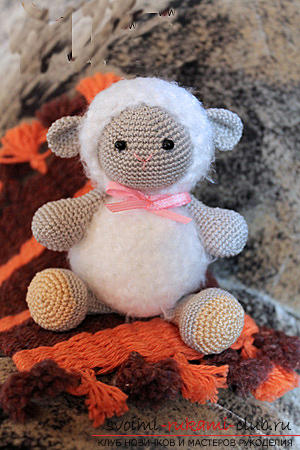
How to tie a lamb with an amigurum crochet: a master class with a detailed description and a photo
Products and things that are made byhands, have gained great popularity in our time. To explain this can be quite simple: these products are unique. By creating with your own hands a toy, clothes or jewelry, you definitely will not meet her double. Therefore, moms so often began to make toys with their own hands for their babies. One of these techniques of needlework is the Japanese amigurumi. In this article we offer to your attention a detailed master-class on the creation of lamb amigurumi with the help of a hook.  In work we use 2 types of yarn: threads of the brand "Iris" of beige and gray shades, as well as fleecy yarn, to tie the trunk of the product and a hood for the lamb. You can use the remnants of threads from previous works. Use a mohair as a fleecy yarn. Also note that if you select another yarn, your product will have the required number of loops. But in our descriptions we will take time to this question. For work you will need such tools and materials:
- yarn (which we already talked about in detail above);
- crochet hook (number 1, 15) for yarn "Iris" and hook number three for knitting yarn "Lotus Travka grass";
- scissors;
- weighting agent;
- filler (fluff, cotton or sintepon);
- a marker or a pin to count ryadochkov.
How to tie the head of our lamb with amigurumi?
In the beginning, gray yarn will be used"Iris". The head of the toy is a ball, which is crocheted. Having mastered the basics of knitting a ball using a hook, you will greatly improve your skill level in the amigurumi technique. The main thing is to understand the basic principles by which a ball is knit.  Series number 1. It is necessary to close six loops in a ring of amigurumi. Series number 2. It should be followed six times in succession with the indicated combination: add to all loops (as a result - twelve loops). Series number 3. It is necessary to tie the mentioned combination six times in succession: execute one RLS (column without a cape), and after it - one increase (as a result - eighteen loops). Series number 4. It is necessary to tie the indicated combination six times in a row: execute two RLSs (a column without a cape), and after them - one increase (as a result - twenty-four loops). Series number 5. Six consecutive combinations of the following combination must be made: execute three RLSs (a column without a cape), and after them - one increase (as a result - thirty loops). Series number 6. We make six consecutive strips of the indicated combination: four RLS (column without a cape), and after them - one increase (as a result - thirty-six loops).
 Series number 7. We make six consecutive strips of the indicated combination: five RLS (columns without a cape), and after them - one increase (as a result - forty two loops). Series number 8. Create six times in a row to tie the indicated combination: six RLS (columns without a cape), and after them - one increase (as a result - forty-eight loops). Series number 9. We do six consecutive strips of the indicated combination: seven RLS (columns without a cape), and after them - one increase (as a result - fifty-four loops). Series number 10. Create six times in a row to tie the specified combination: eight RLS (columns without a cape), and after them - one increase (as a result - sixty loops). As you can see, such a cloth is based on a hexagon. When knitting you add to all rows of 1 column without a cape. Once the size of the circle you are satisfied, you can make a couple more rows, and then start to carry out the deductions. Row number 11. To knit sixty columns without creating a cloak, that is, you need to execute 1 RLS in all the loops of the previous ridge.
  But with the next randochka you can startcarrying out of additions. Series number 12. Create six times in a row to tie the indicated combination: eight RLS (columns without a cape), and after them - one decrease (as a result - fifty-four loops). Series number 13. We make six consecutive strips of the indicated combination: seven RLS (columns without a cape), and after them - one decrease (as a result - forty-eight loops). Series number 14. Create six times in succession to tie the indicated combination: six RLS (columns without a cape), and after them - one decrease (as a result - forty two loops). Series number 15. We make six consecutive strips of the indicated combination: five RLS (columns without a cape), and after them - one decrease (as a result - thirty-six loops). The row number 16. We do six consecutive strips of the indicated combination: four RLS (column without a cape), and after them - one decrease (as a result - thirty loops). Series number 17. Six consecutive combinations of the following combination must be made: execute three RLSs (a column without a cape), and after them - one decrease (as a result, twenty-four loops). Next, you need to fill the part that you already tied with filler. As a result, it will be a little easier for you to make adjustments. Series number 18. It is necessary to tie the mentioned combination six times in a row: execute two RLS (column without a cape), and after them - one decrease (as a result - eighteen loops). The head needs to be stuffed more tightly so that it has an elastic shape. Series number 19. It is necessary to tie the mentioned combination six times in a row: execute one RLS (column without a cape), and after it - one reduction (as a result - twelve loops). Then it is necessary to carry out reductions until the hole is completely closed.
 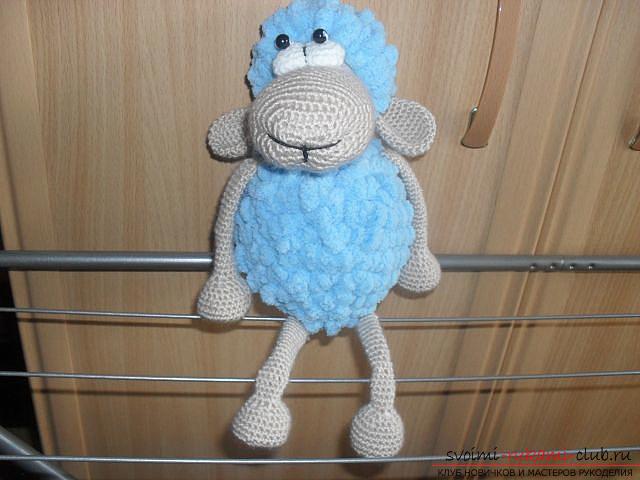 How to tie the ears of our lamb with an amigurumi? Series number 1. It is necessary to close six loops in a ring of amigurumi. Series number 2. It should be followed six times in succession with the indicated combination: add to all loops (as a result - twelve loops). Series number 3. It is necessary to tie the mentioned combination six times in succession: execute one RLS (column without a cape), and after it - one increase (as a result - eighteen loops). Series number 4. It is necessary to tie the indicated combination six times in a row: execute two RLSs (a column without a cape), and after them - one increase (as a result - twenty-four loops).
 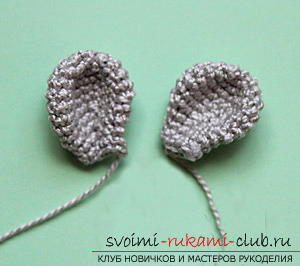 Series number 5 - 6. Should be tied further: twenty-four RLS (column without a cloak). Series number 7. It is necessary to tie the mentioned combination six times in a row: execute two RLS (column without a cape), and after them - one decrease (as a result - eighteen loops). Series number 8. Should be tied further: eighteen RLSs (column without a cloak). Series number 9. It is necessary to tie the mentioned combination six times in a row: execute one RLS (column without a cape), and after it - one reduction (as a result - twelve loops). Row number 10 - 11. Should be tied further: twelve RLS (column without a cloak). The ears should not be stuffed. Do not forget to leave the thread, then attach them to the base of the head of our sheep. For a more even edge of the ears, we advise you to complete their binding with a connecting column. How to tie the hood of our lamb with amigurumi? In the beginning, a fleecy string of white "Grass Stretch" will be used. The head of the toy is to be tied up. In doing so, we will use hook number three.
 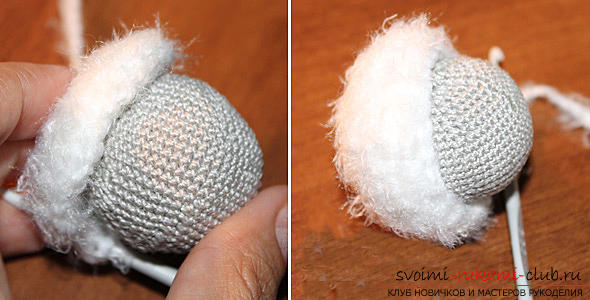 Series number 1. It is necessary to close six loops in a ring of amigurumi. Series number 2. It should be followed six times in succession with the indicated combination: add to all loops (as a result - twelve loops). Series number 3. It is necessary to tie the mentioned combination six times in succession: execute one RLS (column without a cape), and after it - one increase (as a result - eighteen loops). As you have already understood, I again started to knit a ball. The set of rows is carried out until the diameter of the hood becomes larger than the head of the toy. Then we knit a row of rows with an equal number of loops. From time to time we are trying to fit the hood to the head of the lamb. Row number 4 - 7. Should be tied further: eighteen RLS (column without a cape). After that, we can leave the head of the product in the hood itself. We make the mating using the adjustments. Series number 8. Should further tie the indicated combination: execute RLS (columns without a cape), and every four - one loop should be skipped. If you use mohair in your work, then we advise you not just to pass the loop, but to carry out a decrease.
 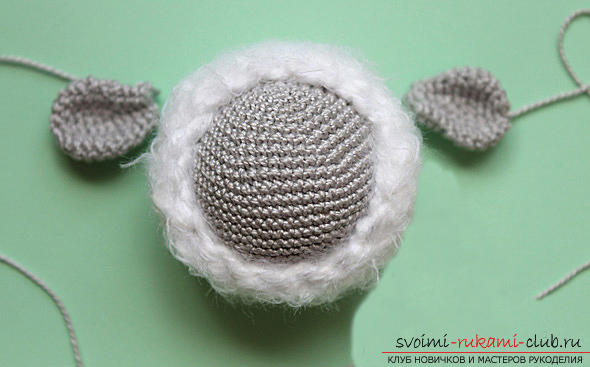 Series number 9. We continue to make deductions so to say "by sight". Finish the mating by hiding the edge of the thread under the hood itself. How to tie the torso of our lamb with amigurumi? The trunk itself is advised to start knitting after completing the mating of the hood. So it will be easier for you to calculate the dimensions of the trunk. The principle of mating is similar to the creation of the head of the article. We remind you that if you use mohair or other yarn, you need to calculate the number of loops for the ball yourself. Series number 1. It is necessary to close six loops in a ring of amigurumi. Series number 2. It should be followed six times in succession with the indicated combination: add to all loops (as a result - twelve loops). Series number 3. It is necessary to tie the mentioned combination six times in succession: execute one RLS (column without a cape), and after it - one increase (as a result - eighteen loops). Series number 4. It is necessary to tie the indicated combination six times in a row: execute two RLSs (a column without a cape), and after them - one increase (as a result - twenty-four loops). Series number 5. Six consecutive combinations of the following combination must be made: execute three RLSs (a column without a cape), and after them - one increase (as a result - thirty loops). Row number 6 - 10. Should be tied further: thirty RLS (column without a cape). Row number 11. It is necessary to tie the mentioned combination six times in a row: execute three RLSs (columns without a cape), and after them - one decrease (as a result - twenty-four loops).
 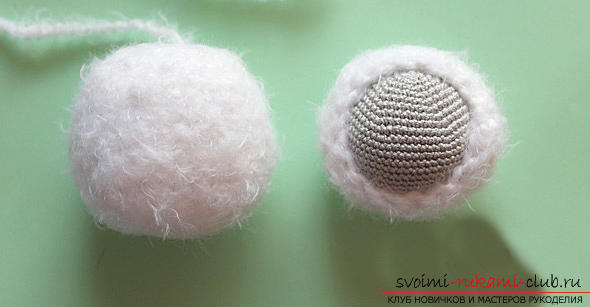 Series number 12. It is necessary to tie the mentioned combination six times in a row: execute two RLS (column without a cape), and after them - one decrease (as a result - eighteen loops). Series number 12. Should be tied further: eighteen RLSs (column without a cloak). Series number 13. It is necessary to tie the mentioned combination six times in a row: execute one RLS (column without a cape), and after it - one reduction (as a result - twelve loops). Series number 14. Should be tied further: twelve RLS (columns without a cloak). Do not forget to leave the thread, then attach the trunk to the base of the head of our lamb. Then the body should be filled through the hole that you left. In the rear part of the lamb it is necessary to put the prepared weighting agent in order not to be outweighed by a double head. How to tie the legs of our Amigurumi lamb (create 2 elements)? In the beginning, beige yarn "Iris" will be used. Series number 1. It is necessary to close six loops in a ring of amigurumi. Series number 2. It should be followed six times in succession with the indicated combination: add to all loops (as a result - twelve loops). Series number 3. It is necessary to tie the mentioned combination six times in succession: execute one RLS (column without a cape), and after it - one increase (as a result - eighteen loops).
 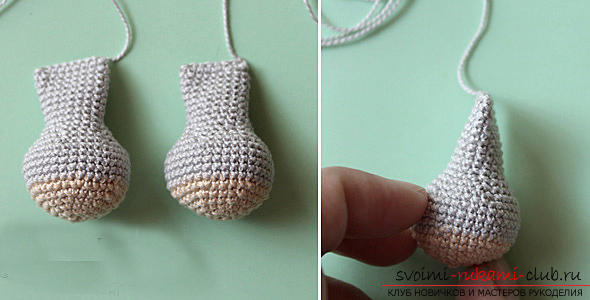 Series number 4. It is necessary to tie the indicated combination six times in a row: execute two RLSs (a column without a cape), and after them - one increase (as a result - twenty-four loops). Series number 5. Six consecutive combinations of the following combination must be made: execute three RLSs (a column without a cape), and after them - one increase (as a result - thirty loops). Series number 6. We make six consecutive strips of the indicated combination: four RLS (column without a cape), and after them - one increase (as a result - thirty-six loops). Row number 7 - 11. Should be tied further: thirty-six RLS (column without a cloak). Series number 12. We do six consecutive strips of the indicated combination: four RLS (column without a cape), and after them - one decrease (as a result - thirty loops). Series number 13. Six consecutive combinations of the following combination must be made: execute three RLSs (a column without a cape), and after them - one decrease (as a result, twenty-four loops). Series number 14. It is necessary to tie the mentioned combination six times in a row: execute two RLSs (columns without a cape), and after them - one decrease (as a result - eighteen loops). The wider part of the foot is advised to fill after that ryadochka, so that it was slightly easier to carry on the binding. Row No. 15 - 24. Should be tied further: eighteen RLSs (columns without a cloak).
 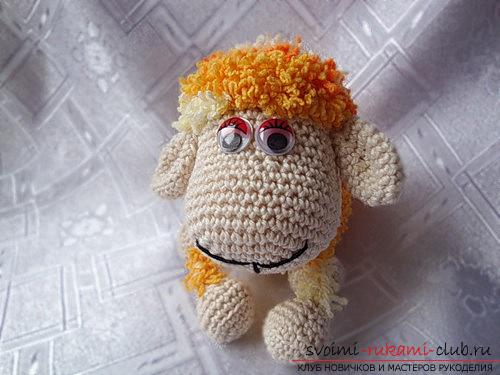 With the help of RLS, you need to close the hole. How to tie the hands of our Amigurumi lamb (create 2 items)? In the beginning, gray yarn "Iris" will be used. Series number 1. It is necessary to close six loops in a ring of amigurumi. Series number 2. It should be followed six times in succession with the indicated combination: add to all loops (as a result - twelve loops). Series number 3. It is necessary to tie the mentioned combination six times in succession: execute one RLS (column without a cape), and after it - one increase (as a result - eighteen loops). Series number 4. It is necessary to tie the indicated combination six times in a row: execute two RLSs (a column without a cape), and after them - one increase (as a result - twenty-four loops).
 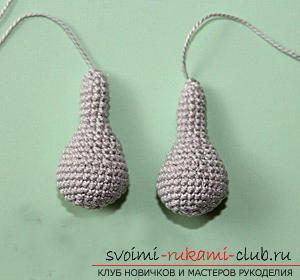 Series number 5. Six consecutive combinations of the following combination must be made: execute three RLSs (a column without a cape), and after them - one increase (as a result - thirty loops). Series number 6 - 8. Should be tied further: thirty RLS (columns without a cloak). Row No. 9. We do six consecutive strips of the indicated combination: create a loss, and after it - three RLS (column without a cloak). As a result - twenty-four loops. Series number 10. Should be tied further: twenty-four RLS (column without a cloak). Row No. 11. We do six consecutive strips of the indicated combination: create a loss, and after it - two RLS (column without a cloak). As a result, eighteen loops. Series number 12. Should be tied further: eighteen RLSs (columns without a cloak). Row No. 13. We do six consecutive strips of the indicated combination: create a loss, and after it - one RLS (column without a cloak). As a result - twelve loops. Then go to the stuffing of the lower part of the hand. Row No. 14-20. Should be tied further: twelve RLS (columns without a cloak).
 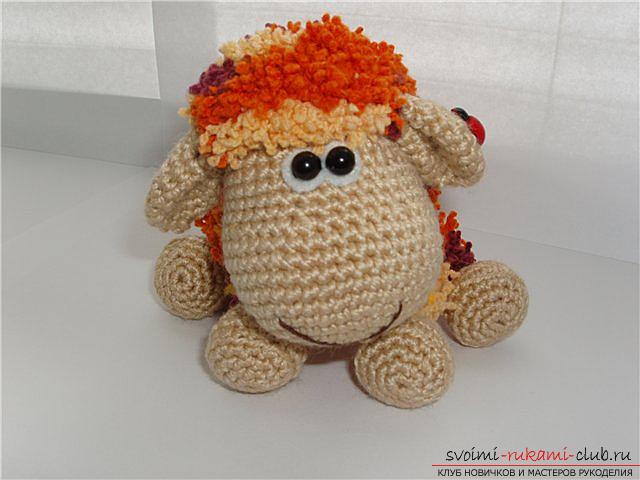 The upper part of the foot is advised not to be stuffed tothe handles did not protrude after sewing to the trunk. We connect all the details of the toy in one piece. Handles and legs are attached to the base of the trunk. But before you make out the muzzle of the toy. Sew her eyes and sew an embroidery of her nose. Eyes can be created from large beads. For the embroidery of the nose, use the threads of pinky pink.
  If this toy is meant for absolutelysmall children, then do not use small parts. In this case, you can embroider your eyes using the same string of mulina. In the end, all the ends of the threads must be hidden under the hood. After completing the face, go to the attachment of the ears. And already at the very end - sew the hands and feet of our little animals.
 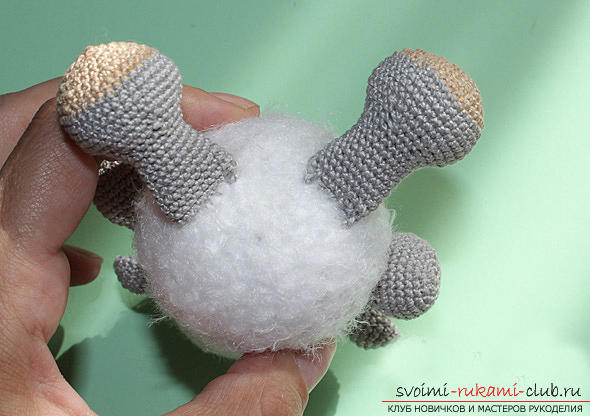 Our sheep amigurumi is ready!
Comments
Related posts:
 Master class with photo and step-by-step description will teach how to tie an amigurumi crochet toy
 A master class with a detailed description and photo will show how to crochet a toy-symbol of the year - a monkey on a Christmas tree
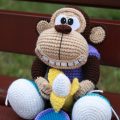 Master class on knitting monkey amigurumi crochet with their own hands with step-by-step description and photo.
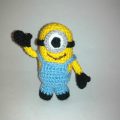 Master-class with detailed photos and step-by-step description will teach how to crochet a toy minion
 Master class with photo and description will teach how to crochet booties for newborns