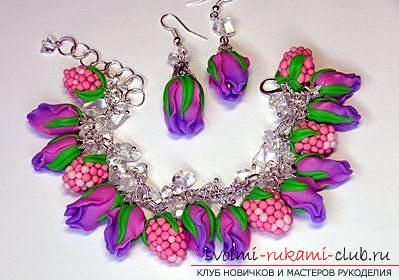
A gift for March 8 in the form of jewelry from polymer clay like every woman
A gift for March 8 in the form of jewelry from the polymerClay is sure to please a girlfriend, sister or mother. Making jewelry is not difficult. It will take a little free time and your desire. You can make such a gift yourself, even if you have never worked with this material before. So do not be afraid that you will not succeed. One of the variants of beautiful ornaments and the order of their manufacture you will find in this article. March 8 - International Women's Day. This is an excellent occasion to congratulate all close women. I am sure that each of you has your favorite girlfriends, colleagues, relatives, whom you would not want to ignore. You can buy a card, flowers and any other item that you like in the store. And you can do otherwise and make a gift yourself. There are a lot of ideas for creativity that you can use. One of them is a gift by March 8 in the form of jewelry made of polymer clay. He will definitely like his mistress, because there is not a single woman who will refuse beautiful jewelry. So, today you will learn how to make an interesting set of costume jewelry from this simple material. I think you can use this material to create your product. The decoration consists of pleasant flower buds and raspberry berries. This kit does not carry bright and colorful colors, it only has soft, fresh shades. It is not necessary to have preliminary skills in working with polymer clay. It seems to me that the manufacture of this set of jewelry will be in force even for beginner needlewomen. This kind of gift will suit any holiday and it will be especially relevant on 8 March. Hardly anyone can resist such a beauty. As always, first you need to prepare your workplace and stock up on everything you need for creativity. For work you will need:
- clay is polymeric (in our case, shades of pink and clay, painted in a gently green color) are used;
- a bottle, a rolling pin or a glass (which you will find at hand, it is not a matter of principle);
- knife stationery;
- toothpicks (we will make holes for them);
- food foil.
To begin with we take in the same quantity clay of two shades, in our case it is pink and violet. Then both pieces must be connected, as shown in the photo. 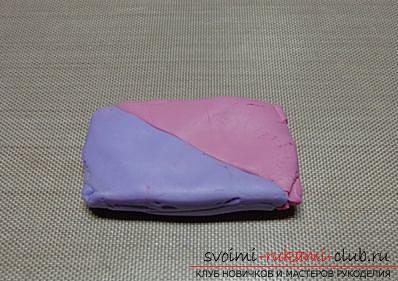 After that, use a rolling pin (bottle) to make the transition from one color to another. The transition must be smooth. When the resulting canvas is even, fold it in the form of an accordion.
 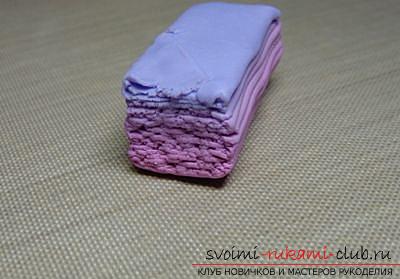 Then the accordion, which has a rectangularform, you need to give a uniform and round shape. Its diameter should be about one and a half to two centimeters. On the side, where the violet color predominates, it is necessary to pinch the resulting sausage with two fingers. As a result, it will take a slightly drop-shaped shape. Our sausage needs to be cut. We will get blanks for making petals. Their thickness should be about three millimeters, and for the six petals, the larger ones - five millimeters.
 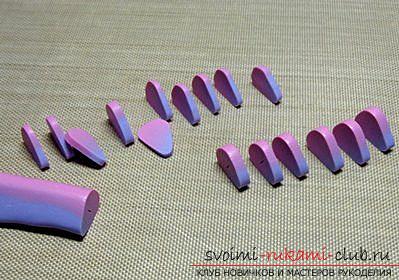 At this stage I advise you to wear disposablegloves. Given that the clay is colored, she can paint her hands. Gloves will protect us from this trouble. With each cut you need to work separately. It must be pulled out with your fingers and made thinner. Cut off the large petals for the time being to the side.
 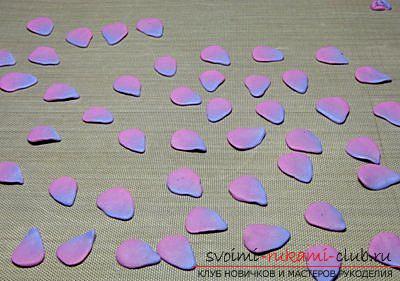 Now you need to work with each lobe, giving them a shape. To do this, we take a clay of pink color and form a drop, its length should be one centimeter. We pass through it a toothpick.
 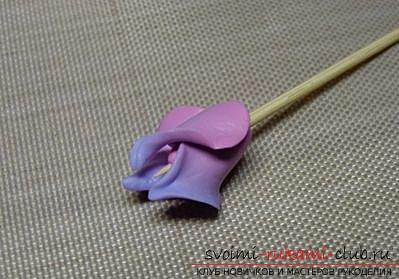 Around the drop, threethe petal. Lay in such a way that one part of the petal was hidden under the next petal, and the other looked outward. The petals must be twisted and smoothed in such a way as to obtain the shape of their base. For a kit, you need at least twelve medium buds and two large ones (for earrings). It's time to start the leaflets. To do this, light droplets of clay should be created with thin droplets, their length should be no less than five to seven millimeters. Use a toothpick to make a central groove.
 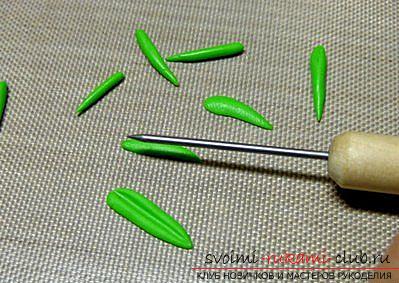 On the spot where the toothpick enters the bud, attach three sheets to it. The action is repeated with each individual bud. All leaves must pass along the central part of the petals.
 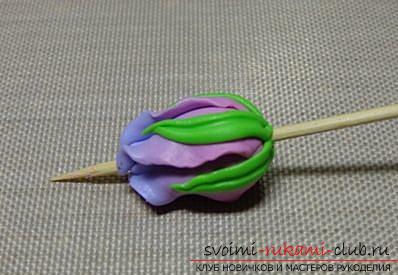 From clay of pink shades we form smallballs, not more than three millimeters each. They need a lot, make in any case more, in reserve. Make another base of clay, now pink. Pass the toothpick exactly to half a drop. Now it's time to start the formation of the Malinka berry. We use the balls that were made earlier. Put the balls of all shades. The center of the berry should be bright and rich in pink color. Stack balls should be mixed, both light and dark shades.
 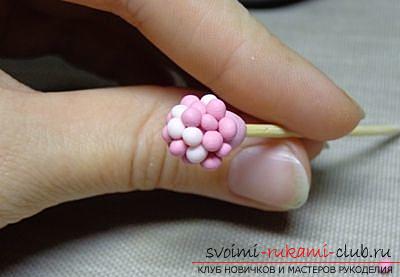 For our set, we need to make at least sixraspberries. Try to make all berries different. After all, in nature every plant, leaf and twig is individual and unique in its own way. Please note that you only need to burn the hand-made articles in an upright position. Each clay sold in the store has its own instruction, which must be observed. As a rule, the instruction is indicated on the packaging of the material. After all the details are burned, you can tackle raspberries. Take care of greens for berries. So they will look more realistic. Form it in the same way as the leaves for the flowers. Remove the toothpick from the berry and fill the hole with a clay of light green color and insert a thin clove.
 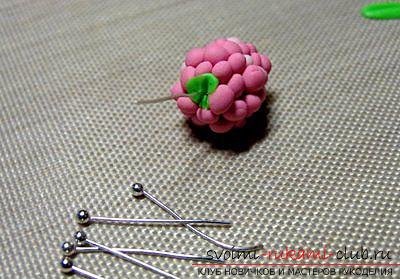 Attach at least three leaves to the berries andput them back in the oven. After the last burn, cover all parts with a clear varnish. You can use the usual building varnish for wood. Now proceed to assemble the product. In the holes that remain in the colors, insert the stud, make a small loop, and fasten it on the common chain. Since there are already nails in the berries, therefore, with the help of pliers, attach the berries to the chain. Alternate flowers with berries. You can add small beads.
  The gift for March 8 in the form of jewelry made of polymer clay is ready. It remains to beautifully pack and you can give.
Comments
Related posts:
 A charming set of jewelry in the form of roses, made of polymer clay. A clear master class for beginners
 How to make a gift to March 8 with your own hands made of polymer clay, step-by-step photos of creating a set of bracelet, earrings and pendants
 Lambs in the form of earrings - how to make New Year's earrings from polymer clay own hands?
 How to make earrings from polymer clay in the form of snowmen, detailed master class with photo and description
 Postcards on March 8, made by own hands. Easy and free gift to a woman.