How to make Christmas-tree toys: balls, snowflakes and much more by yourself, master classes on creating Christmas tree toys with step-by-step photos and descriptions
Loved by many New Year's Eve - timejoyous troubles. A merry bustle picks up in its maelstrom both children and adults. In preparation for this wonderful time there are lots of pleasant moments. But there is a moment that is such an old tradition that we can not even imagine the celebration of the New Year without it. This custom adores everything from small to large - decorating the tree. The origins of this remarkable event go far into the depths of centuries, in pre-Christian times. Ancient people believed that evergreen trees - firs and pines, are especially loved by the gods. Therefore, they decorated them with gifts, seeking to obtain divine blessing, luck and luck. In Europe, the tradition of decorating Christmas trees began in the middle of the 16th century. According to the assumptions of scientists, its founder was the founder of one of the directions of Protestantism Martin Luther. In Russia, the tradition of decorating the Christmas tree was introduced by the great reformer Peter I. Initially, candles, fruits, cookies and paper craft were used as decorations. In the modern world, such a huge amount of jewelry for the Christmas tree and for the whole room, that the eyes run up: how to choose from all this tinsel and shiny decor elements that will suit your home? Our article is devoted to Christmas tree toys, but not ordinary, but created independently, with their own hands. You will not buy such original and unusual things in the store. Your Christmas tree will be decorated with exclusive, bright and original products that will no doubt make the holiday even more memorable. When it comes to handmade crafts, many can imagine an incredibly high expenditure on the details of the decor. We hasten to assure you - the creation of unusual and beautiful Christmas toys is not only simple, easy and fascinating, but also quite inexpensive. In our master classes we will tell you in detail about crafts made of felt, shreds of fabric, sequins, threads, buttons, beads and even old computer parts or pasta.
We will probably start with the most popular decoration - Christmas balls.
 Christmas balls of cloth You have in the closetbright, colorful dress that you will never wear and never wear? Then boldly take the scissors and begin to create. In order to make a Christmas ball made of fabric, you will need:
- The basis. It can be a foam ball or even an old socks that need to be tightly packed, until a solid ball is obtained;
- Material for sheathing;
- Rope or ribbon for the loop, for which we will hang the ball on the tree;
- Glue (glue gun) or thread with a needle.
There are many options for attaching tissue. Decorative decoration can be sewn or glued. In her role can be ruffled strips of fabric, which need to be sewed in circles. You can cut the fabric into small squares and sew them to the base grabbing just the center of each square. Place their centers denser to each other and you will get a charming shaggy ball.  You can use burlap, old tablecloths, fabrics of any texture, quality and color.
  Another option for decorating a Christmas tree can be buttons.
  Choose bright colors and different sizes. Christmas balls made of string and lace
  Another wonderful ornament can be balls of thread. It will take:
- Balloon;
- PVA glue;
- Sequins;
- Threads of Iris type.
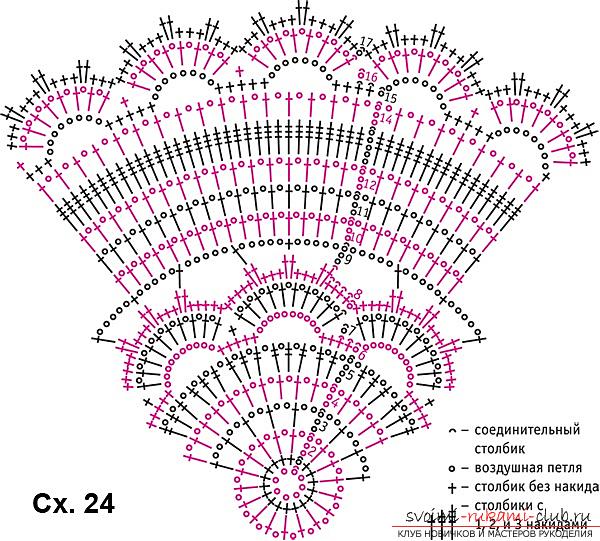
It is very easy to make such an ornament. We inflate a ball of the size corresponding to the size of the future toy. Tie one end of the thread to it. Threads can be lowered into the glue or covered with a brush. Near the base of the ball leave a little space. Sprinkle the top with sequins. We wait while the glue dries. Now it remains only to pierce the ball and pull it out of the workpiece. It remains to hang our toy on a string or ribbon.  For needlewomen who know how to crochet, do notit will be difficult to make such a magical openwork. We do by analogy with threads, but here we glue lace elements. Below we offer several schemes for creating delicate details.

 Decor of foam balls We offer several options for decor. It will take:
- Polyfoam base - ball;
- Thin felt of two shades;
- Sequins of bright colors;
- Pins with beautiful hats;
- Thin ribbons and hooks as fastenings;
- Corrugated paper;
- Beads;
- Needles and thread;
- Glue.
We will be the first to decorate with felt. We have white and red colors (you can choose any others). So, draw a sketch of a flower with five petals. Two options, larger and smaller. The photo shows a detailed master class. 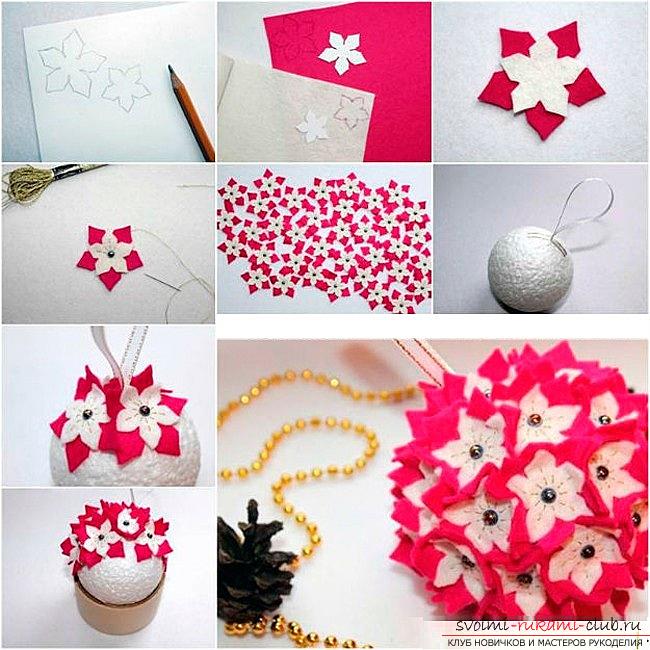 The next version of the decoration will be sequins. To fix them we used pins. To make the ball more vivid and interesting, try using carnations with beautiful hats. It can be sequins, pearls, you can paste rhinestones. Start to attach in concentric rows so that each subsequent sequin is slightly overlapped.
 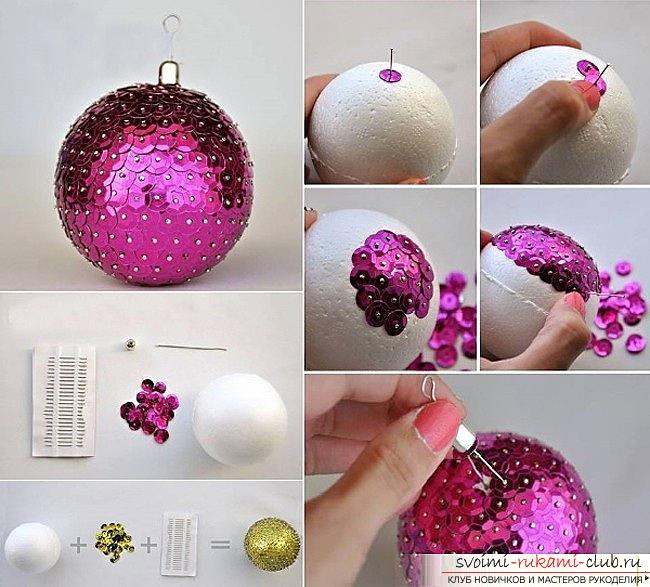 The photo shows the method of attachment step by step. For the decoration of another Christmas tree toy, you can use tiny corrugated paper flowers. Take our foam ball base and attach to it a loop from the ribbon, for which we later hang it on the tree. It is necessary to roll the paper into a roll and cut it with strips about 1 cm wide. Following the step-by-step photos, we turn the small ribbons from the resulting ribbons. We glue the base to them and cut off the unnecessary tail. Now carefully glue the flowers on the surface of the ball. To hide the gaps between the roses, we glued the beads in the tone of the paper and ribbon.
 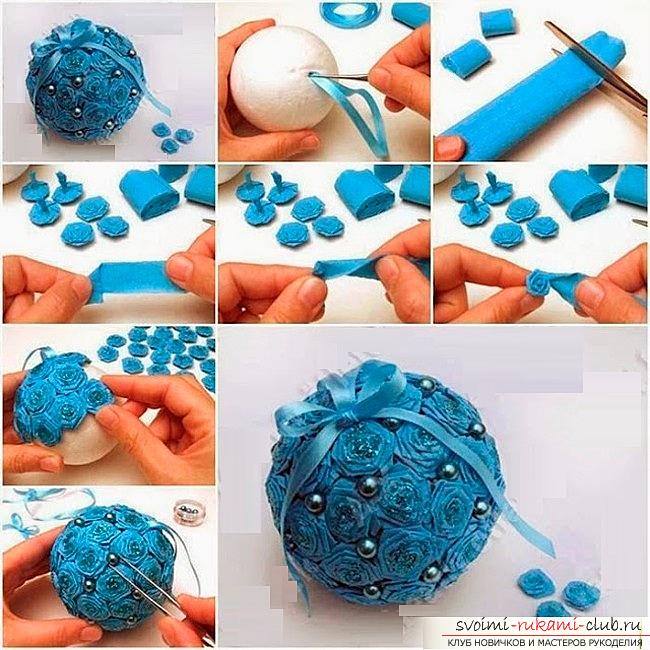 The next Christmas ball with our own hands, we will do in the style of vintage lace. Required:
- Foam base;
- Small pieces of lace;
- Glue;
- Paint white and the color of black coffee;
- Brush;
- Pin with a cap (base for Christmas toys);
- Tapes.
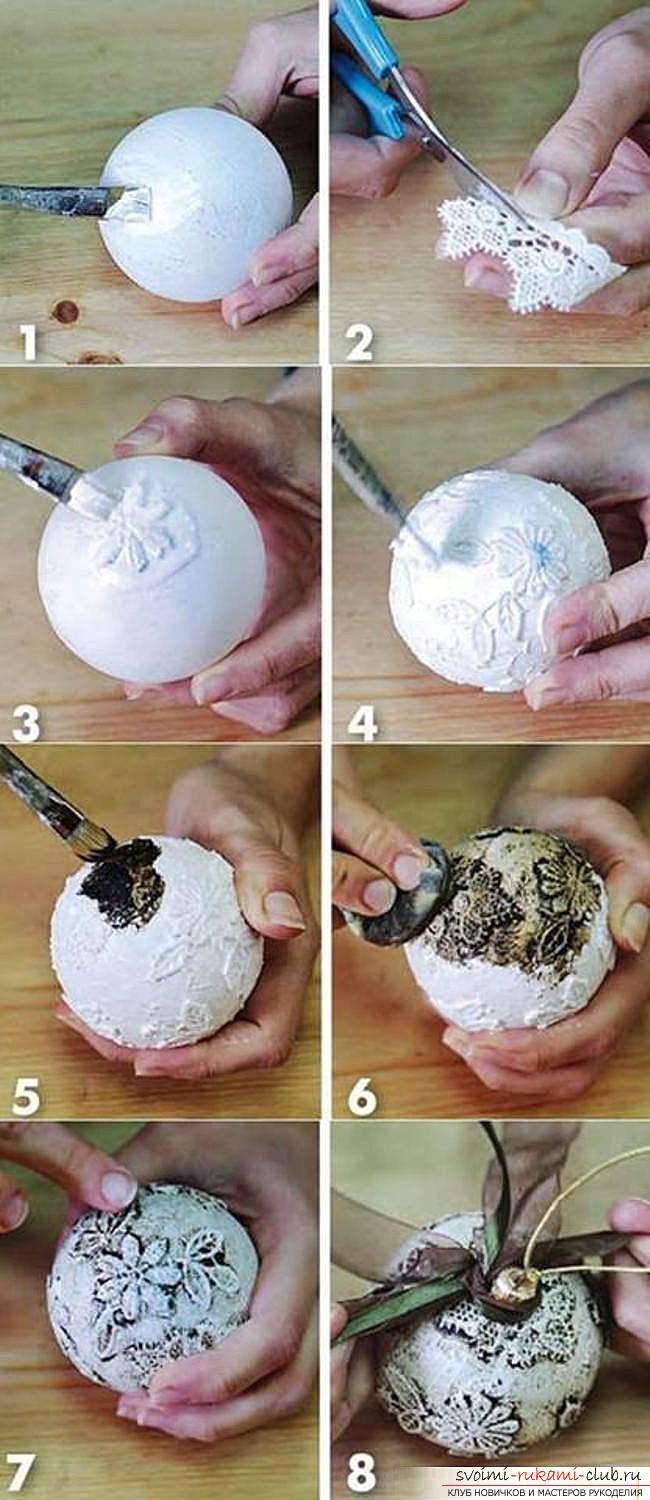 First, we cover the foam ball with a whitepaint. After it dries in an arbitrary order, we paste pieces of lace on the workpiece. The next stage will be the coating of the brown paint of our workpiece. Paint in several pieces, so as not to stain the handles. When the paint starts to dry, take the cotton pad, wet it with water and go through the entire painted surface, erasing the excess paint. Wipe with different intensity. Somewhere the paint will remain more, somewhere less and the ball will have a delightful vintage, vintage style. We will decorate the next Christmas ball in high-tech style. For this we need:
- Old CD (depending on the size of the ball you will need to take a few pieces);
- Plastic transparent Christmas ball;
- A small piece of golden satin fabric;
- Clay moment is crystal.
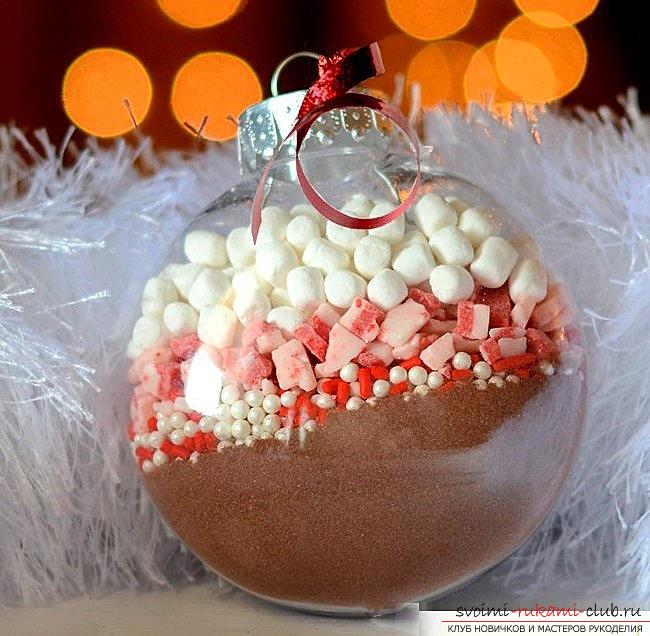
We cut our disks into small piecesfree form. We take our transparent ball and begin to glue the pieces of discs with a mirror surface to the outside. The location of the pieces does not matter, you glue them as fantasy tells you. 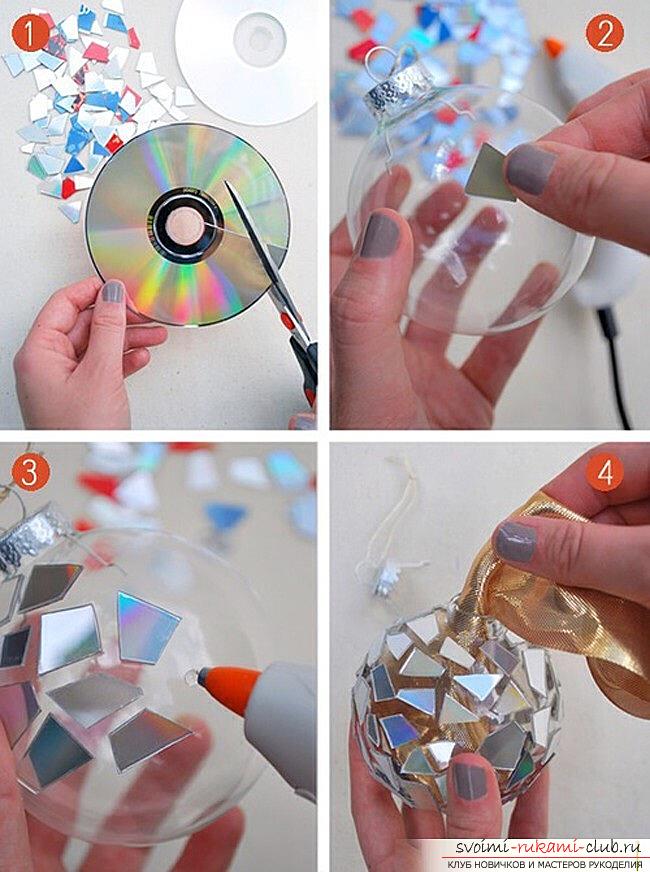 When the workpiece dries, remove the cap from thea loop on which the ball is suspended, we put inside a golden satin ribbon or just a cut of fabric. We put back the fastener. Our ball is ready. The next toy will be especially loved by all sweet tooth. Christmas tree decoration in the form of a cake with cherry. It will take:
- Small foam balls;
- Bright molds for cupcakes (made of foil or paper);
- Glue gun;
- Swords;
- Scarlet beads (preferably if they are pins);
- Large white sparkles.
Carefully put the skewers onthe convenience of working a foam ball with glue. We roll our workpiece in sequins. We glue the eyelet. We are waiting for the glue to dry. Then take the mousse molds. Such a corrugated "skirt" can be made from foil or buy ready. We put glue inside and put our workpiece. From above decorate with a simple bead or pin (they also need to be glued). Our sweet Christmas tree decoration is ready. 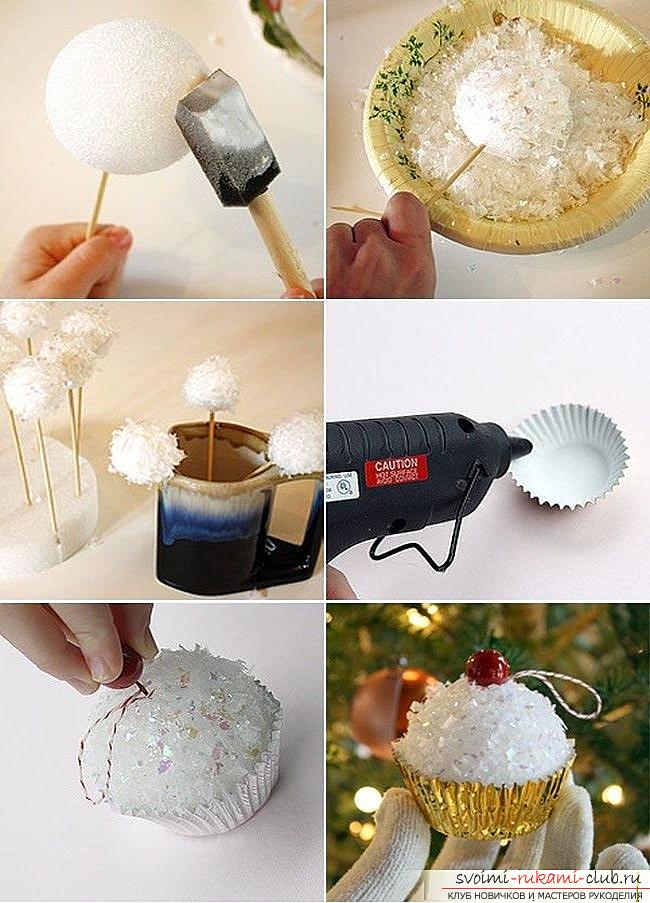 On New Year's Eve everything is always sparkling, shining,overflows with all the colors of the rainbow, and Christmas decorations are no exception. At home you probably have some beads or long forgotten unnecessary jewelry, or maybe an old sweater with rhinestones that you will not wear for anything and never. All shiny and iridescent elements can be cut off and boldly used for decorating Christmas balls.
 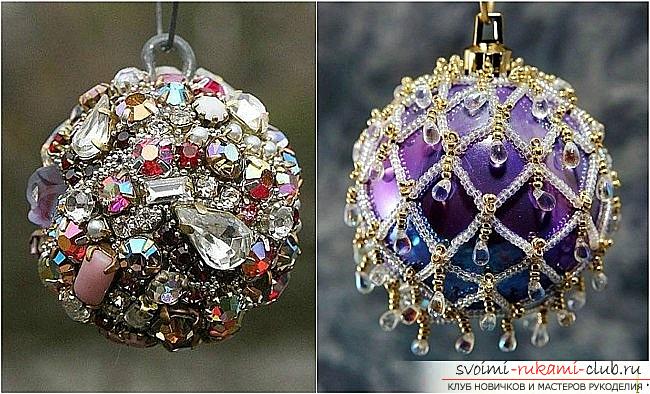 If you have rhinestones, crystals, bicones orbeads just put them on the glue. For decoration with beads of different sizes, a foam ball base and pins with a hat larger than the hole diameter will be needed. Below the photo shows in detail how it is possible to decorate a Christmas ball.
 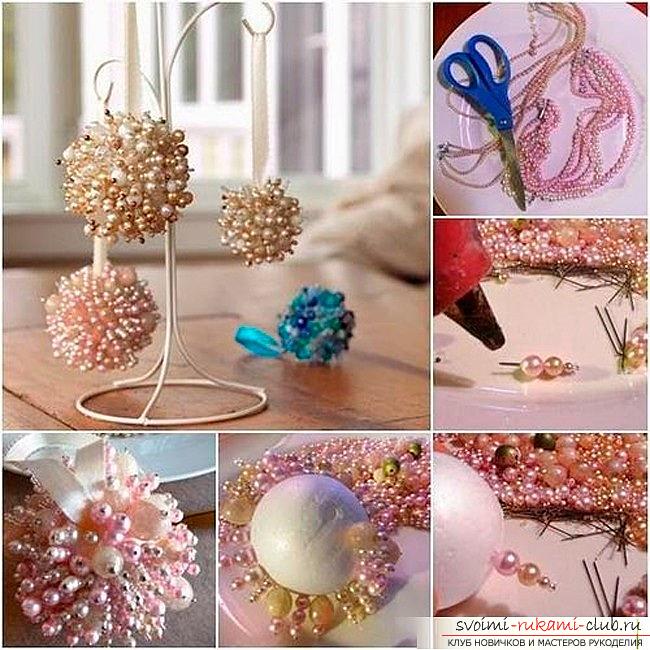 On the New Year tree, not only the balls hang. Outside, it's snowing, and the beauties of snowflakes are falling to the ground. And the delicate elegant beauties adorn the tree. In the New Year holidays, the family spends a lot of time together, and it will be very fun and great to make a snowflake with their own hands with the children. For this, you can use safe and funny materials, for example, pasta.
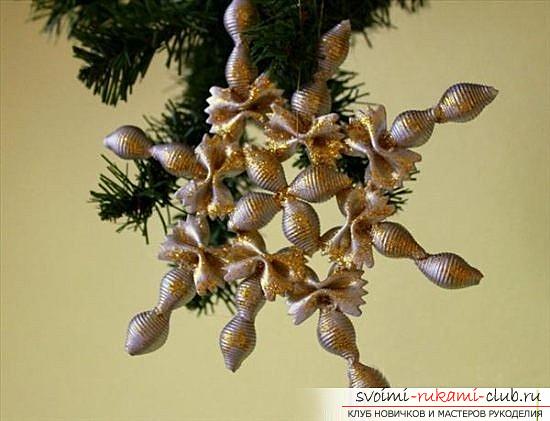
Snowflakes from macaroni own hands
 It will take:
- Macaroni products of the most various form (cockleshells, feathers, spirals, casters);
- Fastening material (for small children - plasticine, for those older - instant glue or PVA);
- Paints of different colors, silver and gold;
- Elements for decoration (suitable semolina, sugar, sparkles, beads and beads). The use of small parts is best carried out under the supervision of adults.
 Because working with instant glue for babieswill be difficult, we suggest the crumbs to glue the pasta together with plasticine. Then color and zadekorirovat. For adults, there are several ways to create and decorate snowflakes from pasta. One of them is as follows: glue the snowflake as usual, then cover it with PVA glue and roll in sugar, mango or sprinkle with sequins for nails. They can be purchased at cosmetics shops or salons of nail aesthetics.
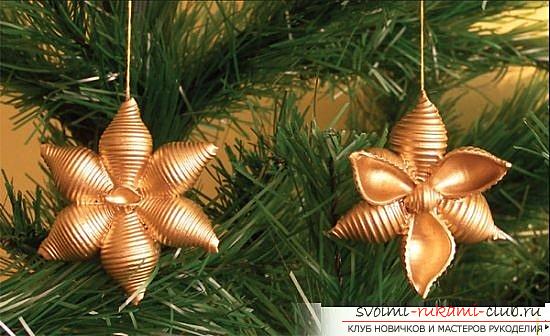
 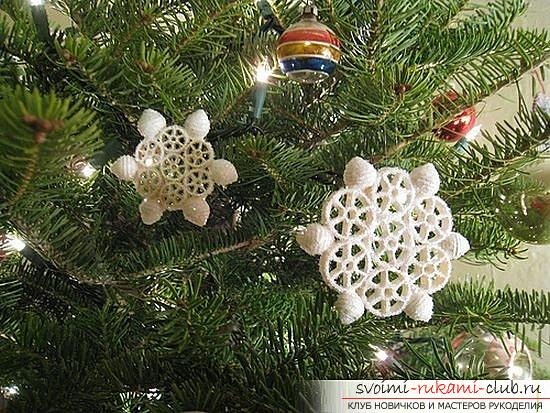 Very advantageous look snowflakes from pasta, painted with gold or silver paint.
  We have resulted some variants of such products, but the imagination of needlewomen is unlimited, therefore you can create real masterpieces together with your own.
 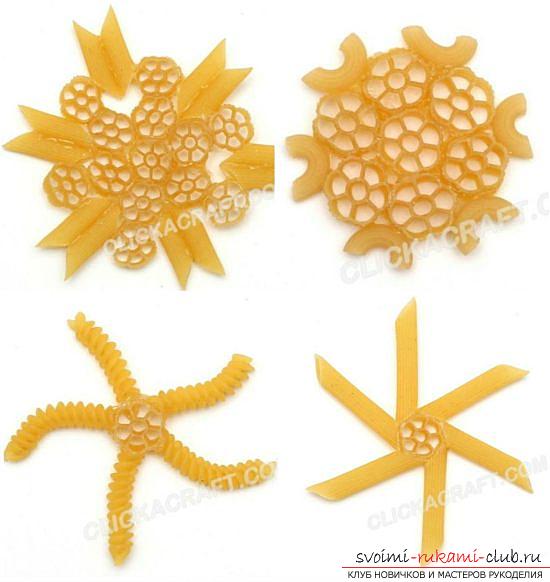 Are your children or do you like animals? You can decorate the Christmas tree with charming penguins made of old light bulbs. It will take:
- Unsuitable and old spoiled light bulbs;
- Paints;
- Paints;
- Brushes;
- A bit of glue;
- Thin ribbons.
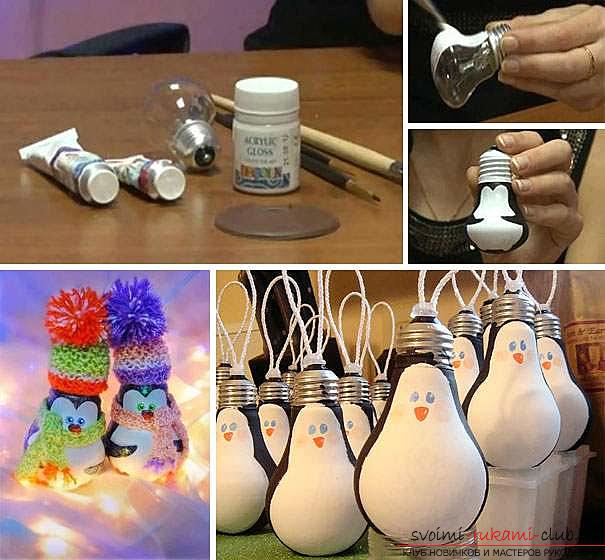 Make a penguin from an old light bulb veryjust enough paint a light bulb. After the paints dry, glue a ribbon around the socle in the form of a loop. It will be convenient for her to hang our penguins on spruce branches. You can borrow hats and scarves from dolls or build them yourself and dress up penguins.
 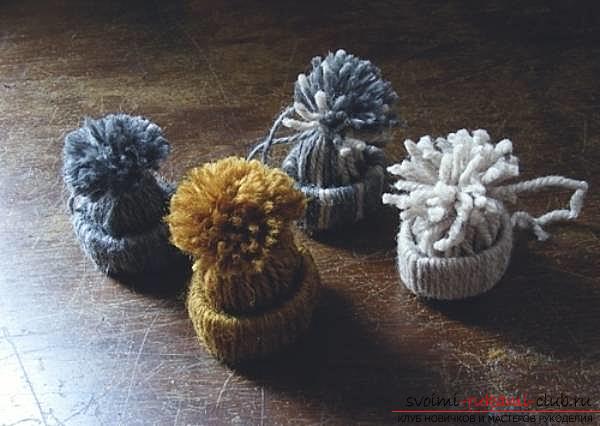 In order to make hats for penguins or use as an independent decoration you will need:
- Thick threads (you can use the rest of the yarn from any of your product);
- Sleeves of cardboard from toilet paper.
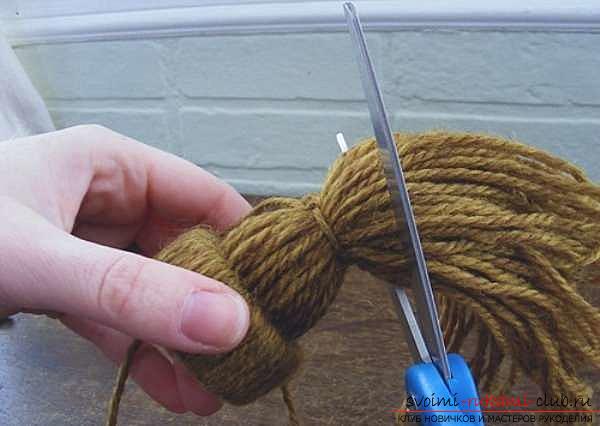
We cut cardboard blanks with rings. The width of the cap will depend on the height of the ring. 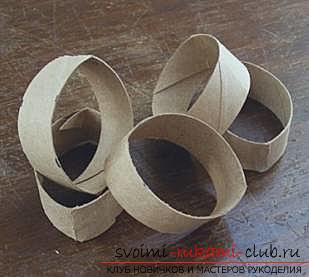 Now we cut the threads 30 cm long.
  Fold the thread in half and put it in the ring. Now take the ends of the thread and make a loop (see photo). Thus, we weave the entire cardboard blank. That's what we got.
 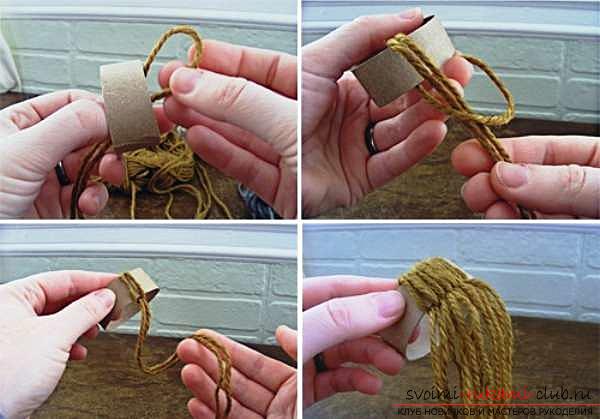 We take all the tails and thread them inring (see photo). At some distance from the ring (about 1.5 - 2 cm) we tightly bind the entire bundle of threads. It only remains to retreat from the string about 1 cm and cut off all the threads. We got a nice and funny cap with a bubo.
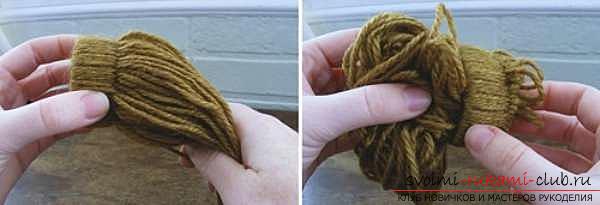

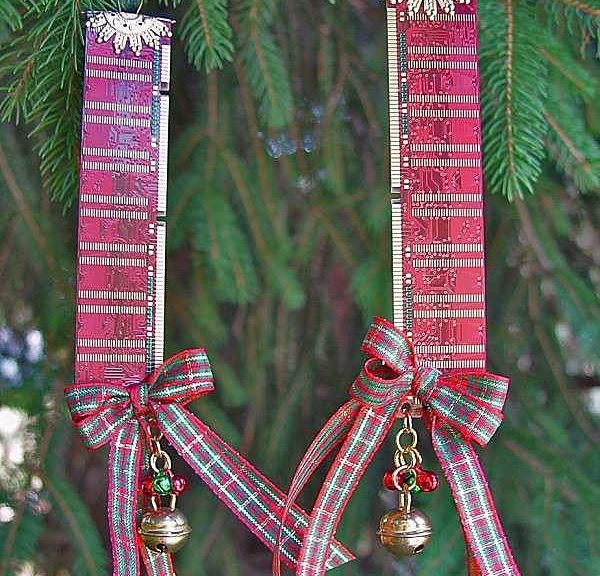
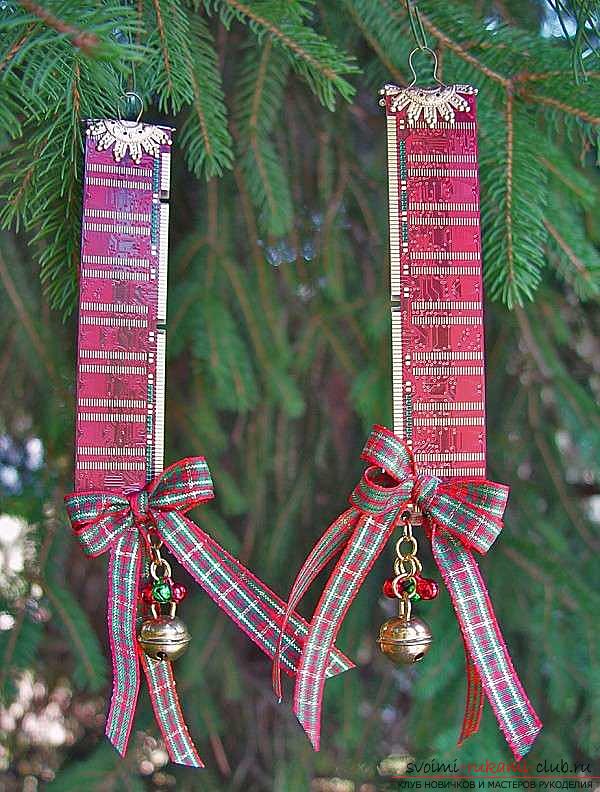
 Another version of the Christmas tree toys are necessarily interested in fans of modern technology and computers. You will need:
- Old computer parts (boards from game consoles, RAM, etc.);
- A drill with a thin drill (if not, a thin carnation and a hammer will fit);
- Instant glue;
- Ribbons, connecting rings and elements for decoration.
Using a drill, make a few holes. We insert rings there, we hang ribbons, bows and various ornaments. At the other end we attach a loop, for which we will hang it on the tree. 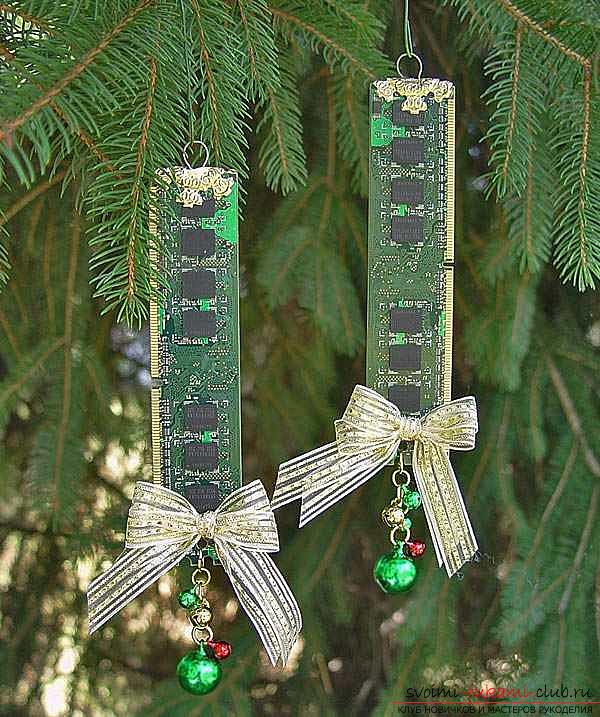
 Do not limit decorations to just these crafts. On the pages of our Club you will find many more ideas for creativity and inspiration, and your New Year will necessarily turn out to be fabulous.
Comments
Related posts:
 Master classes on weaving various Christmas decorations, photos, charts, description
 Master-class of making their own toys for decorating a Christmas tree - Christmas ribbons made of ribbons.
 Master classes for the manufacture of beautiful crafts for the New Year 2016 with their own hands with photos and step by step instructions.
 Free master classes on modeling crafts from the test with step-by-step photos and job description
 We learn to create crafts from vegetables for the exhibition with our own hands - master classes with photo and description.