
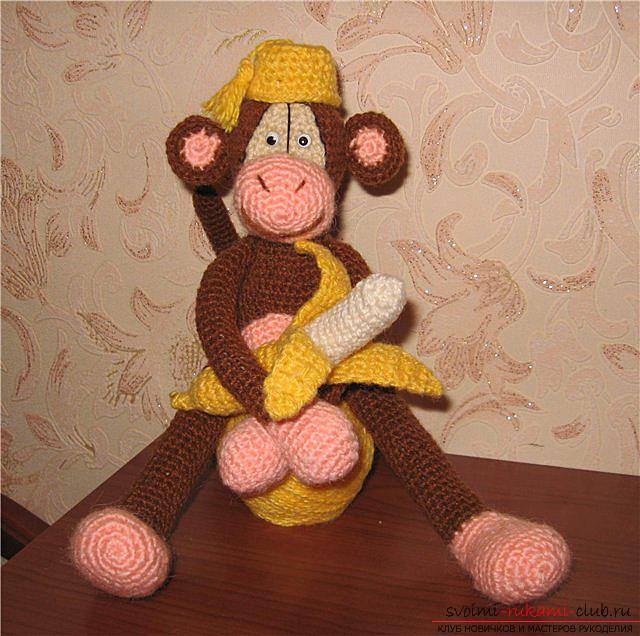
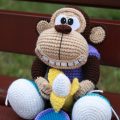
We knit monkey Amigurumi Abu with a hook with a step-by-step description and photo.
In this article, we will tell you in detail about how,how to crochet a monkey amigurumi with your own hands. Moreover, the coming 2016 will be held under her protection. Therefore, a gift in the form of a crocheted monkey will be very relevant throughout the year. In addition, an amigurumi monkey can be used as a toy for your children. We take the hook and begin the creative process. 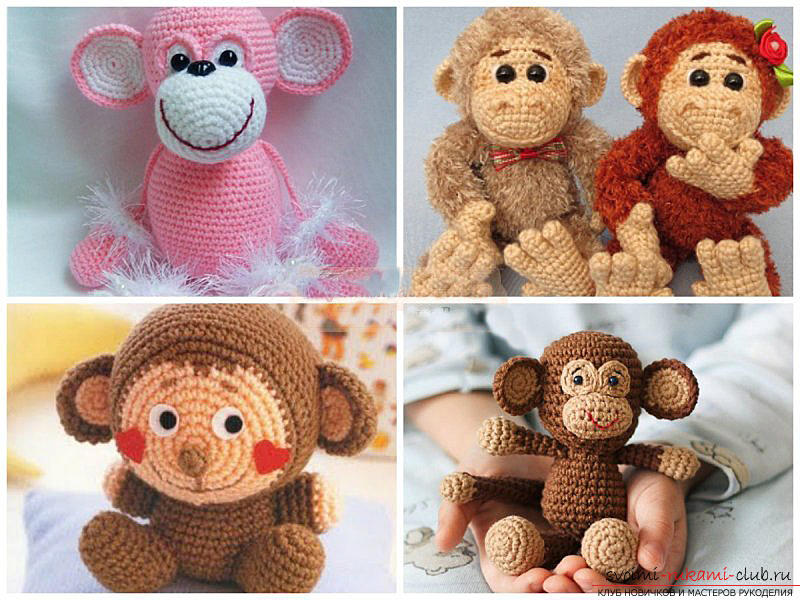 First you need to clearly decide what material will knit your monkey. For work you will need such materials:
- Yarn of several colors (brown and beigeto create the torso of the animal, yellow and red - to tie the headgear). Naturally, it is best to use natural yarn. The thickness of the thread will affect the size of the finished product. For a large monkey, you need a fairly tight yarn.
- Black threads of a mule (to embroider a nose and a mouth).
- Crochet hook, the number of which directly depends on the yarn chosen by you.
- Needle for stitching small parts.
- Black beads for the peephole.
- Wadding or sintepon for filling parts.
- Scissors.
- Wire.
 We mated the monkey by analogy withthe creation of other toys amigurumi - spireleobrazno (not adding an air loop in the initial part of all ryadochkov). Beginning needlewomen are advised to use a small pin, attached at the beginning of each new row, so as not to get confused in knitting. We knit the head of the future monkey This item should be made of beige yarn. The head has the shape of a ball. and the muzzle itself is knitted separately, and then attached to the base of the head. First ryadochek: tie six columns without a cloak in the form of a ring amigurumi. To create it, you need to dial two air loops, and then tie six columns without a cape in the 2 nd loop from the bottom of the hook. Second ryadochek: spend an increase in all the loops of the previous row - do the same actions six times. As a result, six increments should appear in this row (twelve loops in a row).
 Third ryadochek: we make an increase in all the loops of the previous row, create one column without a cape - do the same actions six times. As a result, eighteen loops are to appear in this row. The fourth ryadochek: spend an increase in all the loops of the previous row, create two columns without a cape - do the same actions six times. As a result, in this row there should be twenty-four loops. Fifth ryadochek: spend an increase in all the loops of the previous row, create three columns without a cape - do the same actions six times. As a result, in this row there should be thirty loops. Sixth ryadochek: we spend an increase in all the loops of the previous row, create four columns without a cape - to do the same actions six times. As a result, there are thirty-six loaves in this row. Seventh ryadochek: spend an increase in all the loops of the previous row, create five columns without a cape - do the same actions six times. As a result, forty-two loops should appear in this row.
 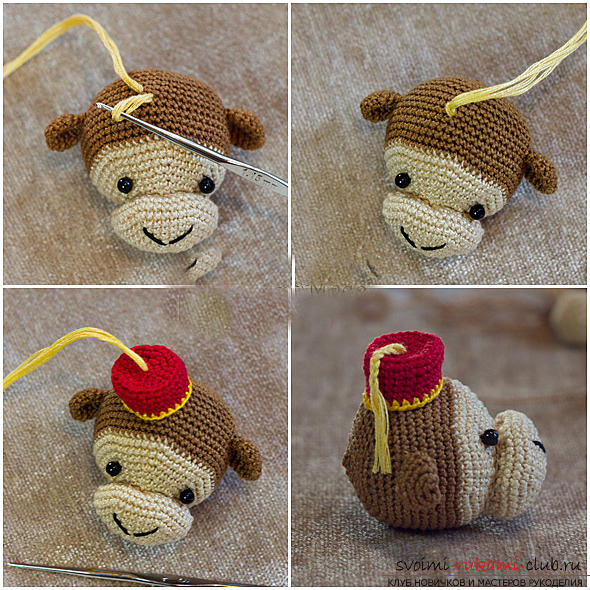 Eighth ryadochek: we make an increase in all the loops of the previous row, create six columns without a cape - do the same actions six times. As a result, forty-eight loops should appear in this row. Ninth ryadochek: spend an increase in all the loops of the previous row, create seven columns without a cape - do the same actions six times. As a result, there are fifty-four loops in this row. Next, you need to change the color of the work thread by taking a brown one. The tenth - the eighteenth row: we create one column without a cape in all the loops of the previous row - do the same actions six times (fifty-four loops in a row). Nineteenth ryadochek: create seven columns without a cape in all the eyelets of the previous row, we carry out a reduction - to do the same actions six times (forty-eight loops in a row). Twentieth ryadochek: create six columns without a cape in all the eyelets of the previous row, we carry out a reduction - to make similar actions six times (forty-two loops in a row).
  Twenty-first ryadochek: create five columns without a cape in all the loops of the previous row, we perform a reduction - do the same actions six times (thirty-six loops in a row). Twenty-second row: create four columns without a cloak in all the loops of the previous row, we carry out a reduction - make similar actions six times (thirty loops in a row). Twenty-third randochek: create three columns without a cape in all the loops of the previous row, we carry out a reduction - do similar actions six times (twenty-four loops in a row). Twenty fourth ryadochek: create two columns without a cape in all the eyelets of the previous row, we carry out a reduction - to do the same actions six times (eighteen loops in a row). We pass to the filling of the part with the synthepon.
  Twenty fifth row: We create one column without a cape in all the loops of the previous row, we carry out a decrease - make similar actions six times (twelve loops in a row). Twenty sixth ryadochek: we carry out a decrease - to do similar actions six times (six loops in a row). We end by tying the connecting column to the next loop. Make a knot, leaving a long string. Using a needle to pull off the hole that is left. The very same tail of the thread to hide from the wrong side.
We knit an animal's face
We have already said that these two details will be created separately. The muzzle must be knit with a beige yarn. First ryadochek: tie six columns without a cloak in the form of a ring amigurumi. 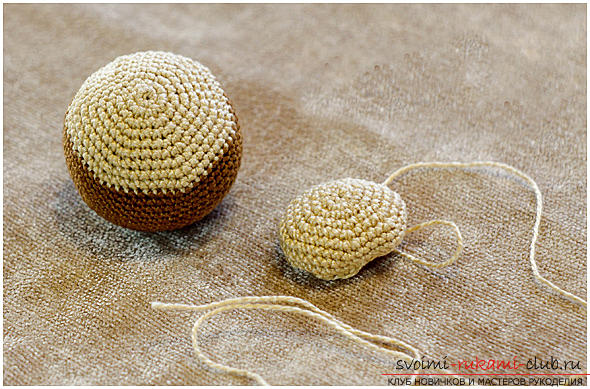 The second ryadochek: we make an increase in all the loops of the previous row - do the same actions six times. As a result, twelve loops are to appear in this row. Third ryadochek: spend an increase in all the loops of the previous row, create one column without a cape - do the same actions six times. As a result, eighteen loops are to appear in this row. The fourth ryadochek: spend an increase in all the loops of the previous row, create two columns without a cape - do the same actions six times. As a result, in this row there should be twenty-four loops. Fifth ryadochek: spend an increase in all the loops of the previous row, create three columns without a cape - do the same actions six times. As a result, in this row there should be thirty loops. Sixth ryadochek: we spend an increase in all the loops of the previous row, create four columns without a cape - to do the same actions six times. As a result, there are thirty-six loaves in this row. Seventh ryadochek: spend an increase in all the loops of the previous row, create five columns without a cape - do the same actions six times. As a result, forty-two loops should appear in this row. The eighth - the ninth ryadochki: we spend the bandage in all the eyelets of the previous row, we create one column without a cloak. As a result, in these rows there should be forty-two loops. Tenth ryadochek: we carry out the reduction until the completion of the row. As a result, in this row there should be twenty-one loops. We end by tying the connecting column to the next loop. Make a knot, leaving a long string. Using a needle to pull off the hole that is left. Before filling the face with a sintepon. The very same tail of the thread to hide from the wrong side. Attach a face to the head of a monkey. We knit the ears of the monkey amigurumi with their own hands (2 pcs.) First ryadochek: tie six columns without a cloak in the form of a ring amigurumi. Second ryadochek: spend an increase in all the loops of the previous row - do the same actions six times. As a result, twelve loops are to appear in this row.
  Third ryadochek: we make an increase in all the loops of the previous row, create one column without a cape - do the same actions six times. As a result, eighteen loops are to appear in this row. Four ryadochek: we spend the bandage in all the eyelets of the previous row, we create one column without a cloak. As a result, eighteen loops should appear in these rows. Fifth ryadochek: create one column without a cape, we carry out one decrease - to make similar actions six times. As a result, twelve loops should appear in these rows. Six ryadochek: create four columns without a cape, hold two adjustments, and then again - create four columns without a cape. As a result, there are eight loops in these rows.
  We end by tying the connecting column inthe subsequent loop. Knit Torso Amigurumi Monkey Torso need to knit a brown yarn. First ryadochek: tie six columns without a cloak in the form of a ring amigurumi. Second ryadochek: spend an increase in all the loops of the previous row - do the same actions six times. As a result, twelve loops are to appear in this row. Third ryadochek: spend an increase in all the loops of the previous row, create one column without a cape - do the same actions six times. As a result, eighteen loops are to appear in this row. Four ryadochek: we spend the bandage in all the eyelets of the previous row, create two columns without a cloak. As a result, these rows should have twenty-four loops. Fifth ryadochek: create one column without a cape, we carry out one decrease - to make similar actions six times. As a result, twelve loops should appear in these rows. Six ryadochek: create four columns without a cape, hold two adjustments, and then again - create four columns without a cape. As a result, there are eight loops in these rows. Fifth ryadochek: spend an increase in all the loops of the previous row, create three columns without a cape - do the same actions six times. As a result, in this row there should be thirty loops. Sixth ryadochek: we spend an increase in all the loops of the previous row, create four columns without a cape - to do the same actions six times. As a result, there are thirty-six loaves in this row. Seventh ryadochek: spend an increase in all the loops of the previous row, create five columns without a cape - do the same actions six times. As a result, forty-two loops should appear in this row.
 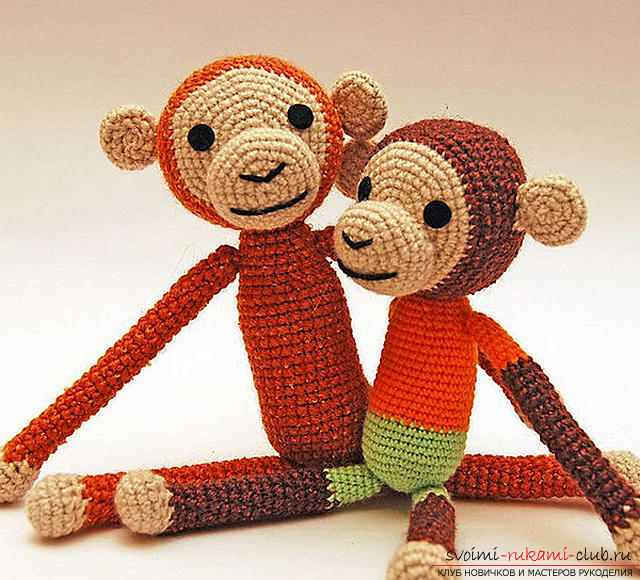 Eighth ryadochek: we make an increase in all the loops of the previous row, create six columns without a cape - do the same actions six times. As a result, forty-eight loops should appear in this row. Ninth ryadochek: spend an increase in all the loops of the previous row, create seven columns without a cape - do the same actions six times. As a result, there are fifty-four loops in this row. Next, you need to change the color of the work thread by taking a brown one. The tenth - the nineteenth row: we create one column without a cloak in all the loops of the previous row - do the same actions six times (fifty-four loops in a row). The twentieth ryadochek: create seven columns without a cape in all the eyelets of the previous row, we carry out a reduction - to do similar actions six times (forty-eight loops in a row). Twenty-first ryadochek: we spend the bandage in all the eyelets of the previous row, we create one column without a cloak. As a result, forty-eight loops should appear in this row. Twenty-second ryadochek: create six columns without a cloak in all the eyelets of the previous row, we carry out a decrease - to make similar actions six times (forty-two loops in a row). 23rd ryadochek: we spend the bandage in all the eyelets of the previous row, we create one column without a cloak. As a result, forty-two loops should appear in this row.
  Twenty fourth ryadochek: create five columns without a cape in all the loops of the previous row, we perform a reduction - do the same actions six times (thirty-six loops in a row). Twenty fifth ryadochek: we spend the bandage in all the eyelets of the previous row, we create one column without a cloak. As a result, there are thirty-six loaves in this row. Twenty sixth row: create four columns without a cloak in all the eyelets of the previous row, we carry out a reduction - to make similar actions six times (thirty loops in a row). Twenty seventh ryadochek: we spend the bandage in all the eyelets of the previous row, we create one column without a cloak. As a result, in this row there should be thirty loops. Twenty eighth ryadochek: create three columns without a cloak in all the eyelets of the previous row, we carry out a decrease - to make similar actions six times (twenty-four loops in a row). Twenty-ninth - the thirtieth ryadochki: we spend a bandage in all the eyelets of the previous row, we create one column without a cloak. As a result, in this row there should be twenty-four loops. We end by tying the connecting column to the next loop. Make a knot, leaving a long string. Using a needle to pull off the hole that is left. The very same tail of the thread to hide from the wrong side. Knit Arm Amigurumi Monkey (2 pcs.) The trunk needs to be knit with a beige yarn. First ryadochek: tie six columns without a cloak in the form of a ring amigurumi.
 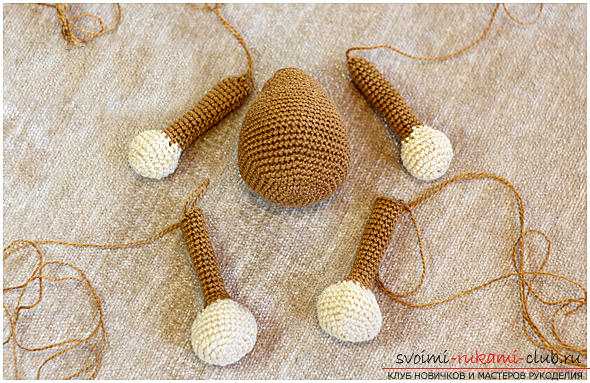 The second ryadochek: we make an increase in all the loops of the previous row - do the same actions six times. As a result, twelve loops are to appear in this row. Third ryadochek: spend an increase in all the loops of the previous row, create one column without a cape - do the same actions six times. As a result, eighteen loops are to appear in this row. Four ryadochek: we spend the bandage in all the eyelets of the previous row, create two columns without a cape - do similar actions six times. As a result, these rows should have twenty-four loops. The fifth - the seventh ryadochki: we spend a bandage in all the eyelets of the previous row, we create one column without a cloak. As a result, in this row there should be twenty-four loops. Eighth ryadochek: create two columns without a cape, we carry out a decrease - to make similar actions six times. As a result, eighteen loops should appear in these rows. Ninth ryadochek: create one column without a cape, we carry out a decrease - to make similar actions six times. As a result, twelve loops should appear in these rows. Change the color of the working thread. Tenth - twenty-sixth ryadochki: we spend the bandage in all the eyelets of the previous row, we create one column without a cloak. As a result, twelve loops are to appear in this row. We end by tying the connecting column to the next loop. Make a knot, leaving a long string. Using a needle to pull off the hole that is left. The very same tail of the thread to hide from the wrong side. Attach the hands to the body of the monkey. Knitting the legs of the monkey amigurumi (2 pcs.) The trunk needs to be knit with a beige yarn. First ryadochek: tie six columns without a cloak in the form of a ring amigurumi. Second ryadochek: spend an increase in all the loops of the previous row - do the same actions six times. As a result, twelve loops are to appear in this row. Third ryadochek: spend an increase in all the loops of the previous row, create one column without a cape - do the same actions six times. As a result, eighteen loops are to appear in this row. Four ryadochek: we spend the bandage in all the eyelets of the previous row, create two columns without a cape - do similar actions six times. As a result, these rows should have twenty-four loops.
 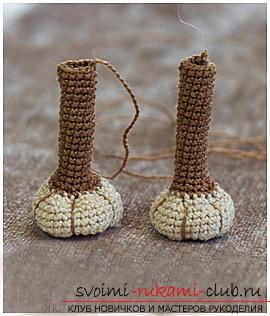 Fifth ryadochek: hold an increase, create three columns without a cape, - do the same actions six times. As a result, in these rows there should be thirty loops. Sixth - ninth ryadochki: we spend the bandage in all the eyelets of the previous row, we create one column without a cloak. As a result, in this row there should be thirty loops. Tenth ryadochek: create three columns without a cape, we carry out 1 reduction - to make similar actions six times. As a result, these rows should have twenty-four loops. The eleventh row: we create two columns without a cape, we carry out 1 reduction - to make similar actions six times. As a result, eighteen loops should appear in these rows. Let's change the yarn to brown threads.
 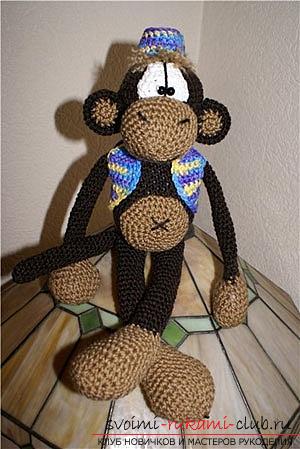 Twelfth ryadochek: we make a bandage in all the loops of the preceding row, create one column without a cloak. As a result, eighteen loops are to appear in this row. Thirteenth row: we create one column without a cape, we carry out 1 reduction - to make similar actions six times. As a result, twelve loops should appear in these rows. Fourteenth - thirtieth row: create one column without a cape in all the eyelets of the previous row. As a result, twelve loops should appear in these rows. Then you need to fill that detail, which is created with a beige yarn. Fingers are formed by tightening the feet of the animal with the help of threads. How to tie the tail of a monkey?
  When knitting we use brown yarn. First ryadochek: tie six columns without a cloak in the form of a ring amigurumi. Second ryadochek: we spend four increases, we knit two columns without a cloak. As a result, in this row there should be ten loops. Third ryadochek: we spend the bandage in all the eyelets of the previous row, we create one column without a cloak. As a result, in this row there should be ten loops.
 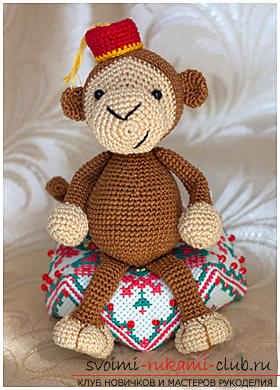 Knitting to continue until the necessarylength of the tail (about thirty-five - forty ryadochkov). Knitting hats for a monkey Abu Torso need to knit a yarn of red color. First ryadochek: tie six columns without a cloak in the form of a ring amigurumi. Second ryadochek: spend an increase in all the loops of the previous row - do the same actions six times. As a result, twelve loops are to appear in this row. Third ryadochek: spend an increase in all the loops of the previous row, create one column without a cape - do the same actions six times. As a result, eighteen loops are to appear in this row. The fourth ryadochek: spend an increase in all the loops of the previous row, create two columns without a cape - do the same actions six times. As a result, in this row there should be twenty-four loops.
 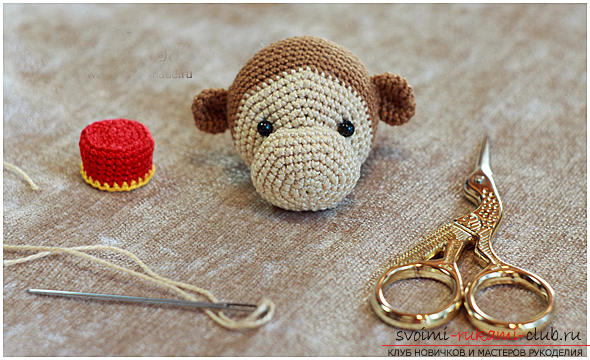 Fifth ryadochek: we make a bandage in all the eyelets only for the posterior stenochku, we create one column without a cape in all the eyelets of the preceding row. As a result, in this row there should be twenty-four loops. Sixth - eighth row: we make a dressing in all the eyelets of the previous row, we create one column without a cloak. As a result, in this row there should be twenty-four loops. The final row should be tied with yellow thread. Ninth ryadochek: we spend the bandage in all the eyelets, we create one column without a cape in all the eyelets of the previous row. As a result, in this row there should be twenty-four loops. We collect the details of the toy. We advise you to first carry out the design of the muzzle of the beast, and only then go to the attachment of the legs and trunk. Step-by-step description of the stages of the assembly: 1. Attach the face to the head of the toy. 2. Attach the ears. 3. Carry out the design of the face of the animal: attach the beads (eyes) with a needle, make an embroidery of the mouth and spout. The edges of the threads should be taken out to where the trunk will later be fastened. 4. Lock the cap on the head of the toy. 5. Attach the trunk. 6. Attach the tail and legs. For their strength, you can pass through them a wire. That's all! Your monkey amigurumi is ready!
Comments
Related posts:
 Master class on knitting monkey amigurumi crochet with their own hands with step-by-step description and photo.
 Master class with photo and step-by-step description will teach how to tie an amigurumi crochet toy
 Master class on knitting monkeys with amigurum crochet for beginners with step-by-step description and photo.
 We knit crochet toys amigurumi with our own hands with detailed descriptions and photos.
 How to tie a lamb with an amigurum crochet: a master class with a detailed description and a photo