
Some useful ideas for autumn crafts, which can be useful for children in school.
A new academic year began, and with it arose, andthe eternal problem of crafts on the theme of autumn to school. And it is clear that with this problem the child will come to his mother-needlewoman. So, you, dear masters, it's time to start preparing to meet any teaching task fully armed. Of course, with the words "school crafts from autumn materials," first of all, animals from chestnuts and acorns, appliqués from leaves and other unpretentious little things are noteworthy. It's clear, they can not do without, especially for kids. But we are creative people to find non-standard solutions. And this autumn we will try to please school teachers with something fresh and unusual. Let's start with a simple one. An evil-looking spider in a thread web is what is needed for boys. Take two twigs, fold them crosswise, wind the center with a stiff white thread. Add two more twigs, they also screw, as follows. It is possible to fix the middle with a glue gun for reliability. Then wind the thread between the twigs, creating a "spiderweb". Glue here and there a few autumn leaves (they need to be dried in advance). From the chestnut and thin branches collect the spider and put it in the center on hot glue. 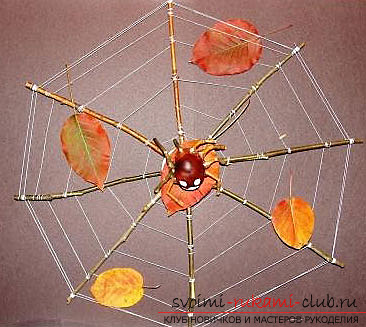 A postcard is another good way to get into the businesssmall dried leaves. To make a basis from a cardboard and to paste with glue PVA drawing the child can independently. You can help him with the composition or find in his hamster supplies suitable materials for decoration, so that the postcard looks more beautiful.
 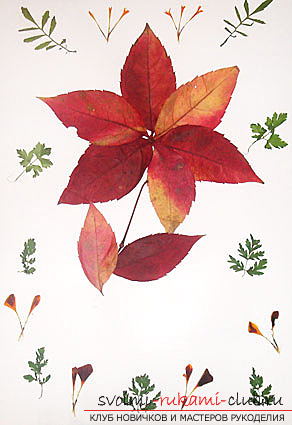 Create from natural materials amazingsilhouette picture, which is not embarrassing to hang in the living room, very simple. Lay out on a sheet of cardboard a composition of leaves, twigs, spikelets, etc. Take liquid paint and an old toothbrush. Dip the brush into the paint, and then swipe your finger along its bristles, directing the spray to the drawing. To train better on the street, otherwise artistic creativity will have to be combined with cleaning. Make sure that the leaves on the cardboard do not move from the place until you finish the job. Then gently remove them and send the picture to dry. You can do it easier and use paint in the can, but in this case the process must necessarily proceed under your supervision - for the child this paint is unsafe.
 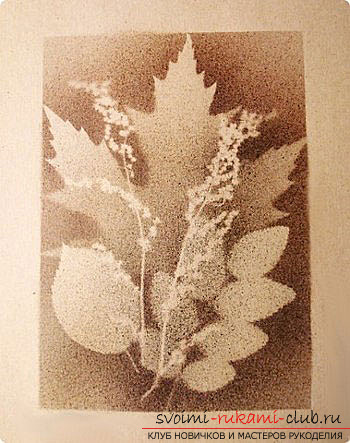 From a small twig and four seeds-lionfish you will get a magnificent dragonfly. Glue the lionfish glue gun, and then entrust your child with grease with glue and sprinkle with sequins.
 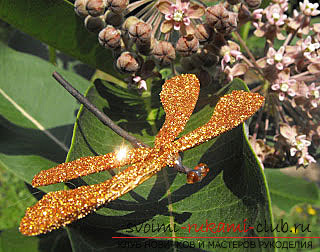 Topiary from acorns - quite "adult" work,However, the student can be instructed to at least half the process. Fix the old ball on the stick with hot glue. Then glue the acorns. You can work with an adhesive gun, applying a drop of glue to the desired area, and your child will spread the acorns on the ball. Then "top up" the topiary with gold paint from the can. In a small pot, pour small pebbles (you can also send a child behind them), "plant" a trunk in them and fill it with gypsum.
 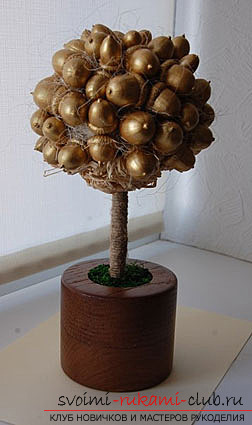 A paperweight made of stones adorned with leaves -stylish and unusual. Such work can become not only a school craft, but a good gift. Send the child "on the hunt" for smooth flat stones and beautiful leaves. Leaves should be small and thin. Rinse and dry both. Stick the leaves on the stones (it seems to me that the PVA glue should come up), dry and varnish.
 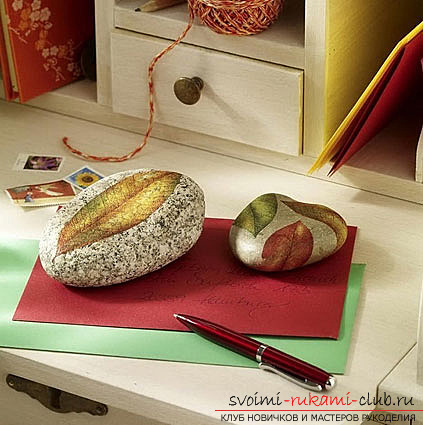 Leaf prints on polymer clay -pretty bauble. However, it can be used in the design of cards or make a magnet on the refrigerator. You will need small leaves with relief veins and self-hardening polymer clay (you can replace it with a salt test). From the clay you need to roll balls, crush them into flat cakes. In the middle, put the leaves down and press down (you can lightly roll them with a rolling pin). Then remove the leaves. Clay should be dried, baking - bake. After that, it remains only to color the prints.
 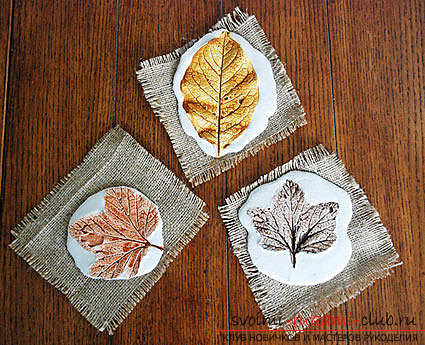 Gypsum castings of leaves - a difficult subject forschool crafts, but with a skilful mother there is nothing impossible. Especially if you study the theory in advance and read the master classes on gypsum castings. Place a plastic wrap in the tray or on the tray. Lay the leaves on it with streaks up. Dissolve the gypsum and carefully fill each sheet with it separately. You can make the eyelets from the cord, attach to the center of the sheet and fasten the bay over the node with another layer of gypsum. Allow the gypsum to harden. Then remove the casting, remove the sheet. With a knife, cut off excess gypsum on the contour of the sheet while it is still soft. Dry completely and paint.
Comments
Related posts:
 A few examples of autumn crafts for children from pompoms, which can be done at home.
 Original ideas for autumn crafts made of clay, leaves, nuts, pebbles and shells.
 Several schemes of crafts made of beads, which will suit those who are just beginning to engage in this kind of needlework
 A large number of samples of autumn crafts made of paper for children. Photos and descriptions.
 What to make of the globe: several creative ideas