
New and original ideas for the design of a funny bear toy. We make excellent gifts for our beloved children with our own hands. Photos and instructions
Young mothers may feel that sewinga toy for your favorite child - it is difficult, and almost impossible, if you are not a professional seamstress. Especially for you it will be demonstrated that it is possible to make a nice toy without having any special skills. You only need to have an old and useless sock at hand. From it, a cute teddy bear will be sewn. And at the same time, you will be able to comprehend the basics of cutting and sewing. What do you need to sew a teddy bear?
Once the preparatory work is completed, you can proceed directly to sewing.
For beginners, it is necessary to clarify what iscutting. Cutting is cutting the material to create future products from it. Therefore, most often they use ready-made paper or cardboard patterns. Before you start cutting the fabric, you should first apply the outline of the future parts. What should you use for this? It is best to apply the outline with soap or chalk. These materials do not leave marks after washing. It is better to use a piece of soap with a sharp edge. Otherwise, you need to cut the edge of the soap for drawing. It is important that the appearance of the bear is excellent, because you are sewing a bear for your child. Felt-tip pens and a ballpoint pen are categorically not suitable! It is also not recommended to use a light pencil, because the mark will still remain, albeit weak.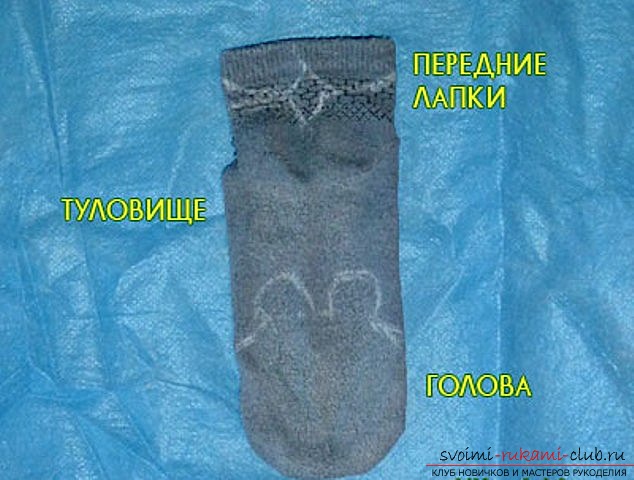
You may be bothered by the bulge from the heel of the sock,but don't worry about it. Everything is as it should be, because this will be the future bear's bottom. You are sewing a sitting soft toy! Now you should trim the two pieces in the area of the elastic of the sock. They remained after cutting out the body itself. As a result, you have the bear's front paws.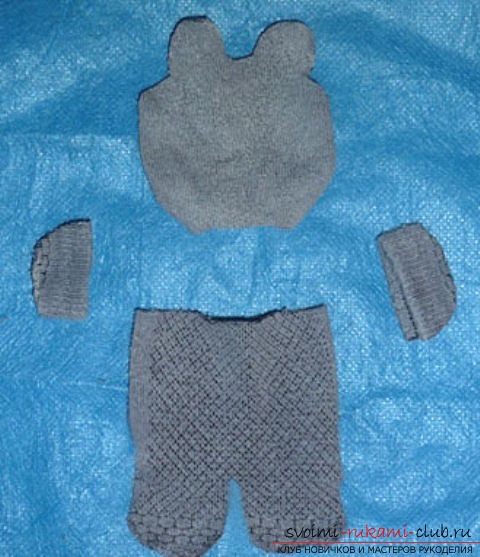 That's it. The details of the future bear are ready. Now you can start sewing.
 Some young mothers do not know what an overlock stitch is. There is nothing complicated about it. When sewing with an overlock stitch, the needle should go like this (from right to left). Everything is shown in the picture.
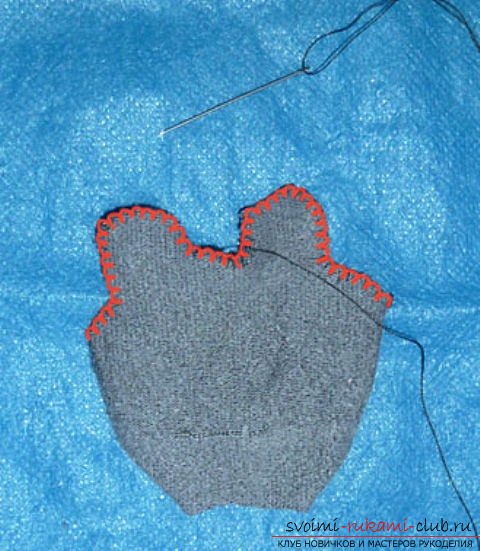
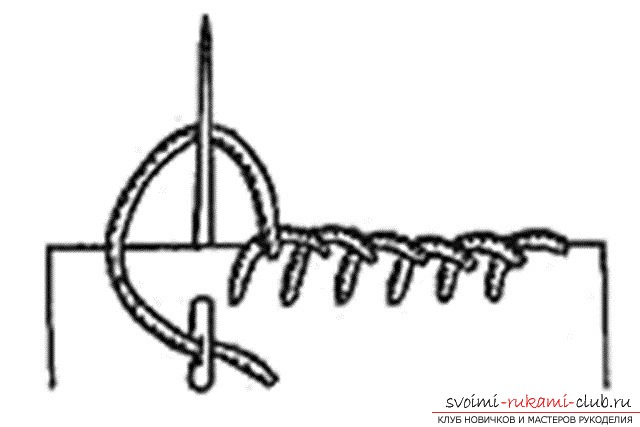 The overlock stitch is mainly used forovercasting edges or loops, as well as for hand-stitching two parts into a single whole. It helps the fabric not to fray and holds the halves of the canvas firmly. By the way, it is almost impossible to unravel such a seam, even if one edge of the thread miraculously comes free. This is what the bear's head looks like with the top edge sewn up:
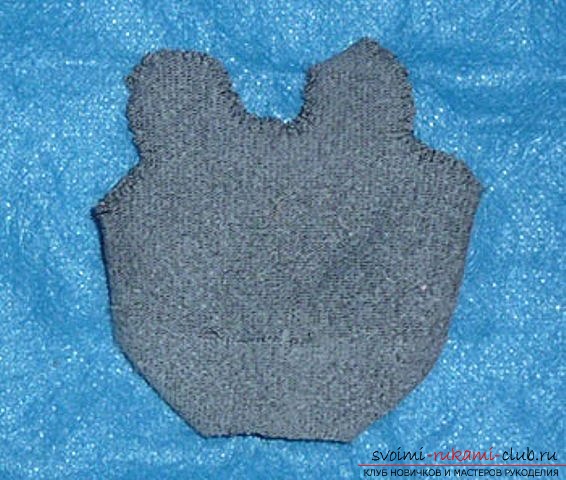 Now we turn the resulting part inside outside, and start stuffing with filler. You can use cotton wool or synthetic padding. The main thing is that the toy ends up being soft. Advice. First, you need to stuff the ears of the product, and then everything else. Now you need to sew the lower part of the body. To do this, turn the part inside out and sew it with an overlock stitch. In the photo, the seam line is shown in orange. Now turn the part right side out.
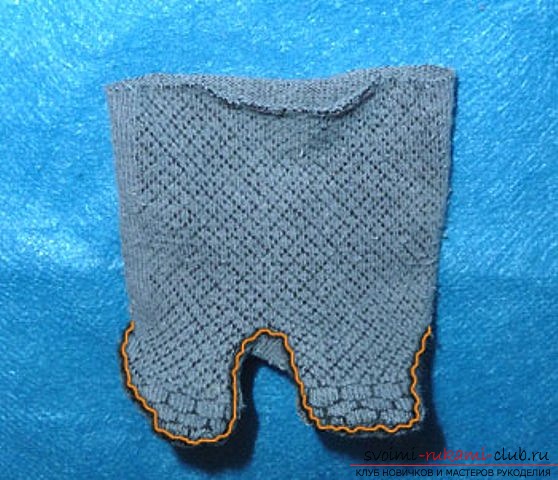 Fill the body of the future bear with stuffing.The next step is to tighten the open edges of the bear's head and body. Take a needle and thread and stitch the open edges of the body of the product using the most common stitch called "Forward Needle". The stitches should not be too small, somewhere around 5-8 millimeters. Tighten the ends of the thread, then tie them with a couple of knots, and then cut off the excess ends. Do the same with the open bottom edge of the head. For the next part, you will need white knitted fabric. A regular white sock or an old snow-white T-shirt will do. Cut out an oval from the fabric, the size of which is approximately equal to half the bear's muzzle. Sew this part to the lower area of the bear's muzzle. Beforehand, put a little filler under the white oval piece of fabric so that this half of the muzzle becomes slightly convex. To sew the oval, use this type of overcast stitch:
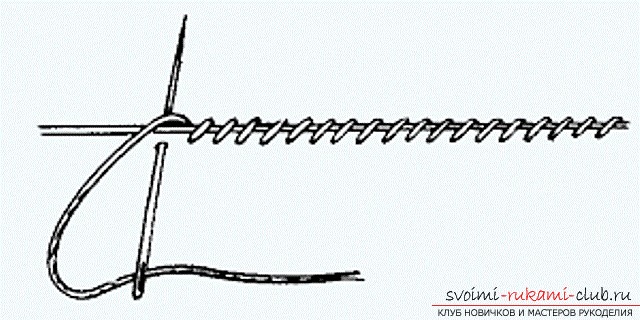 Connect the head and body together.Now it's time to work on the front paws. They need to be sewn in the same way as the head and body were sewn earlier. Turn the parts inside out, sew so that the bottom edge remains open. Turn the part right side out and fill it with cotton wool or padding polyester. Sew the paws to the body with an overcast stitch. Place them on the sides, but below the head. For the mouth, find a small black button, preferably with an eye, not with holes. It will look much better! The mouth can be made using three stitches of thread. Start the seam under the nose, and finish the work under it. Secure the thread. Make the bear's eyes. What materials? There are many options!
- Black beads.
- Black buttons.
- White buttons with four holes to sew on with black thread using the "criss-cross" method.
- Black circles, pre-cut from the material.
- First, sew white circles of fabric, and on top – sulfur circles, but smaller in size – you will get pupils.
Let's create the bear's chest. From the white cloth that was used to create the muzzle, make the following detail:After which, it must be sewn to the chest.You can sew the apron not over the entire surface, but grab only the upper ends at the back – you will get a bib. That's it! The teddy bear is ready. Let your child enjoy the new toy, and in the meantime you will gain invaluable experience in cutting and sewing.
Comments
Related posts:
 Beautiful and original ideas for the design of a soft horse toy. We make wonderful gifts for the holidays for our beloved children
 New and original ideas for a coat for a girl. We make clothes for the child in the latest fashion of 2014. Simple instructions and photos
 Beautiful and original ideas for the design of children's toys made of felt. We make wonderful gifts for the holidays for our beloved children
 New and original ideas for the design of children's clothing. Original and simple solutions that will help you make an excellent gift to your child. Simple instructions and photos
 New and original ideas for the design of a fashionable dress with a lush skirt. Beautiful and unique solutions that will help you make a wonderful gift to your beloved. Easy instructions and photos