New Year 2016, New Year's crafts with their own hands, presents for the new year with their own hands, New Year's toys with their own hands.
New Year's crafts begin to be prepared closer toholidays, at the same time you can use absolutely any materials. Your creations should be bright and elegant. This article will tell you how to make a lot of unique New Year decorations at home in a quick time. Decorate Christmas balls with mosaic from CDs Unused CDs can be used to create a variety of crafts. And one of them is a decorated New Year's ball. Using old discs you can decorate a lot of things, thereby giving them a new and more unusual look. The same option can be used to create large balls that will be an excellent decoration for any party. 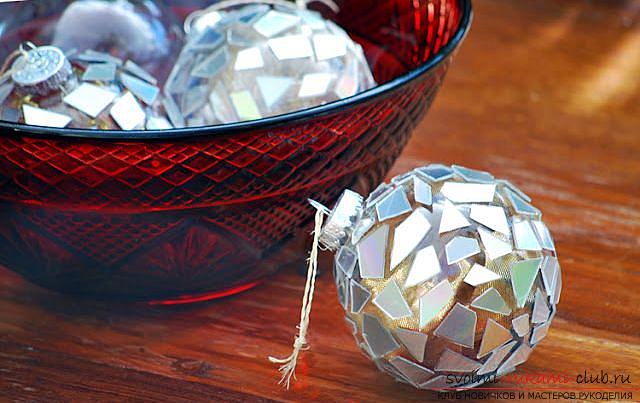 To make such a Christmas tree decoration, you will need several old disks, a suitable ball, scissors, and glue.
  First, cut the CDs into lotssmall parts of various shapes. Of course, this is not the most suitable material for cutting, but if you use well-sharpened scissors, you will succeed. Next, you need to lubricate one by one the small surfaces of the ball and glue them to the piece of disc with a shiny side up. In this way, cover the entire surface with the discs, but do not try to make it perfect, looking for suitable pieces to fold the puzzle. Than detail will be more chaotic, so the New Year ball will be more beautiful. If you use a transparent ball in your work, it is best to fill it with pieces of foil or golden material. This element will hide all the points of the glue and make the ball more interesting.
 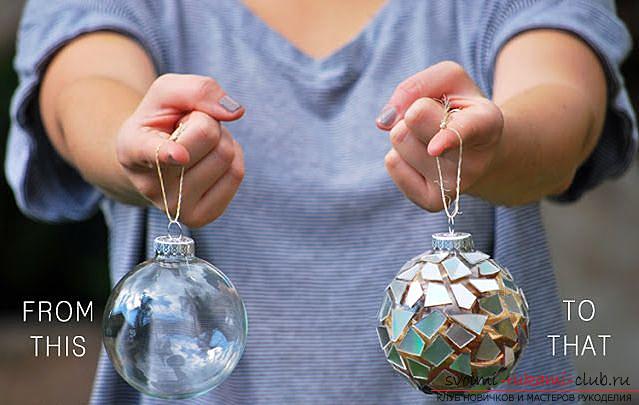 New Year's decorations from wine corks If you havesomewhere in the locker, a small amount of traffic jams lay around, they can easily be used to create original Christmas decorations. Most of these ideas do not require any additional materials or tools. In addition to the jams, you only need to prepare glue. Do not forget to call your children, they will also like this job.
 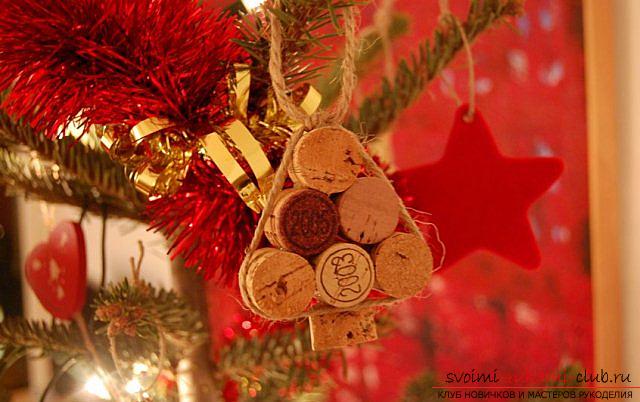 Fold the six cork into the shape of the pyramid and glue it together.they are among themselves an adhesive gun or other glue that is at your fingertips. Seventh cork cut into a couple of parts that will serve as the trunks of future toys. And to decorate the Christmas tree decorations on a branch, tie it with a ribbon or a decorative rope. In a similar way, all sorts of figurines can be made of cork, it can be berry or grapes. You can leave the toy with a natural color, but it will look more bright in case if the stoppers are painted and covered with sequins.
 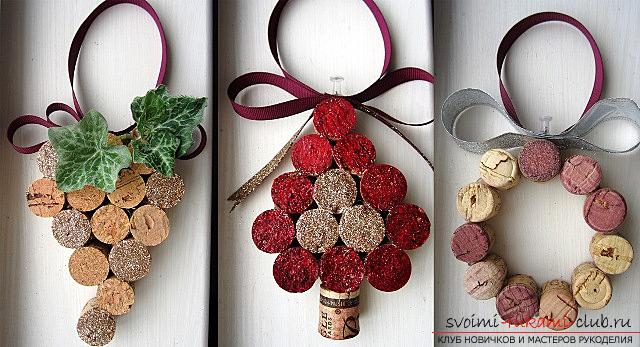 Such ornaments can decorate holiday bottles with wine or champagne.
 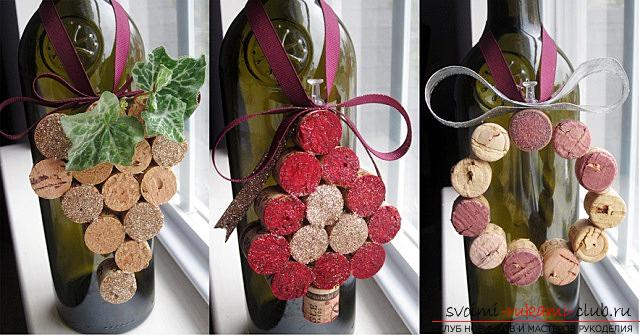 Experiment and create jewelry fromtraffic jams of extraordinary beauty. They will be an excellent decor of your house on the eve of the New Year holidays. Modern tree "Pop Tree", which saves space Pop Tree in English means modern wood. It is an excellent alternative to the New Year tree with a more perfect design. In this case, it can take many different species.
 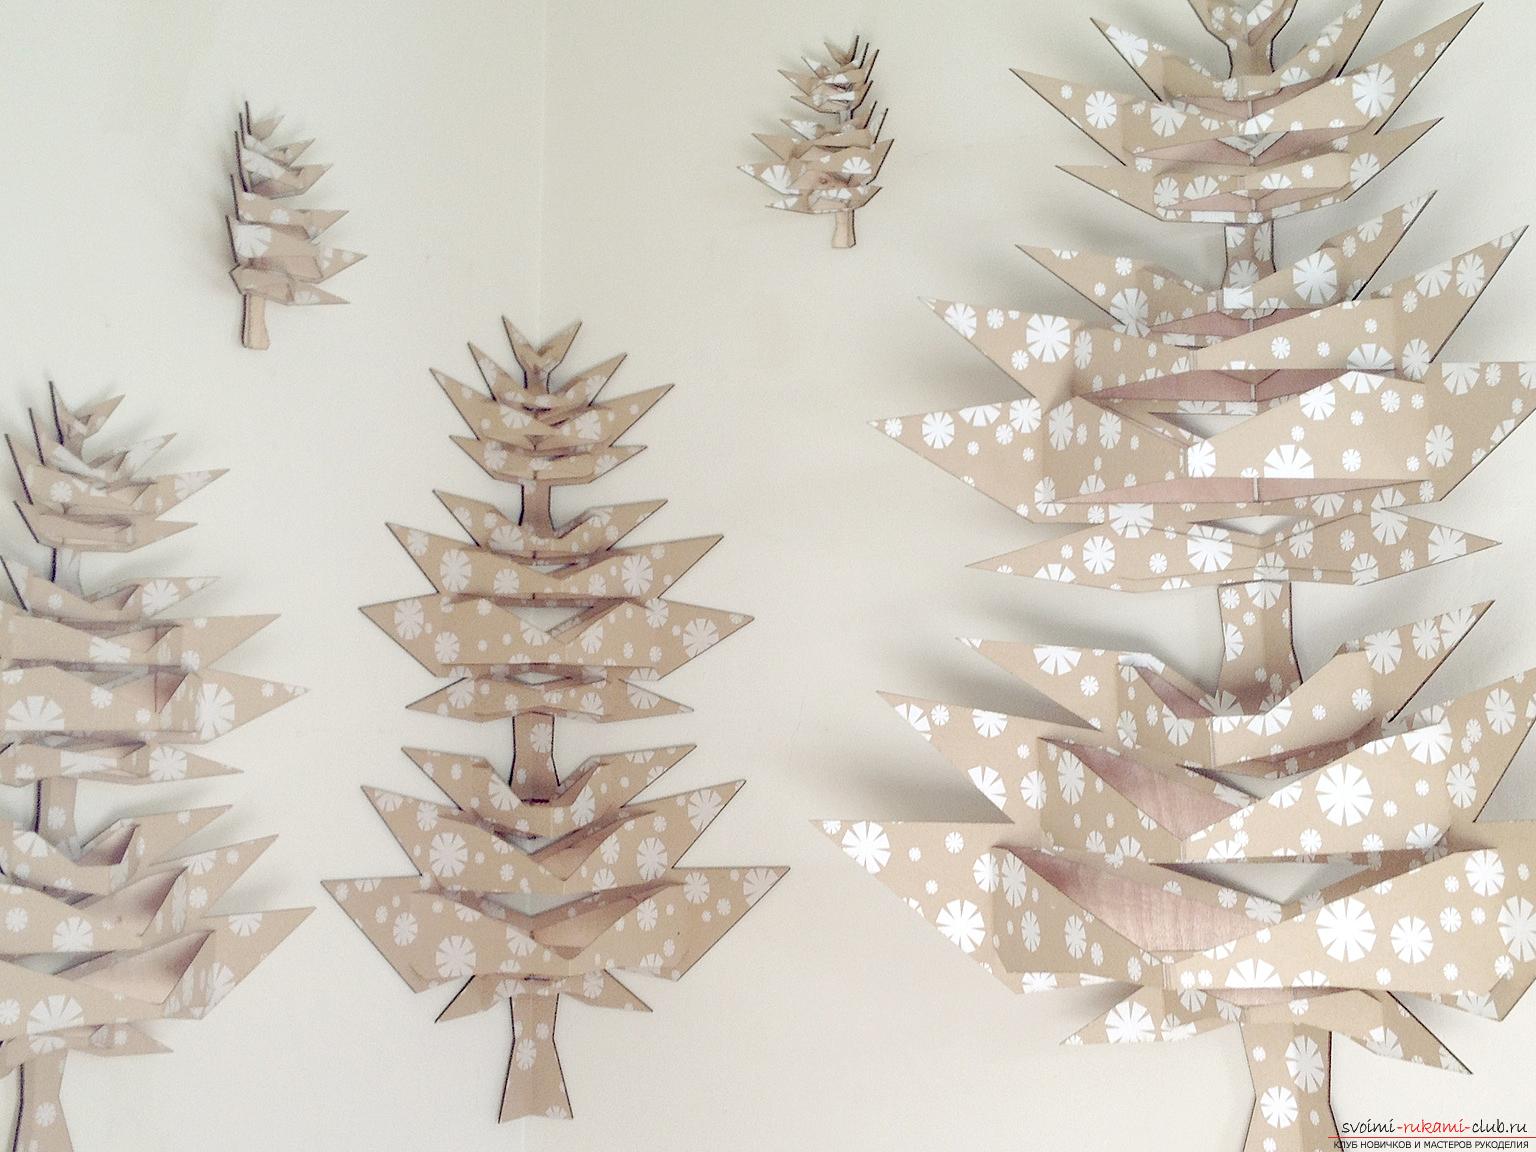 Large-scale paper crafts, as well as Japaneseorigami are the progenitors of modern wood, made of old chipboard and plywood. A very simple design can revive any flat and boring object.
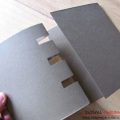
 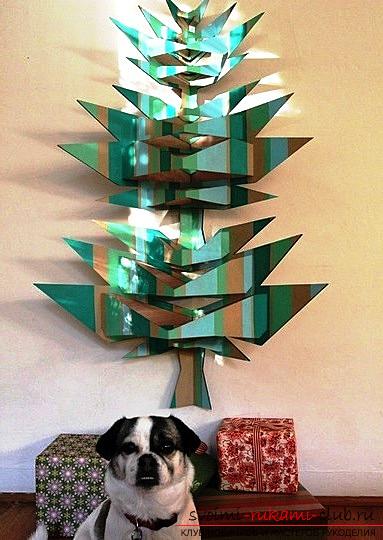 A similar tree made of plywood,It is a practical variation for people living in very small apartments. This is not surprising, tk. the Christmas tree is hung from the plywood in the corner on the wall, it is mounted very quickly, and also takes up little space in the assembled form. Most often, the shape of such a tree is projected using a computer program and only then cut out of plywood. However, we should be most interested in how to do this in a tree at home. Such a tree can be cut and yourself, using the illustrations given as a diagram. You only need a double cardboard.
 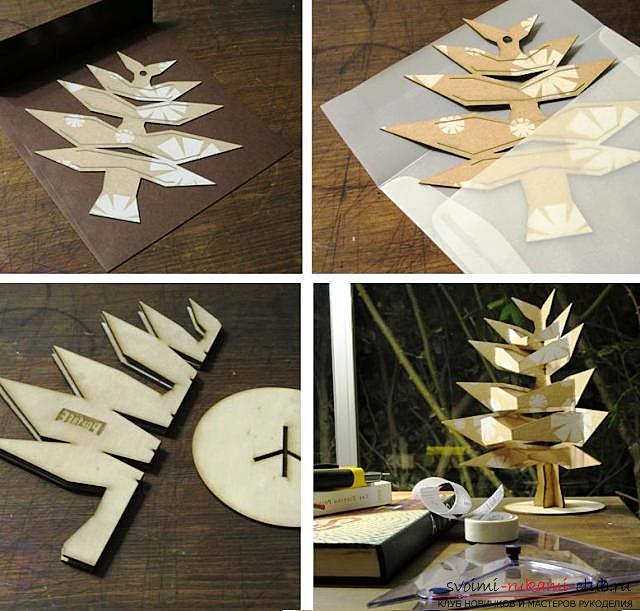 Master-class on making snowflakes from glueMost often, snowflakes are made from paper, using a variety of schemes and ideas: cut out, use quilling techniques or create voluminous structures. For the same work, only a special hotmelt gun will be used. First, choose a beautiful and intricate snowflake pattern. In addition, you will need glass (its size will depend on the size of the snowflake), white acrylic paint, sponge for its application, as well as sequins, you can use nail polish with sparkles.
 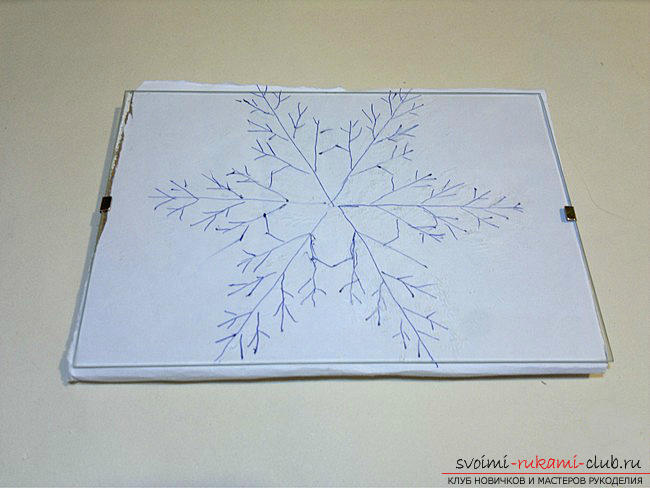 First of all you need to put a snowflake pattern,drawn on paper, under the glass. For this work, the frame for the photo is best suited. paper perfectly fixes the bottom surface, and during the entire operation the circuit will be stationary.
 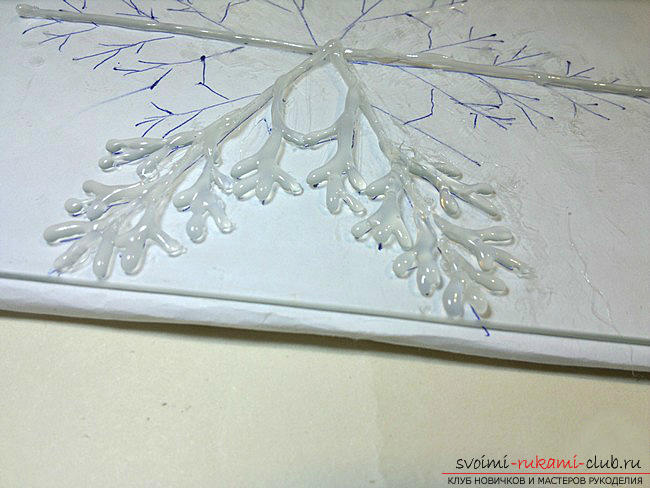 Now start applying hotmelt on the contoursnowflakes with a thin trickle from the tips to the center. This is done so that the snowflake is thicker at the edges. The glue freezes very quickly, it can be seen after the contour acquires a muddy shade.
 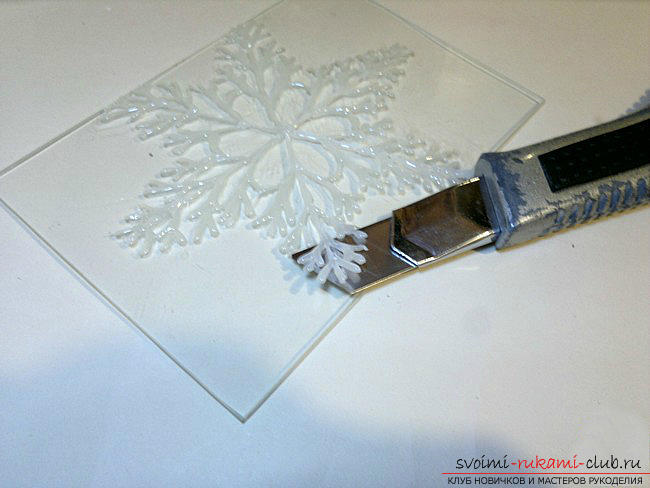 After the whole circuit is surrounded by glue,separate the snowflake from the glass. In order to cope with this work much faster and easier, use a stationery knife, tk. "Barehanded" is much more difficult to do.
 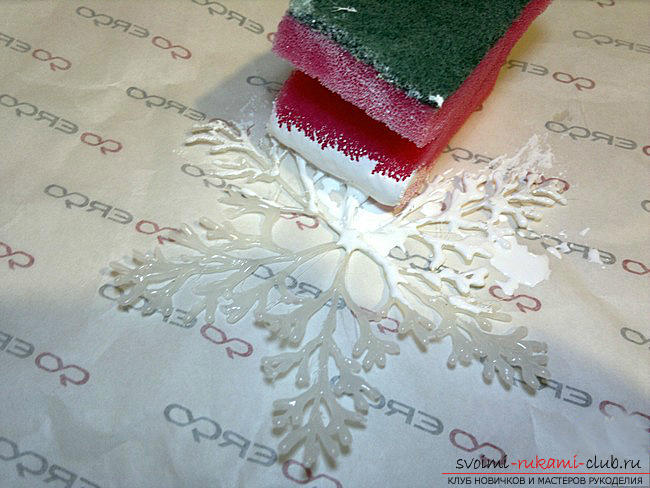 Next you have to paint a snowflake. To do this, place it on a surface that can be smeared with paint (a sheet of paper, a plastic bag, etc.), soak the sponge with paint and start painting the snowflake. Give the product half an hour to dry. In the end, you need to put a layer of sparkles and your snowflake is ready. Use it as an independent decoration or engage in the design of the New Year's composition.
  Toys decorated with paper spirals forQuillings Now on sale very often there are fur-tree spheres from a transparent glass. For creative natures, they open a huge field for imagination. The upper part of these toys is removed, so there can always put some bright and shiny detail in the form of rhinestones, beads, tinsel, etc. An excellent material for filling such a toy will be a paper for quilling, twisted in a spiral. Instead, you can use old postcards, cutting them in thin strips and twisting in a spiral.
 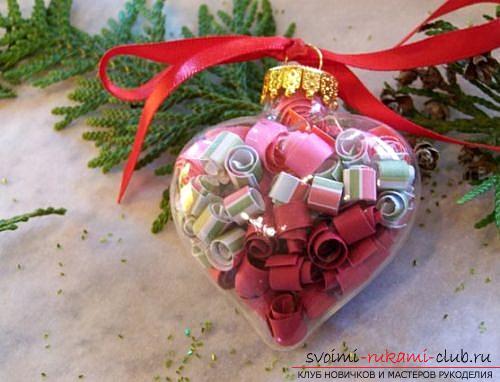 So that you get dense spirals beautifulshape, use a toothpick. It is necessary to cut off the sharp tips of the wooden skewer and make a small incision on one of its sides. Take the prepared strip, insert its edge into the forked tip of the toothpick and begin to twist the tight spiral. Note that you need to twist the toothpick itself, not the paper. When the paper structure is completely ready, remove it from the wooden skewer and allow it to spin a little, leaving it on a horizontal surface. After that, spread the edges of the paper tape with glue and press it to the spiral. Now, the cute paper structure will not lose its shape. And to make the New Year's toy look even more elegant, tie a bow of satin ribbon on top. If you pick up a glass toy in the shape of a heart, then it can also be used in decoration on the Day of All Lovers. Unusual and fragrant New Year's decorations from spices What fragrant and incredibly cute are the ornaments made from spices. They can decorate the tree and the kitchen, and the festive interior will be filled with a fantastic smell. To work on such original handicrafts, you will need cardboard, a clerical knife, scissors, PVA glue, golden threads and acrylic paint, as well as all kinds of spices in the form of vanilla sticks, cinnamon, and badan stars, not sesame seeds and dried citrus fruits.
 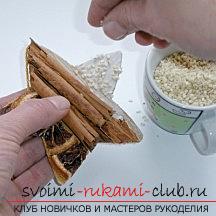 From the patterns, cut the cardboard figures in the formstars, hearts, fir-trees. Execute a hole at the top and thread a golden thread through it. Next, paint the cardboard base with gold paint, let it dry and start pasting with spices and dried fruit. Carefully trim them in the shape of a toy.
 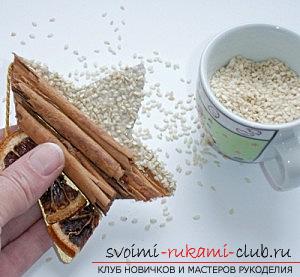 The part on which you plan to placeseeds of sesame, spread with glue and sprinkle with them. After the glue dries, gild the seeds with a sponge soaked in paint. It turns out very cool. New Year's Lantern from the Bank In fact, there is nothing difficult to make New Year's handicrafts, the main thing is to connect all your skills, efforts and imagination. Everyone in the house has glass jars, making them flashlights is very simple. And first you need to prepare all the required materials and tools. Choose a suitable glass jar, a wide brush, PVA glue, a beautiful napkin with a Christmas motif and additional decorations in the form of decorative chains, ribbons, sequins, etc.
 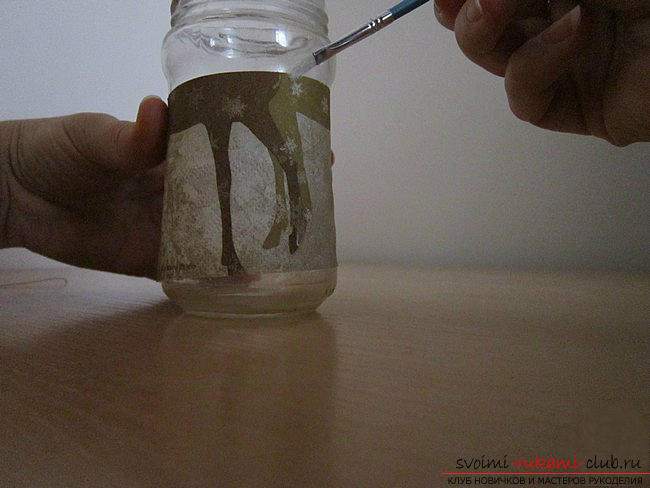 First, thoroughly wash and dryglass jar, carefully cut out the desired picture from the napkin, it should match the size of the jar. Attach the picture to the glass container and start smearing it with glue. Do this as carefully as possible so as not to tear the napkin. Leave the jar to dry for half an hour and then proceed to the next stage of work.
 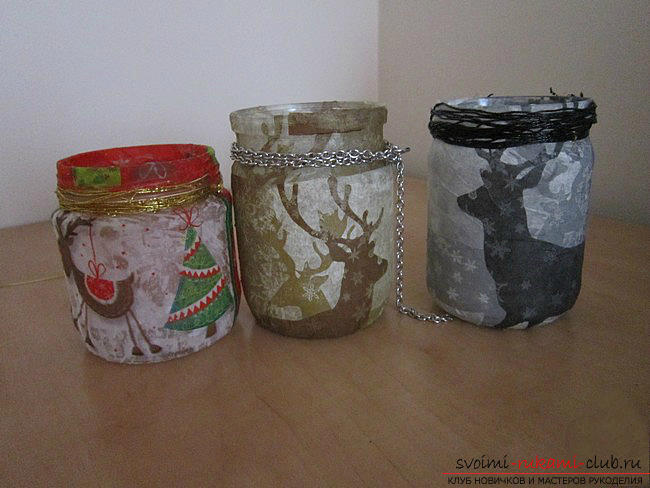 You need to decorate a jar with a pattern. To do this, use gold threads and tie the neck of the jars with them, they can also be glued with glue for a firm fixation. Instead of gold threads you can use other materials - decorative chain or twine.
 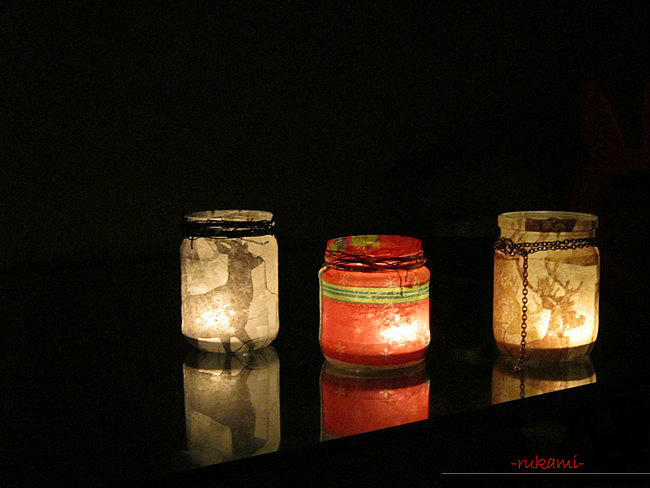 Now your flashlight is ready, put in itcandle-tablet and light it. If a room will light a few such lights, it will create a magical atmosphere. At your discretion, you can use the sequins, whiter wide ribbons. Perform them in different colors and in the evening your room will play absolutely new colors. New Year's garland of cones Very beautiful garlands made of the materials that nature has given us. Of cones you can make a beautiful decor of the interior, especially it will be on the eve of the Christmas holidays. Christmas tree garlands look very beautiful and fill the atmosphere with a special scent. Such decoration can be placed on a wall, a window, etc. If you combine them with a variety of colors, sparkles, fruits, etc., you can get a really unusual Christmas decoration, believe me, it will not be left without attention. Below are some examples that will inspire you to create masterpieces.
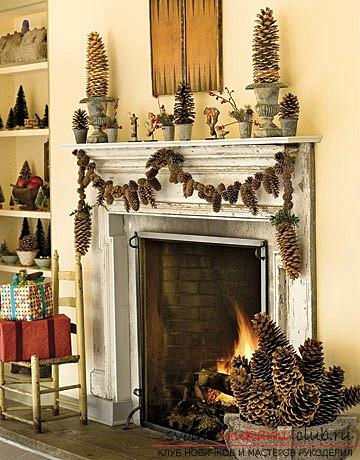
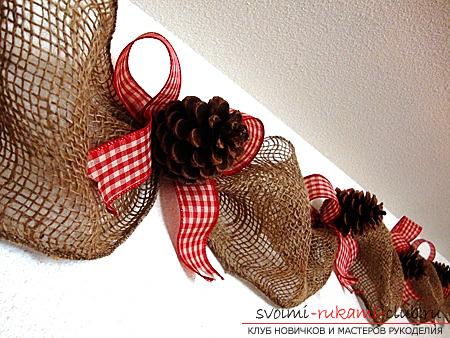
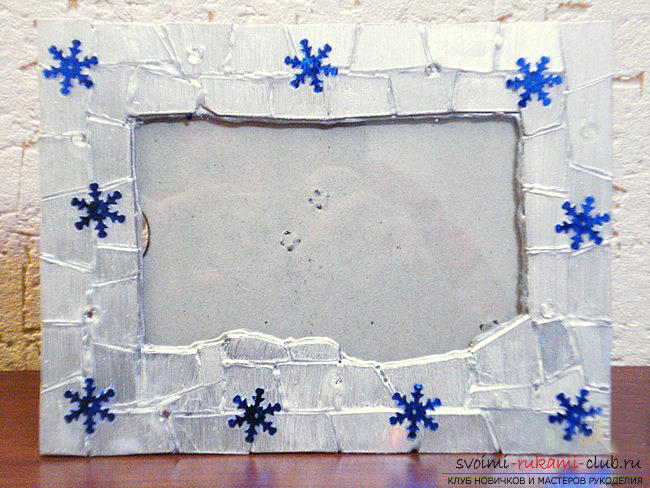
 New Year's photo frame as a gift with your own hands Thiswork involves a combination of the old photomark and unnecessary disks, from which you can get a rather original gift. In addition, prepare paint tape, acrylic primer, paint and brushes. To begin with, paint with paint tape those places that paint should not get to. The next step is to apply a primer. It is necessary for the finishing material to be connected to the surface as best as possible. While it is drying, cut the discs into many pieces of arbitrary size and shape. Take into account the fact that if you initially dunk all the disks in hot enough water, then in the future they will be better cut, without flawing at the same time. On one frame size of 10 to 15 takes about 2 disks.
 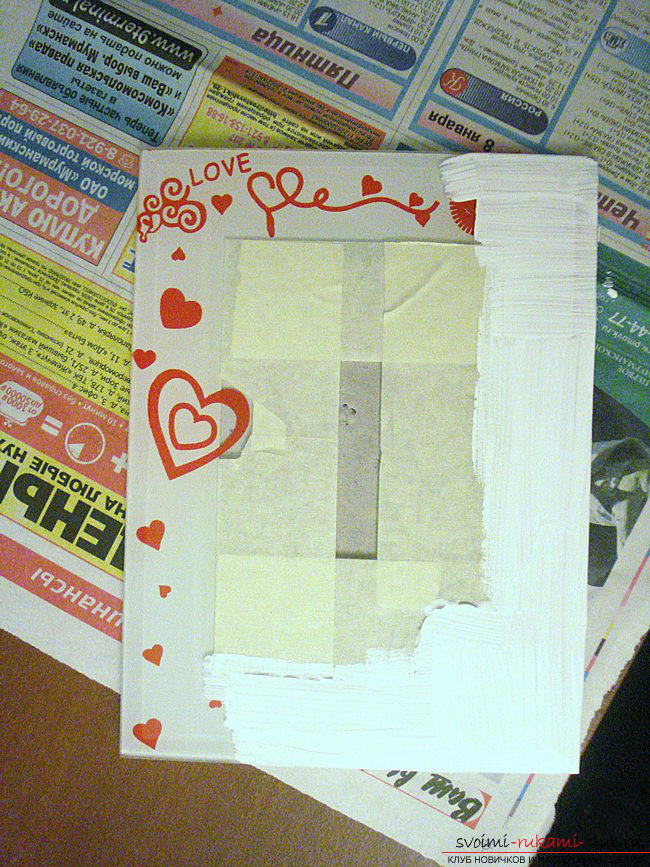 When the primer is dry and the discs are cut, you canto get down to work. Glue all parts of the disc in the form of a mosaic to the surface of the frame with a universal glue. When the entire surface of the frame is filled with disc elements, leave it to dry.
 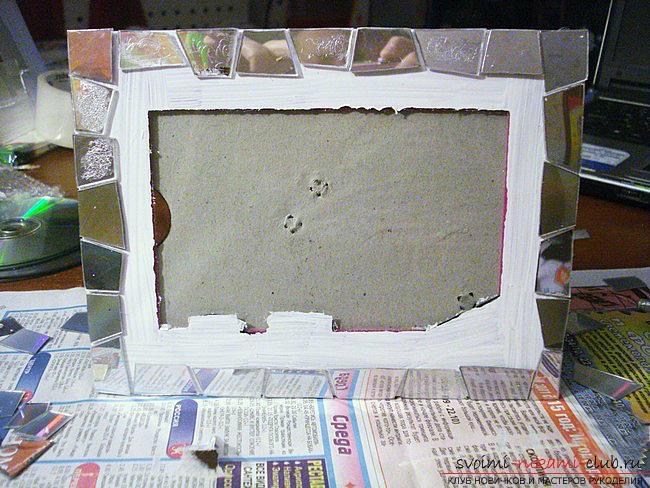 After that, you need to fill the space between the individual particles with silver acrylic paint. It should also be left to dry completely.
  In principle, at this stage you can leave a framesuch as it is. Such a gift will resemble a disco ball from the 90's. But you can go further, covering the surface of the frame with pearlescent paints. After it dries, decorate the frame with crystals with snowflakes, sequins, etc., gluing them with glue.
 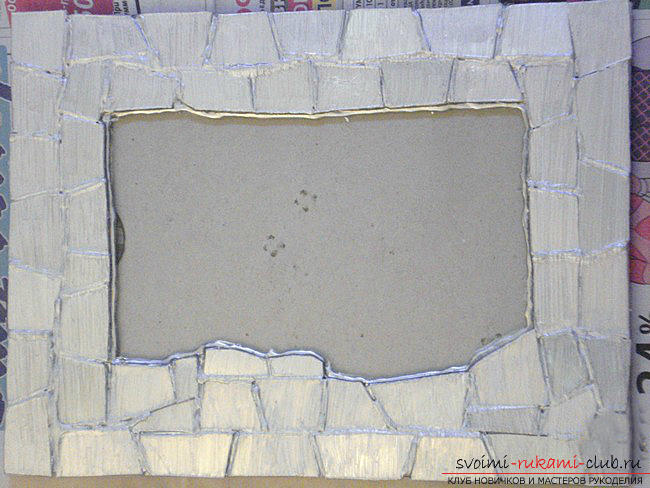 As a result, you need to cover the entire product with a clear varnish and the photo frame is ready. By New Year's Eve, everything is always prepared in advance, we hope that the advice and master classes gathered in this article will help you make bright and unusual ornaments for your holiday.
Comments
Related posts:
 New Year gifts, New Year's crafts, souvenirs with their own hands, how to make a gift for the New Year, ideas for New Year gifts with their own hands.
 Crafts from napkins with their own hands: a bunny for the contest Spring 2016, pattern toys hare
 Crafts for the New Year 2016 for the 2015 Competition, handmade crafts from their own hands
 New Year's articles from beads: toys and jewelry by own hands
 How to make a snowman. Gift wrapping for the chocolate on the New Year for the 2015 Competition, New Year's handmade crafts