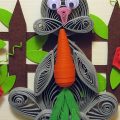
Technique "comb" for creating a leaf in the quilling technique with your own hands
Those who have already encountered this at least once in their lifequilling, know that this technique is a manipulation of paper, or more precisely, the deformation of paper into small, elastic strips. From them you can recreate a variety of objects that can be used for postcards, gifts, decorative compositions or other items.
Technique "comb" for creating a leaf in the quilling technique with your own hands
Thus, we have the opportunityform a variety of leaves, in different sizes. Take advantage of incredible lessons and solutions from the masters. Inside the article is a completely new way of working on flowers, where you need to use an ambiguous tool - a comb. But, as it turns out, even this item can become a real friend for the quilling technique and help those who want to form incredible and unique variations of leaves for their work.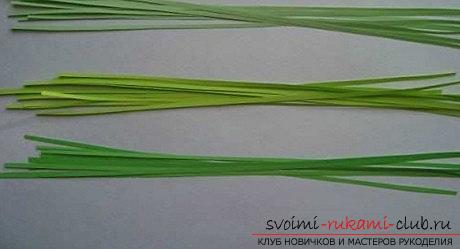 However, there are special sections of quilling,which can be used to recreate unique works. We are talking about mastering a special quilling technique, with the help of which you can recreate leaves. A leaf can serve as an object for a variety of works. In the first case, these can be objects that come out as an addition to a flower or composition. In other cases, leaves can be made to become the main symbol of the composition. In this lesson, we will try to consider popular technologies and methods for creating unique works in the quilling technique.
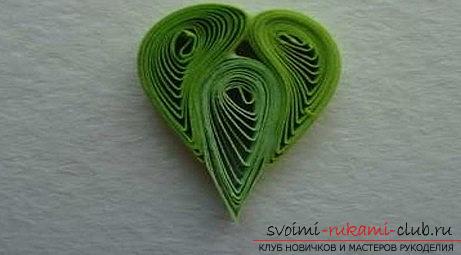 Working with a sheet Let's try to formown leaf. It can be suitable both for a composition with flowers, and as a separate element that can be used to create a full-fledged quilling work. Volumetric leaf quilling includes special and modern methods of work, as well as popular materials.
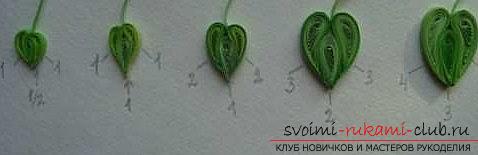 In order to begin our work, we need to prepare special materials, which will become the main addition to all the necessary tools of our future work:
- Take the usual paper for quilling in the performance of green shades (Exactly shades!)
- We will also take a quilling tool (You can use a toothpick as a replacement)
- Take the officer line
- You will need a special tool - a comb
- Also for gluing - regular PVA glue.
 As a rule, all work on quillingoccurs due to the formation of simple rolls. We make them using the quilling technique, winding paper on our tool. When the rolls are ready, they need to be given a special shape, using various lessons in creating a "drop" shape, or a "comma" shape. Our leaves will be formed thanks to these elements. In the case where we form blanks using one strip, then it is necessary to unravel the roll, using a size of 10 millimeters. From two strips, the roll is unraveled in a size of 15 millimeters. For three strips, unraveling the roll up to 20 millimeters is used. Formation of a leaf
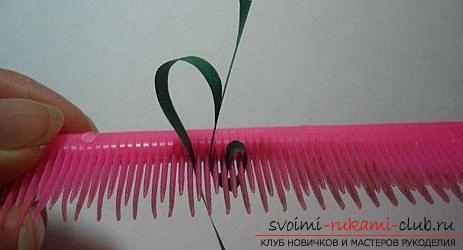 To form one small leaflike, you may need one "drop" form from a roll, as well as two "comma" forms, also from a roll. Next, we can fantasize at our own discretion. Some try to use different shades of green in the formation of their own flowers. As a rule, you should make the base a darker shade, and the inner rolls with forms are lighter shades. In this way, we will be able to get a more natural look for the future greenery of the flower.
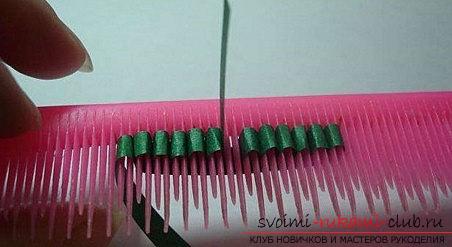 Next, you need to take careful actionsto glue. First of all, we work with the elements of the heads for the comma forms. Then, we work on the tails, which also need to be glued. After that, we work on gluing the leaf with an element of flat paper, with the same color. Immediately, you should put part of the strip in the petiole. The next step is to attach more blanks of different shades of green to form beautiful leaves with large sizes. Leaf on a comb
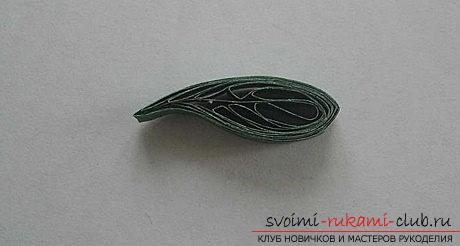
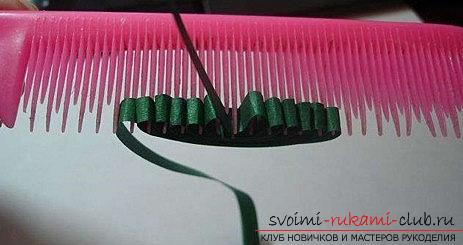 Also, the leaves should be formed usingan ordinary element of a comb. The size of the comb will determine the dimensions that we will select for the leaf. To do this, you need to take two strips glued together, and then wind them on one of the strips of the comb. With a special movement, we deform the paper and then move the sheet to the edge of the teeth inside each threshold of the comb. After, you need to intercept the middle of our leaf with the help of a tool - tweezers. Then, you need to glue each end of the craft, and then - trim the necessary edges of the strip, so that later - glue our work. You will get a beautiful version of a leaf with a vein.A wide variety of techniques opens up formasters the opportunity to develop their compositions and create their own applications with handicrafts. But, the main advantage of using the quilling technique is the ability to create objects from different modules. Thus, we can form our leaves using different color shades. Thus, the leaves will be more saturated and interesting.
Comments
Related posts:
 Quilling technique, various flowers in technologyquilling with your own hands, creating compositions using colors, quilling techniques, tips, recommendations and instructions for creating them with phased photos.
 Quilling a beautiful rose with your own hands – master class in quilling technique
 How to make Easter quilling for a hare – DIY quilling technique
 This master class will teach you how to make a postcard by yourself in the technique of quilling.
 Quilling flower technique “Fantasy” with your own hands – Master Class