How to make postcards for the New Year with your own hands, step-by-step photos and the description of creating postcards in the technique of killing, ayris folding, origami
Probably, there is not a single person on earth,who would not like gifts. To receive or give lovely souvenirs or grandiose presents people began from time immemorial. In ancient Egypt, Babylon, Greece and Rome, it was customary to give gold ornaments, sometimes reaching a few kilograms, slaves, horses, wine, weapons and expensive fabrics. A separate line was the rulers, who could give citizens a plot of land or a high title. One of the categories of gifts were presents to the ruler of one country from the ruler of the other. Often they were completely unusual and surprising. So, for example, the Persian Shah gave Ivan the Terrible an elephant. In our day, you can also find non-trivial gifts. The main and indispensable condition of the gift is the relevance of the gift. It is important that he liked the one for whom it is intended. Often, gifts are given to a specific date or event. And calendar holidays are an excellent occasion. One of the most beloved and expected days is the New Year. You can give anything you like, but very often you want to leave with the thing warm words and wishes that a person will keep in memory of the donor. And here the postcard will come to the rescue. About how the first postcard appeared, and who invented it, there are many versions. The Chinese believe that the cards came from business cards. Etiquette in ancient China ordered to leave a congratulation and wishes on the business card, if the visitor could not find the owner of the house. The French believe that the first postcards are drawings on letters that the soldiers of the Franco-Prussian War sent home. In war, the paper is a rarity, so they cut out small rectangles from the cardboard, and then wrote and drew on them. Such a letter was seen by one seller of books, and this was the beginning of postcards. How exactly the postcard was born is not important. The main thing is that with the help of a small piece of paper you can express warm feelings and capture your wishes for relatives, friends and relatives. And the New Year is perfect for showing affection, affection and gift of the postcards. Now an incredible number of different postcards with New Year themes are on sale. But it will be much more interesting to create such a thing yourself. To show imagination and creativity, to do something truly original, and ideas for creativity offered here will contribute to this. An opening with a herringbone of straw in scrapbooking technique 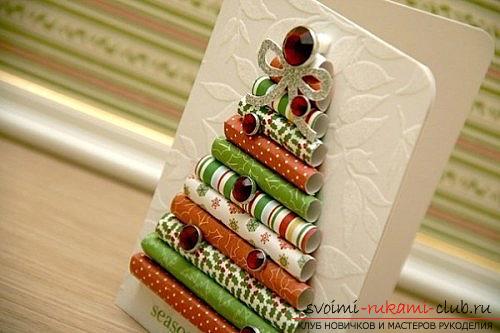 Materials:
- A thick sheet of paper (for the base, so it will be more interesting if you take any relief version, you can use cardboard);
- Different paper for scrapbooking;
- Pencil with ruler;
- Scissors;
- Glue;
- Elements of decor (beads, rhinestones, buttons, in general, whatever you want).
To begin with, we cut the pieces of paper from the paperfor scrapbooking. The height of all the pieces should be the same, but the width should go down (see photo). Now we begin to twist all the paper blanks into tubes. Use a pencil or a handle to make the diameter of the workpieces equal. Carefully glue the edges. When you wind the last straw, and it will dry, we begin to decorate the postcard. To do this, we glue all the tubes together between the larger and the smaller. Make sure that the sides are symmetrical. Billets should be glued together in one plane, i.e. our pipe tree should be flat.  On the embossed paper, the Christmas tree will lookmore original. It remains only to attach the tubular blank to the postcard. Now we decorate with buttons, beads or something else and are ready. Open on New Year in technique, come from Holland - ayris folding
 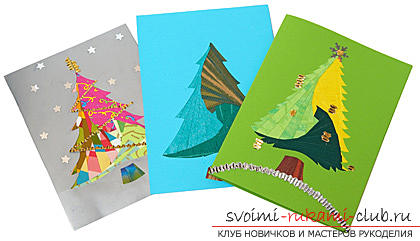 Iris Folding is translated into Russian as"Rainbow folding". This unusual technique is great for New Year's postcards. Its essence is in filling the figure in a spiral with colored strips. Materials:
- Cardboard or a thick sheet of paper;
- Color paper (3 shades of green for needles and brown for stem);
- Template (it's easy to download and print or draw by yourself);
- Scissors and glue;
If you decide to make a stencil on your own, thenfor this postcard a triangle with a base of 14 cm and 16 cm in height is used. The width of the step is 1 cm. Now proceed to cutting strips for our rainbow spiral. The width of the green should be 2 times the pitch + couple mm on the seam. So for our Christmas tree we cut stripes 2.2 cm. Brown approximately 3.5 x 2 cm. We take our paper for the base and fold it in half. In one half we cut out the Christmas tree (this will be the face of the postcard), on the inner side of the second half we glue our template. It should be visible in the cut tree. 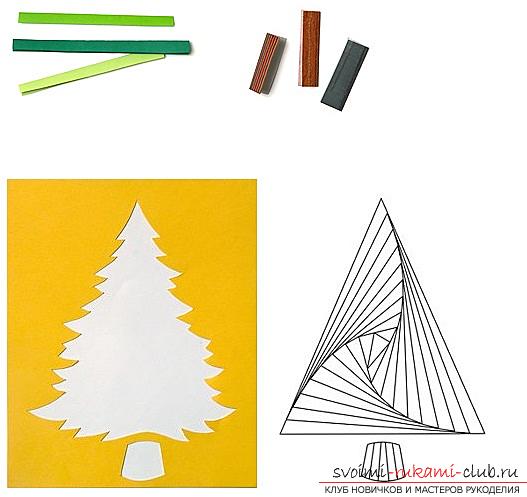 First glue strips on the barrel. To do this, you have to fold it in half. Now proceed to gluing strips of green shades. For each side of the triangle, choose your own color. In order not to be mistaken in the calculations, how many strips it is necessary, you can cut them during the gluing process. As can be seen from the figure, with each turn the strips will be shorter and shorter. Strips similarly brown fold in half and glue the first, the longest, as shown in the photo. The folding line runs along the drawn strip on the template. Strips are glued in a circle, first the first one color, then the first second color, and then the first third color.
 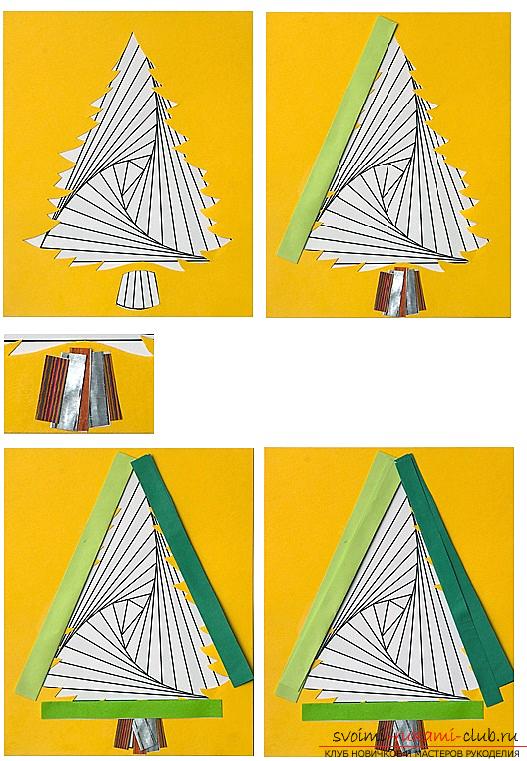 The next coil of the spiral on the same principle -first the first color, then the second, then the third. Glue to use point and very carefully. So gradually fill the whole template. When all the strips are glued, it will only be necessary to fold the postcard and decorate the front side if desired. At the same time, it is already a sufficient decoration in itself and does not need additional decorations. The photo below is an example. New Year cards in the technique of quilling Fuzzy Herringbone
  In the technology of killing there is not one kind of creation of parts and products from them. In this master class it is proposed to make a furry Christmas tree for a New Year's card. Materials:
- Cardboard or thick paper for the basis of the postcard;
- Strips for quilling (need paper of several shades of needles);
- Scissors and glue;
- Corrugated paper or white napkin;
- Elements of decor (ribbon, beads);
- Toothpicks.
The first step will be the cutting of paper stripsfor kvilinga across. Try to act carefully so as not to cut the strip completely. It is very similar to how the grass is made in kindergarten. The smaller the cutting, the fuzzy it will be. 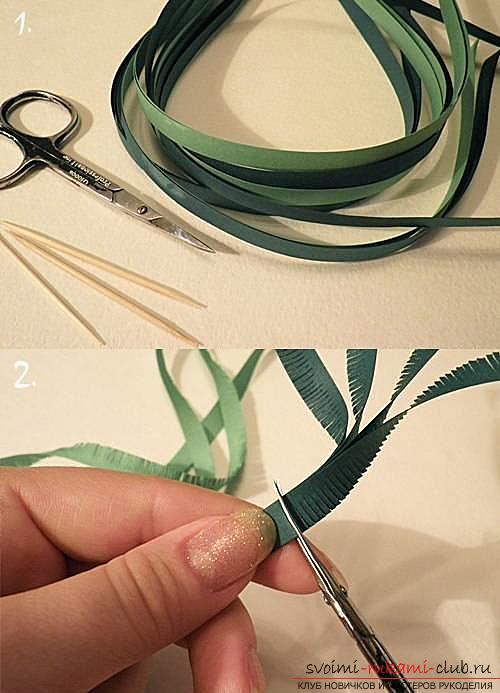 For one tree, you need 10 strips. You can take a few shades. Now take our stripes with fringe and wind on the toothpick. To wind it it is necessary densely, thus to watch, that the fringe does not come off and has not bent. When the whole strip is wound around the edge, it is necessary to fix it with glue and wait until it stiffens.
 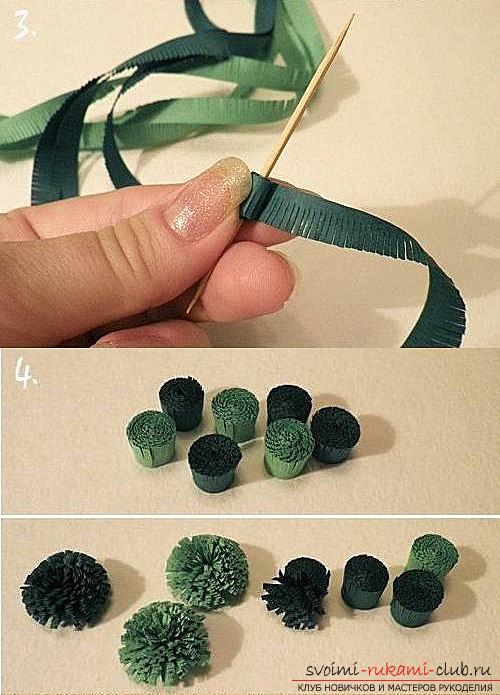 The next stage is to loosen rolls. Carefully bend the fringe and we get here are such nice "fuzzy". It remains only to paste them on a future postcard. In the first row there will be 4 "fuzzy", in the second - 3, in the third - 2 and in the fourth - 1.
 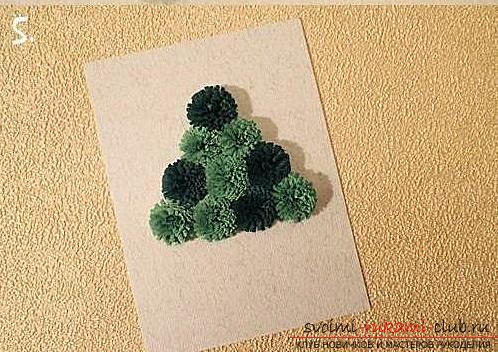 For decor, you can glue the top of the treebow, decorate it with beads. As a stalk fits a toothpick, and snow around the Christmas tree will help with imitating a napkin or corrugated paper. Lacy herringbone
  This herringbone is also made in the technique of killing, but already in another variant of folding paper strips. Materials:
- Heavy paper or cardboard (as the basis for a postcard);
- Color paper is two-sided (A 4, green 2 sheets, 1 sheet of red, orange, blue, light blue, pink and white);
- Figured and conventional scissors;
- Pencil;
- Glue.
We prepare the basis. We fold the cardboard in half. We cut off half the sheet of light blue color and make the edges embossed and wavy with the help of figured scissors. Over light blue will also need an orange leaf with sides of 19 x 14 cm. Of course, colors may be different, it all depends on your taste, imagination and imagination. Leaves of green color cut into strips of 5 mm wide. From the remaining colors, cut 4 to 5 strips of similar width. 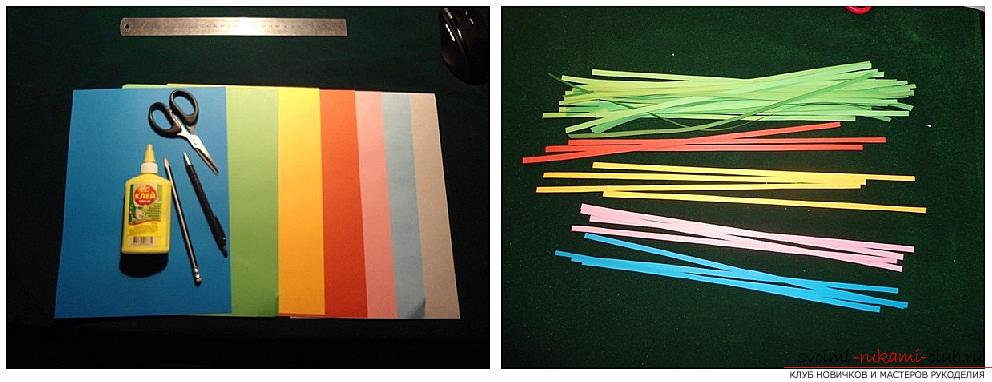 The next step is to fold the stock for the Christmas tree. For the first tier of herringbone, you need 36 strips. For the second - 30 pieces. We make blanks in the form of a drop. In the twisted form, the dimensions are 1.5 cm, in the finished form the droplet size is 2 cm.
 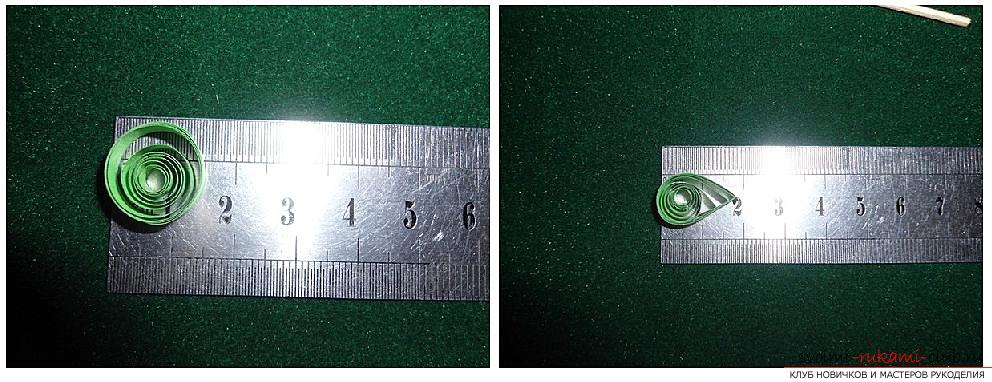 Now we will glue the first tier. This can be done separately from the blank of the postcard. Paste it as shown in the photo. The second tier is glued over the first.
 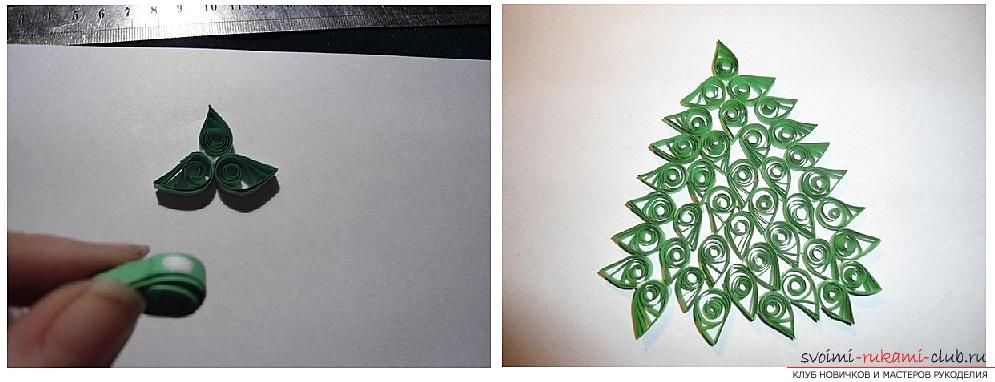 The next stage is decoration for the Christmas tree. It is necessary to roll rolls of orange, pink and other stripes.
 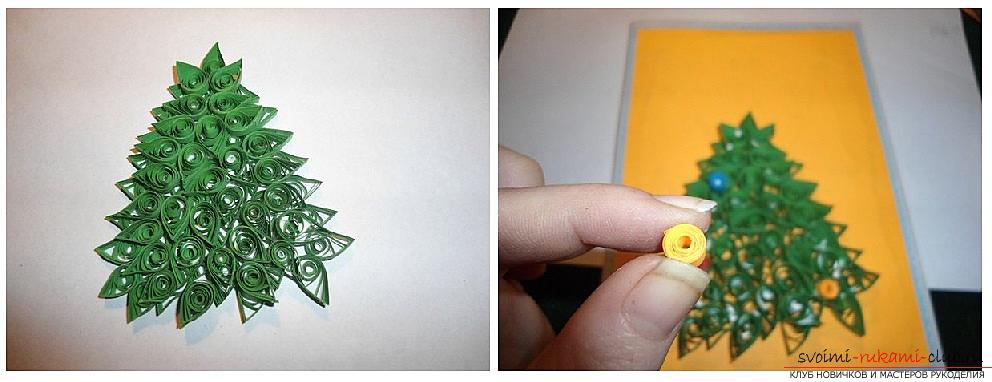 Bells do as follows. Mid-tight torsion roll with a toothpick is pushed, making a groove. On the reverse side, the convex part is obtained. Such bells must have several different colors.
 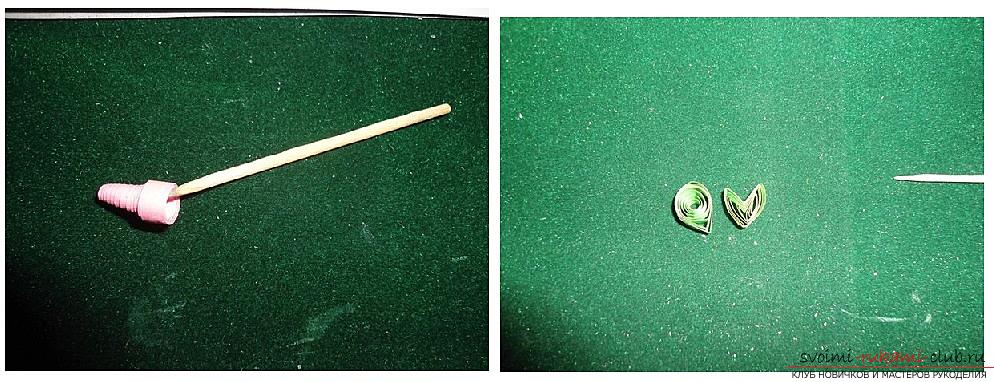 To make a bandage you need two drops. Now it is necessary to push the convex wide base inward. It turns out a shape that looks like a heart. We glue these two blanks with sharp ends and get a bow.
 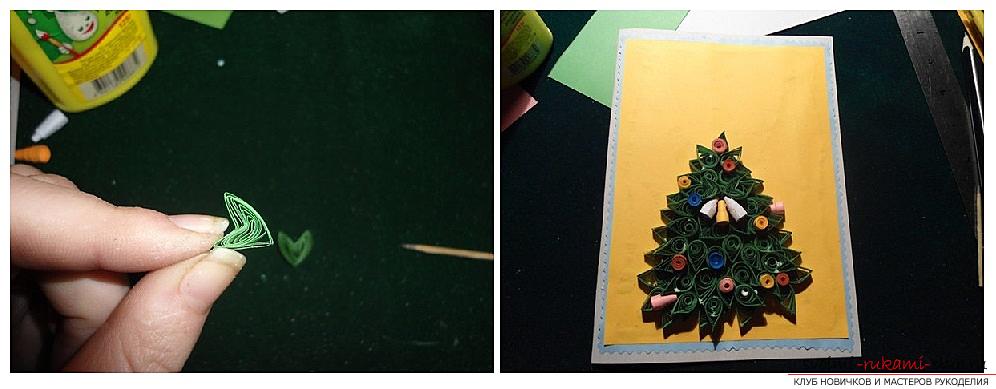 Of the usual rolls, red, blue, pink andorange will be excellent Christmas balls. If desired, you can decorate the postcard with various inscriptions. Christmas card with a herringbone in corrugated paper
 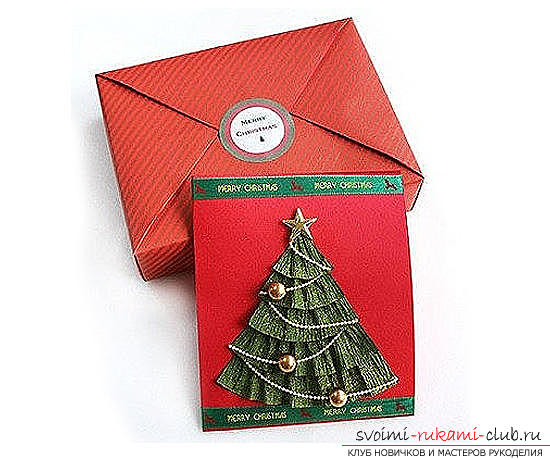 Materials:
- Heavy paper and cardboard for the substrate (color);
- Corrugated paper (green color);
- Scissors;
- Double-sided adhesive tape or glue;
- Decorative elements for decoration (ribbons, beads, sequins).
A sheet of cardboard or thick paper is foldedin half. On the obverse of the future postcard we draw out the contours of the Christmas tree and mark it with horizontal lines on the tiers. Corrugated paper is cut into strips according to the number of tiers. Now it remains only to paste the stripes, making folds, as shown in the photo. 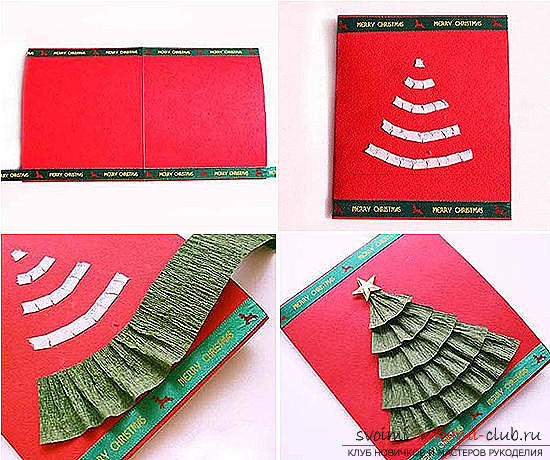 It remains only to decorate with different ribbons, asterisks and other elements at will. New Year's card in origami technique
 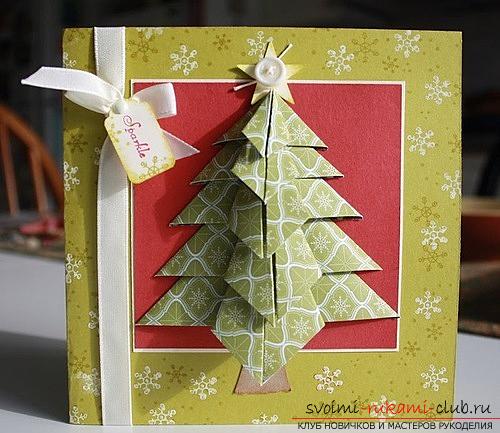 Materials:
- Heavy paper or cardboard (color) for the basis of the postcard;
- Colored paper;
- Glue;
- Double-sided tape;
- Scissors;
- Elements for decoration (ribbons, buttons, sequins, etc.).
For our Christmas tree in origami technique will need 5square blanks of green paper of different sizes (from larger to smaller in equal proportions). From each square it is necessary to fold a triangle. It's very easy to do this. To begin with, it is necessary to designate the fold lines, i.e. bend and unbend the sheets of paper on two diagonals, horizontally and vertically. Now a peculiar snowflake is drawn on the sheet with fold lines. The position of the sheet is such that the horizontal and vertical lines are located respectively. Now take our square by the edges in the places of the horizontal fold and begin to bring together, while the corners of the square are spread out to the sides. We will get a two-sided triangle in which the vertical fold line will divide it in half. Now take the outer two corners of the triangle and bend them as shown in the photo. They touch each other along this same median line. 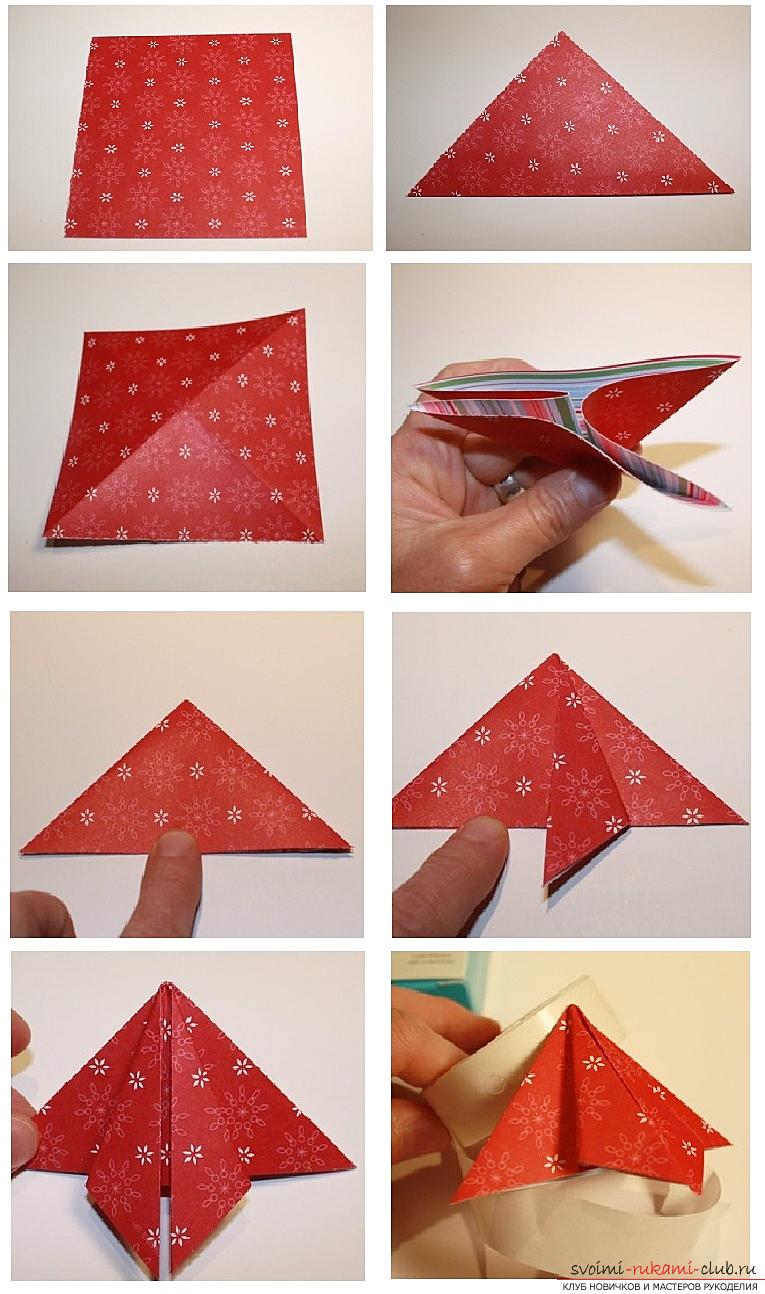 Now on the workpiece of the post we glue the foottree. The paper can be taken brown. Now we start to prepare. We take the largest and next to it in size and plant a smaller one on top of the larger one. This is easy to do due to the fact that the triangles are bilateral. It turns out a kind of pyramid from the blanks. On the back of each piece, apply a piece of double-sided tape. This will strengthen our herringbone. Now it remains to paste it to the postcard. Decorate, if desired, with ribbons, buttons, beads and sequins. Christmas card with a Christmas tree of a round napkin
  To make such a charming napkin is effective even for children. Materials:
- The basis for the postcard (dense colored paper or cardboard);
- Scissors;
- Round napkins (or embossed paper);
- Double-sided adhesive tape or glue;
- Elements of decor (paper snowflakes, beads, half-beads, sequins).
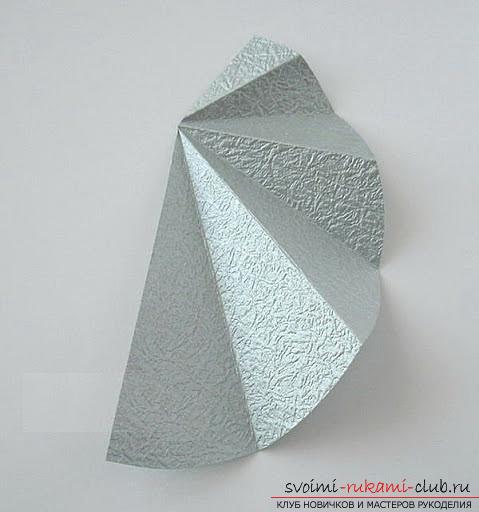
To make a Christmas tree from a round billet, you need to cut it in half. Now you need to fold the paper as it is on the photo. The higher and smaller the upper fold, theMore tiers will be at the Christmas tree. The fold line of the previous fold is the boundary for the next. With the help of double-sided adhesive tape or glue we fasten our workpiece. We paste it on the postcard and decorate it to taste.
Comments
Related posts:
 How to make a souvenir with Easter theme in the technique of modular origami, step-by-step photos and description of the creation of the Easter egg
 This master class will teach you how to make a card with your own hands in the style of ayris folding.
 How to make snowflakes with your own hands made of paper, in the technique of killing, from dough, beads and beads, from tapes in Kansas technique or crochet, turn-based photos and ideas for inspiration
 How to make an original gift by March 8, step-by-step photos and description of creating bouquets of flowers from sweets
 How to create a craft in the technique of modular origami - snake, step-by-step photos and a detailed description of the process of creating a module and crafts in general