How to make your own hands a topira with a satin ribbon decor, step-by-step photos of making topiary with the use of different techniques for creating flowers
Any house will be incomplete without lovely little onestrifles, which create a cozy and special atmosphere. You can decorate your home with a variety of things and ways. Someone prefers a country style, someone likes high-tech or modern. Well, someone mixes several directions and gets an amazing and original cocktail. Interior accessories for decoration there is so much that for each there is something special. Recently, increasingly popular are topiary - small in size decorative items in the form of a tree with a geometrically correct shape of the crown. Initially, the topiary appeared as a direction of landscape design. A tree with a beautifully cut crown is known since the time of Ancient Rome. It was from there that the name of this decorative element came to us. The toparians called special slave-gardeners, who were supposed to follow the topia - a separate section of the garden with trimmed trees. In modern design they use a completely different topiary. He does not need a haircut, irrigation and other agrotechnical care. This decor element is not a copy of any of the existing trees. Beautiful and original topiary, decorating houses, craftsmen make from a variety of improvised materials: ribbons, coffee beans, beads, sisal, paper and many others. No general requirements for topiary. The shape of the crown can have absolutely any geometrically correct form, and the fittings and materials remain at the choice of the needlewoman itself. Topiary can be placed on the floor, decorate a table or a bookshelf. It perfectly replaces the living plants, because all the care is reduced to a periodic dusting. In addition, a rich selection of materials of a variety of colors, colors and textures will allow you to select this element of decor to almost any situation in the room. In this article, we propose to make some beautiful topiary.
Topiary of Satin Ribbons
 It will take:
- Tapes made of satin are 2.5 cm wide with three different shades (two for flowers and one for leaves);
- A piece of silvery fabric;
- White satin ribbon 1 cm wide;
- Threads in tone tapes and a needle;
- Material for packing (perfectly fit balls from synthon);
- Glass;
- Ball for tennis;
- Wand thick with a pencil;
- Pins;
- Adhesive or glue gun;
- Alabaster;
- Lighter or candle;
- Capacity for topiary (suitable for a large plastic cup or a small pot for indoor plants);
- Elements of decor (beads, sequins, sequins, beads).
To begin with, you need to make a hole in the tennis ball. Dip one end of the stick into the glue, well, or just cover it with glue and insert it into the hole. We wait while it dries 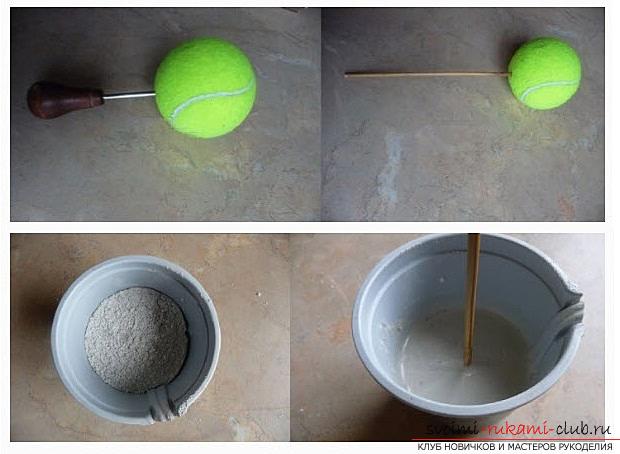 Stir the alabaster with water to consistencythick sour cream. Now take our container, fill it with alabaster and insert the workpiece with the ball. From alabaster to the edge of the pot must remain three to four centimeters of space. We leave it to the full hardening, having made preliminary support, that the workpiece stood exactly. While our base dries, we start making roses from ribbons. We take a ribbon 2.5 cm wide and have a shiny side from ourselves. Now turn the right end of the triangle so that the edge of the ribbon is looking down and the shining side is visible. Turn the lower right corner to the left and make the tube one more turn to the left. The free edge of the tape is bent so that a triangle with a shiny side turns out and again turn the tube to the left. Here it is necessary to fix the core of the future rose with the help of a needle and thread. Continue to bend and twist the ribbon periodically flashing the winding. We make the petals until there is a small tail. It must be fixed with a needle and thread.
 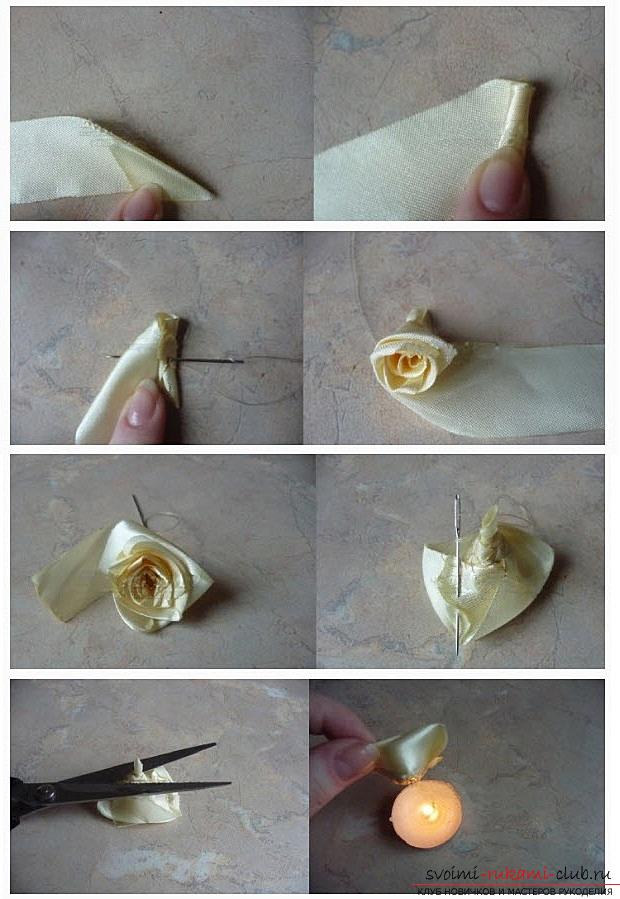 A long tail of a rose cut off and melt the cut line over the fire. Rosochka is ready. How many of them will you need to determine yourself.
 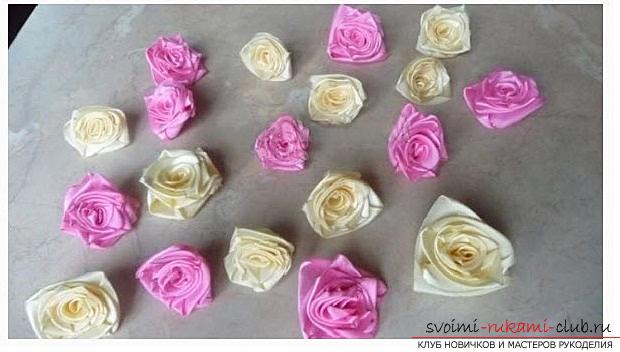 In order to diversify our topiary we will makeseveral leaves in addition to the flowers. To do this, the ribbon should be cut into small rectangles and folded up the upper corners so that they converge at the bottom, forming a triangle (see photo). Go along the base with a needle and thread and tighten it.
 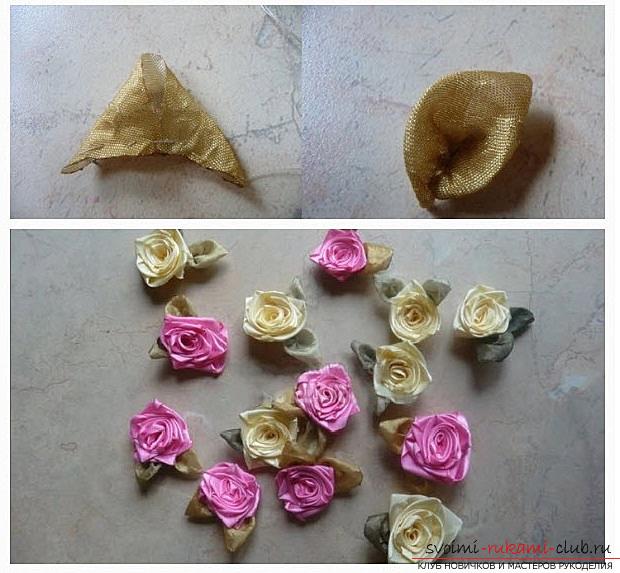 Now we will deal with additional elements of decorin the form of silver balls. To do this, we cut the fabric into squares, put each in a sintepon ball and sew the edges together. Such blanks will need about 12.
 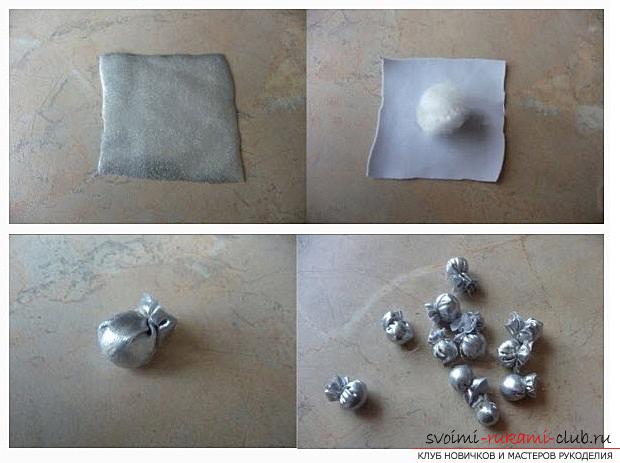 Our procurement with alabaster by this time alreadyshould freeze. Now we need to find the most successful, beautiful and best arrangement of each flower, leaf and ball. For temporary fastening, pins are perfect. When you determine the places of colors you can plant from the glue. We are waiting for them to dry up. Also it is necessary to decorate with a tape our wand, on which the topiary grows. The beginning and end of the ribbon, which we will wrap it, it is necessary to glue it.
 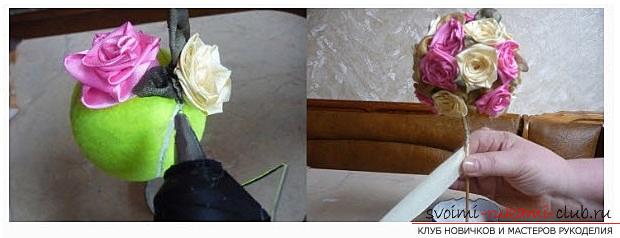 Now we are going to decorate the pot,trunk, etc. in our pot or cup, having receded from the top edge a couple of cm, we make neat holes at equal distances from each other in a circle. Now take the silver fabric and cut out a circle from it. The radius of the circle should be greater than the value from the center of the bottom of the pot to its upper edge a few cm. Try on, the threads must pass above the edge of the pot, if you put it in the center. We have a pot in the circle, raise the fabric and tighten it. We wrap the free edges inside the pot. Now we do two things at once - decorate the pot with paillettes and sew the edges of the fabric. To do this, pass the needle and thread in the holes that were pierced earlier.
 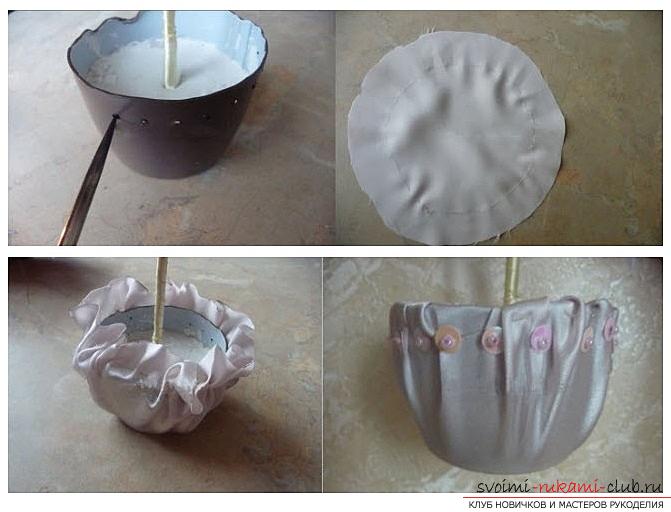 Down under our tree in the pot you can put artificial grass, pebbles, beads, in general, everything that comes to mind. Topiary made of tapes twisted with tubules
 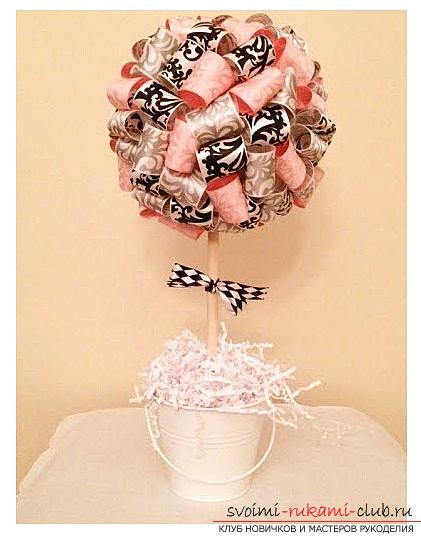 It will take:
- Polyfoam ball;
- Stick for stem;
- Multicolored ribbons;
- Glue;
- Capacity, where we "put" the topiary;
- Alabaster;
- Pins;
- Different decor.
We do in our foam plastic ballhole and insert there greased stick. Alabaster is bred with water to the consistency of thick sour cream. We put our workpiece in a container and fill it with a mixture. If alabaster or gypsum at hand was not possible, you can use pebbles or any other weighting agent. Because the product will be light enough, it does not need to be attached to the container tightly.  After the craft is frozen, we begin to decorate. To do this, cut the ribbon into rectangular pieces. We wind these segments on the finger, forming the tubes. Now we take such a tube, pierce with a pint with a hat from the inside out, so as to grasp both ends of the ribbon. Such designs are stuck in a foam ball, trying not to leave any gaps.
 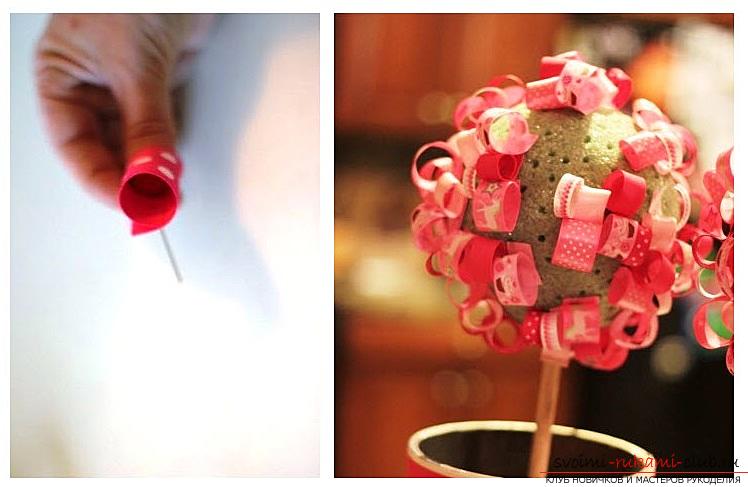 It remains only to decorate our topiary at will and taste, for example, with paper frost or cutting ribbons. Topiary from satin ribbons, folded with roses
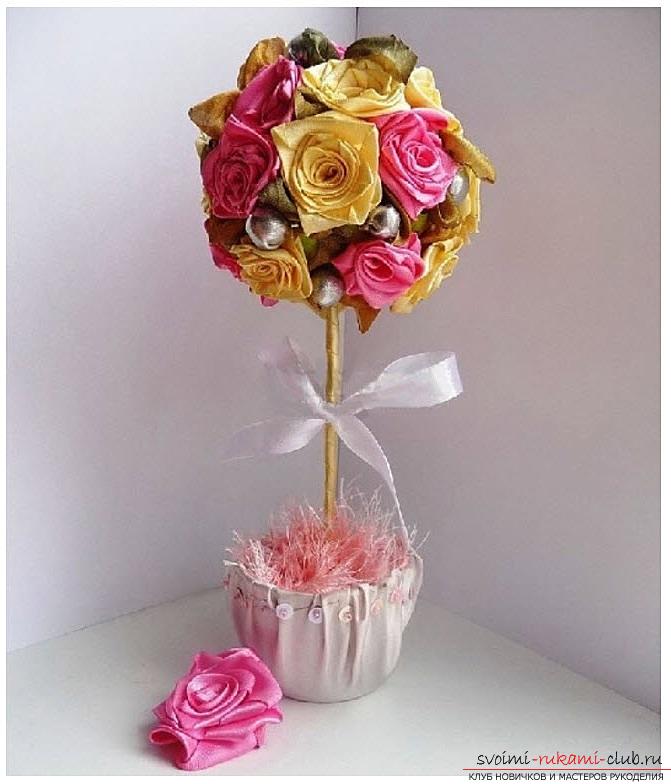
  Very warm, chocolate, coffee and milky colors of ribbons for roses, favorably shade a light purple or light lilac ribbon, from which we will make bows. It will take:
- Satin ribbons of different colors (white, golden beige, bronze and chocolate for flowers, green for leaves);
- Cardboard;
- Threads in tone tapes + a needle;
- Glue (instant and PVA);
- Burnout (if not, then a lighter or a candle);
- Balloon;
- Thick cotton threads (suitable for knitting);
- Capacity;
- Scotch;
- Decorative elements;
- Crochet hook.
Before starting to create a topiary, weit will be necessary to make a basis for the future crown. To do this, we inflate the ball, lubricate it with something greasy, for example, with cream and wrap cotton threads, after impregnating them with PVA glue. If the glue is very thick, you can slightly dilute with water. Now you have to wait until the glue dries completely. This can take from 24 to 48 hours, depending on the size of the workpiece and the thickness of the winding. Now blow off the ball, and our base under the crown is ready.  Now from the green ribbon we cut out the leaves. If you do this with an incinerator, then melt the edges so that they are not needed. Do not be discouraged if you do not find such a tool. Just cut the leaves with scissors and draw the edges over the candle or lighter.
 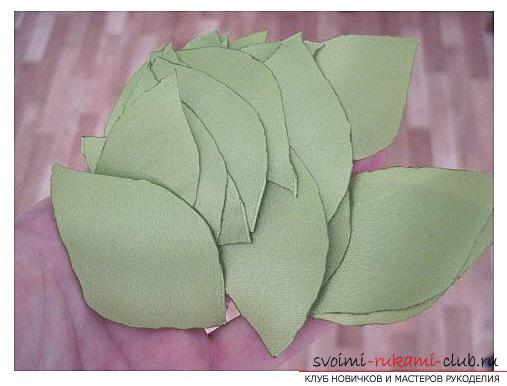 Now we are going for roses from satinribbons. We need to cut the cartons into square pieces 3 x 3 cm and 5 x 5 cm. The cardboard must be tight. Now we need to embroider something like snowflakes. The number of "rays" must be odd. In the center it is necessary to make a hole, not having hooked threads, such that it was possible to pass a tape. We start to turn off the rose. To do this, we pass the ribbon through the hole, twist it a little and pass through one of the "rays", turn it again, and so on. (see photo). To make it more comfortable to work, use the hook for knitting. Do not over tighten the ribbon. Free turns look more floral, voluminous and organic. Now we need to pass the end of the ribbon through the central hole to the wrong side. Sew the ends of the ribbons. Cut the cardboard in such a way that it is not noticeable from the face. We glue a couple of leaves and a rose is ready.
 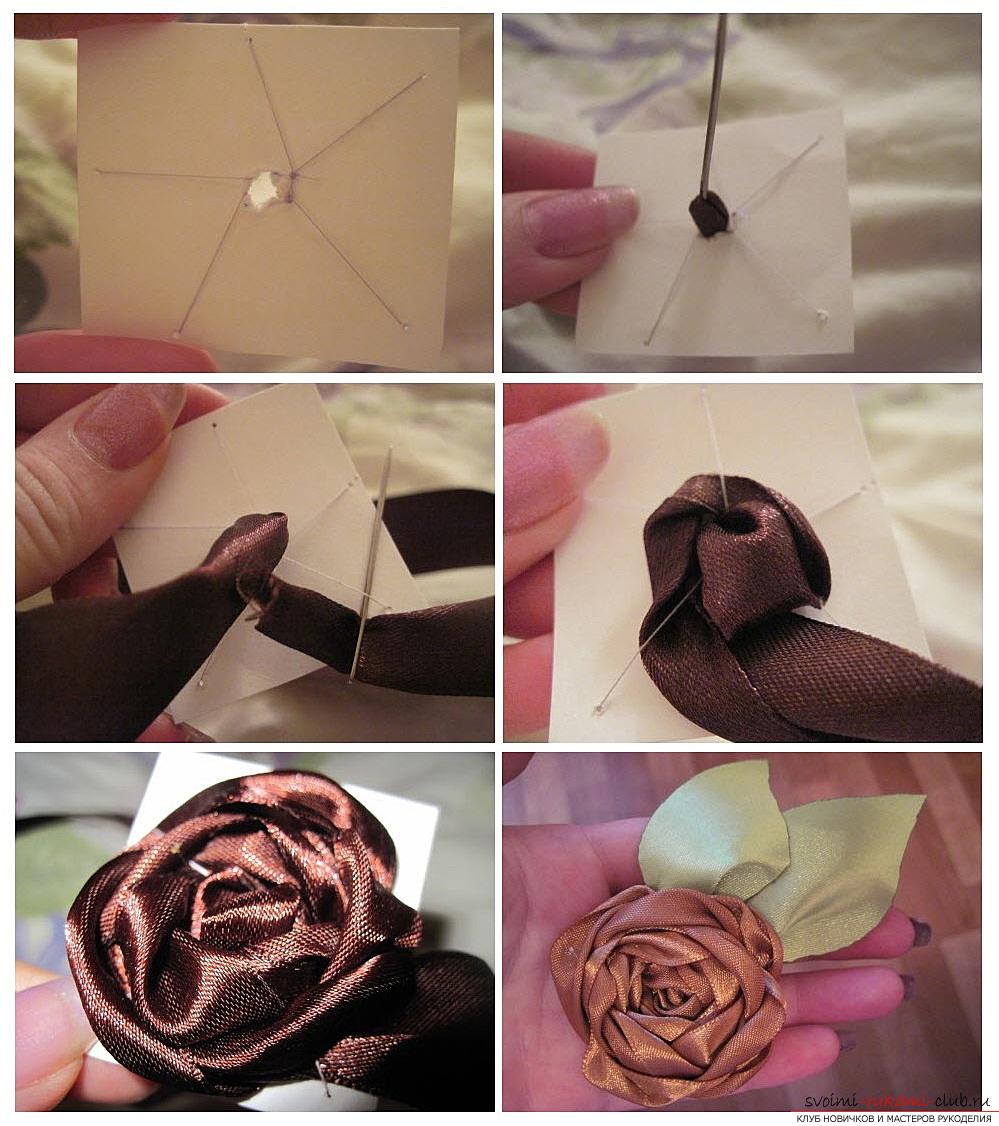 There is no need to make flowers of the same size, let them be different.
  We begin to glue the flowers to the base. Combine a number of roses of different sizes. In order to make the barrel of the topiary, it is necessary to twist the cardboard into a dense tube and fix it with a good scotch tape. The diameter of the tube should be slightly larger than the diameter of the workpiece for the crown.
 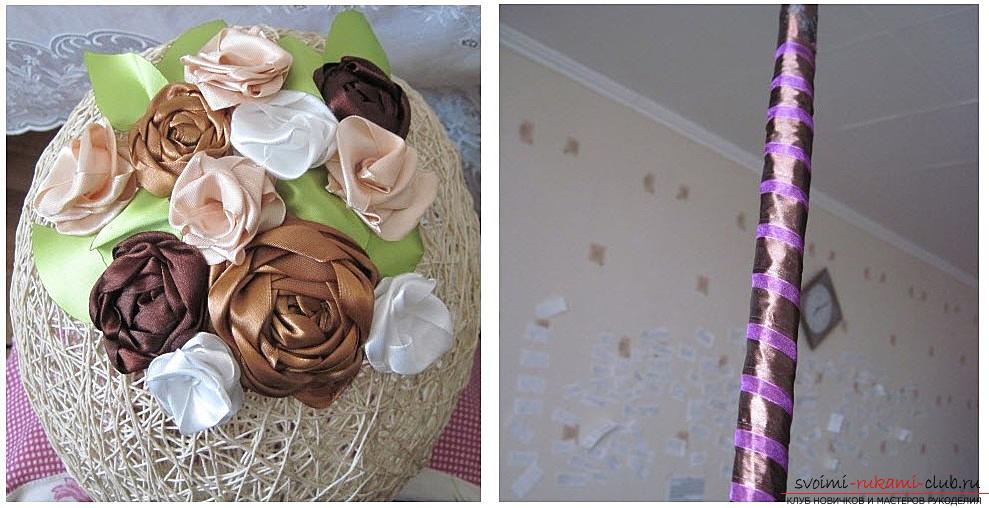 We wrap it first with a chocolate color tape, andthen from above glued to the tube purple or purple ribbons. We fix on it our workpiece. Now you can "plant" our topiary in any pot you like and decorate with beads, small bows of lilac or purple ribbon. Miniature topiary in a cup
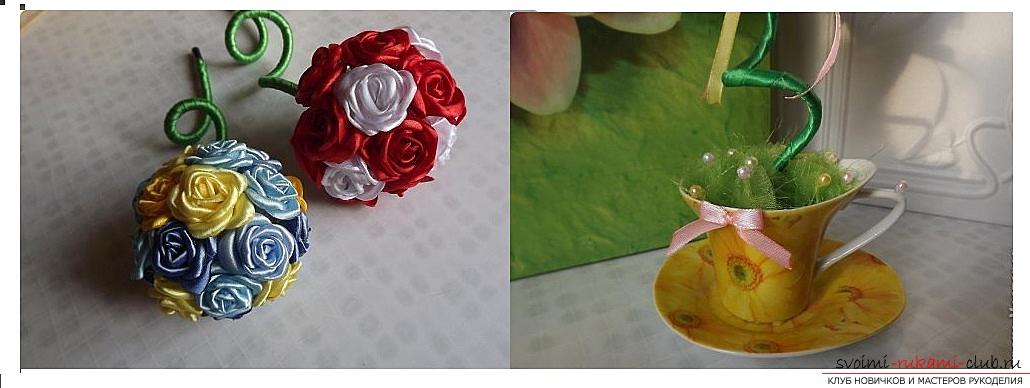
 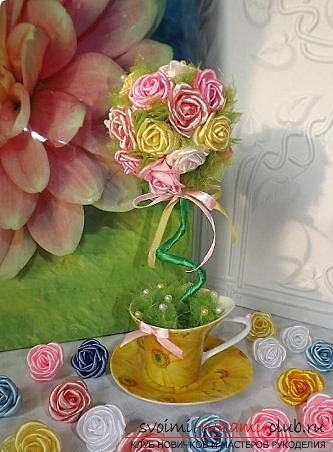 Prior to that, we did quite large topiary, but in this master class we will make a very small to topiary, which we will place in a cup. It will take:
- Tapes of satin of different colors 2.5 cm wide;
- Pieces of green organza;
- Glue (glue gun);
- Wire (thick 3 - 5 mm);
- Lighter or candle;
- Tweezers;
- Cup or other small container;
- Basis for the crown (Christmas ball);
- Elements for decoration (beads, sequins, etc.).
The first stage - we prepare petals. For this we cut the ribbons into squares. The edge sides of the ribbon should be the right and lava side of the squares, and the top and bottom cut-off. You can cut the paper from the paper first, then add a few squares in a pile and cut out a lot of blanks at once. Rounded side from above to melt over fire, so that the petal slightly arched face shiny side outward. For one flower, an average of 9 to 13 petals is needed. 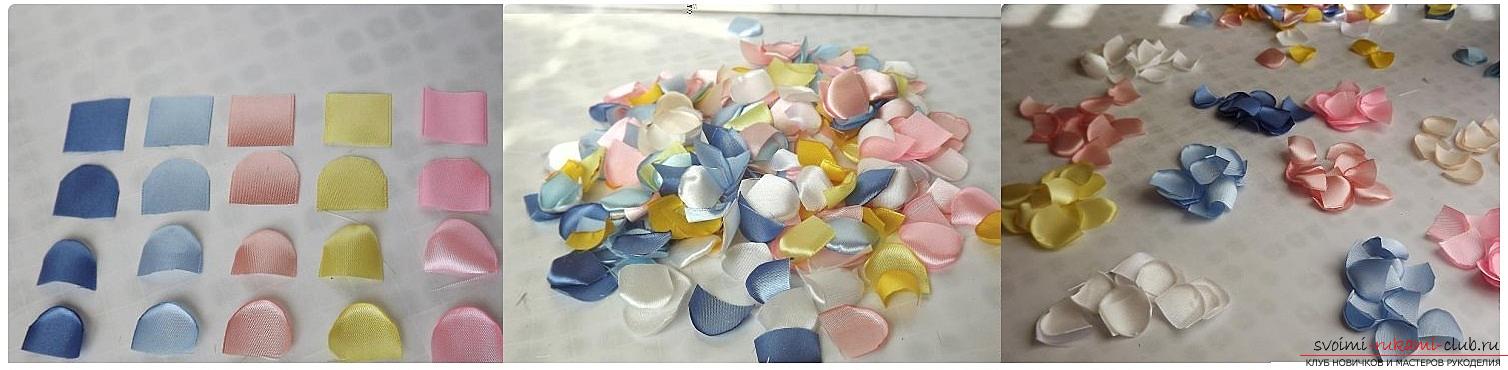 It's time to make flowers. It is necessary to roll one petal with a tube of shining side outward. We take the second petal. We put on a droplet of glue on the shining side and wrap it in our middle tube. The second petal should be slightly higher than the first. Take the third petal, again drip the glue on the shiny outer side and wrap our workpiece in it. The petals go in staggered order, ie, the edges of the previous one are closed by the middle of the next one. So we glue all the flowers.
 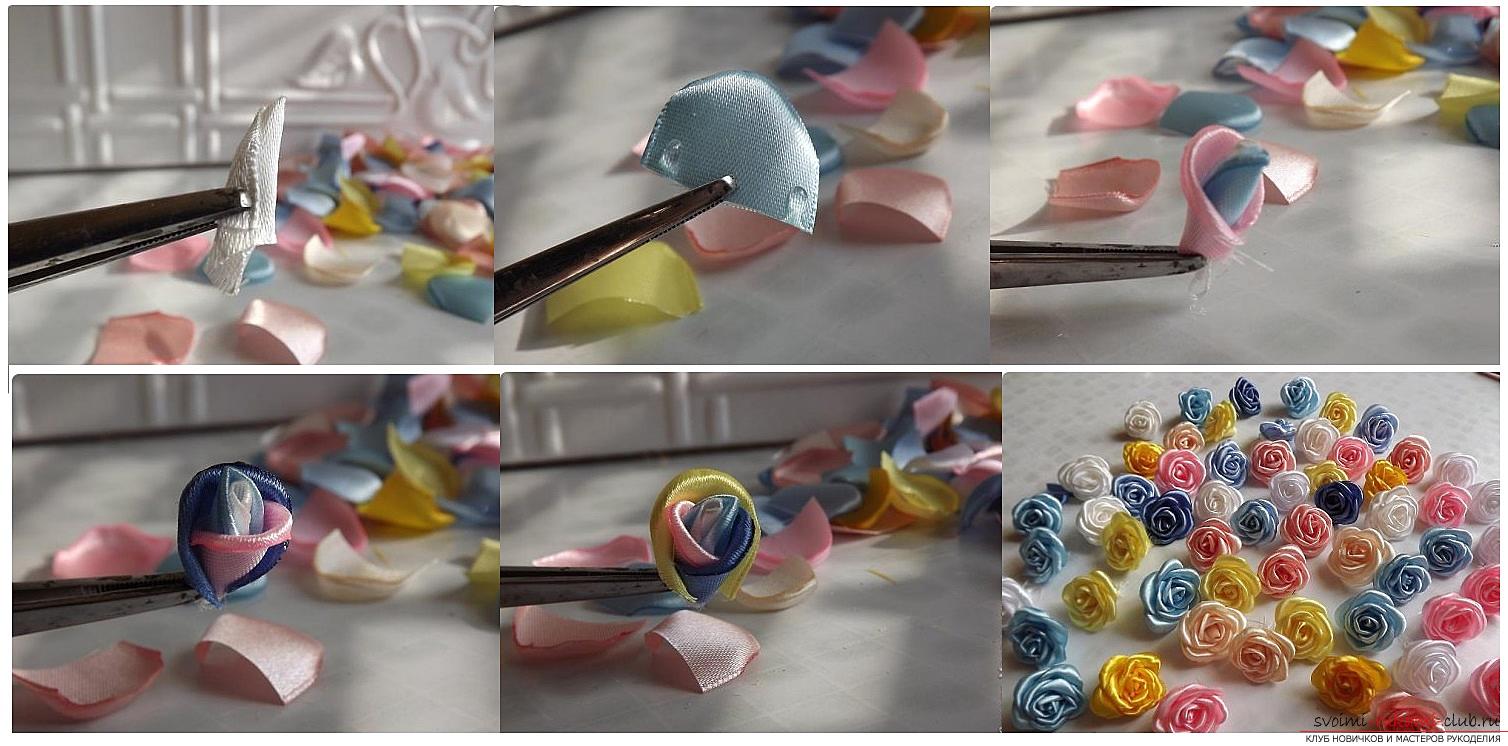 On the ponytails evenly cut off excess strings,which are frayed and melt over the fire. We begin to create the basis for the crown. Take our wire and bend, as fantasy tells. We glue the ball and wrap the whole barrel with a green ribbon.
 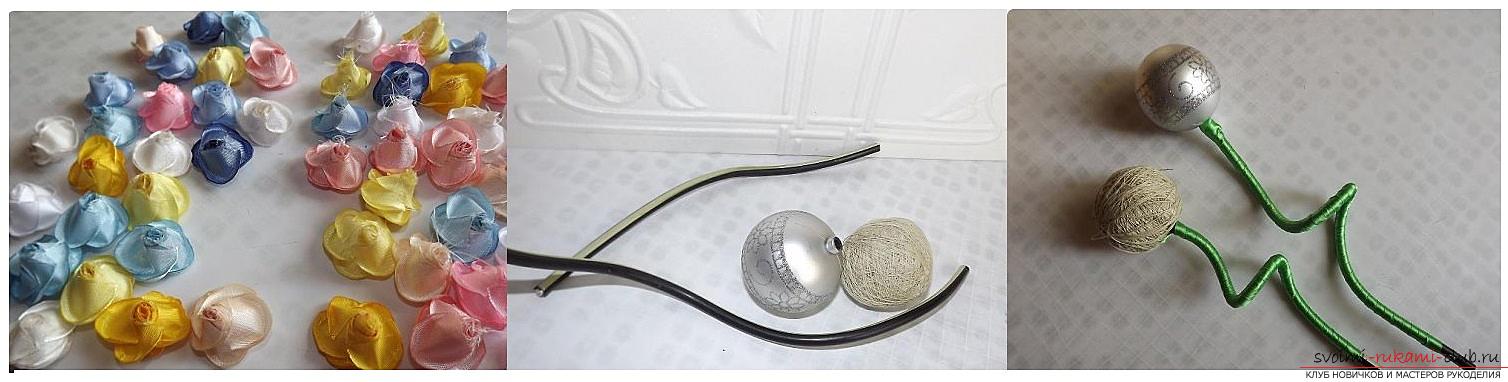 Now we stick our pistols to the ball. In those places where the substrate can be seen glued pieces of green organza. It will replace us with leaflets. Now it remains only to attach the topiary tocapacity. To do this, you can fold the loop at the free end of the wire and rotate it perpendicularly. We glue it in a cup. We decorate the organza with green on top, beads and bows.
Comments
Related posts:
 How to make a variety of jewelry from satintapes with their own hands, lessons with step-by-step photo creation of jewelry for hair, creating decorative items for the interior, decorating bottles of champagne
 How to make an original gift by March 8, step-by-step photos and description of creating bouquets of flowers from sweets
 How to make a bonsai tree of beads with your own hands, several master classes of creating bonsai in different color solutions, step-by-step photos and description
 Make kanzashi from satin ribbons with your own hands with photo and description.
 How to weave from beads gently pink violets, step-by-step photos and detailed instructions of various weaving techniques for creating flowers and violet leaves