How to make a variety of jewelry from satintapes with their own hands, lessons with step-by-step photo creation of jewelry for hair, creating decorative items for the interior, decorating bottles of champagne
In this article we will talk about decorations from tapes. The very history of thin strips of fabric made from natural plant fibers began many centuries ago, and such ribbons served primarily as hairpins. The girls weaved them into braids. In the period of antiquity the Greeks and Romans decorated their hairdos with ribbons with gold embroidery and precious stones. To create a satin weave in those days used cotton and linen, and in ancient China, the ribbons were made of silk, of course. In the Middle Ages, tapes began to be used for the decoration of the room. They were fastened to furniture, used as holders of curtains and canopies. Popularization of tapes in clothing and interior takes place in the middle of the 15th century. Louis XI invites the weavers from Italy to Lyon to teach the local inhabitants the art of creating tapes. After two centuries, the city turns into one of the largest textile centers. In the vicinity of the factories employs more than forty-five thousand people and uses more than eighty thousand machines for weaving tapes of the most varied size and design. Another of the kings who adored the tape was Louis XIV. In the 18th century a new stage of the popularity of tapes began. They decorated not only the clothes and furniture of the king. Ribbons with precious stones and embroidery are located even on the shoes of the French ruler. Over time, the ribbons were firmly entrenched on the ladies' dresses, and then decorated themselves and underwear. Now bright ribbons can be found almost at every step. They decorate themselves with clothes, hairstyles, accessories, interior items, gifts and much more. In this article we will offer several master classes with step-by-step photos and a detailed description of creating satin ribbon ornaments in a variety of techniques. Hair bandage woven from ribbons 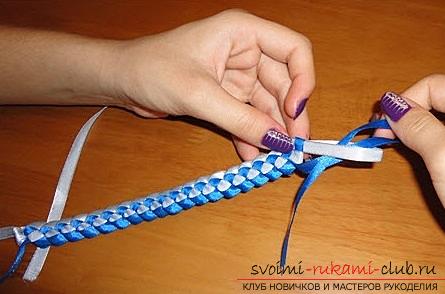 This is very simple and beautiful at the same timeoriginal accessory. Weave it easily enough, and several variants in different colors will allow you to become an adornment for different outfits. In this technique, you can weave not only a bandage on your head. Use the proposed technique for creating belts, decorative dressing, handbags or hats. For work you will need:
- Satin ribbons of two contrasting colors (narrow);
- Candle or lighter.
Below is the master class in step-by-step photos. Following them you will easily make such a beautiful bandage. 
 On two satin narrow ribbons of contrastcolor should be bent approximately 10 cm and cross them. The short ends of the bands should be on top. Now wrap one loops (top) of the second (bottom) and pass the second loop to the first. Tighten the first ribbon, holding the second finger. Follow the photo, now it is necessary to pass the loop from the first tape into the loop formed by the second tape, etc. When the bandage reaches the required length, in the loop we stretch the ribbon completely. We tighten and straighten it.
  At the ends, you need to make two nodules. At one end we already have about 10 cm, leave on the second the same length. The edges of the ribbons melt over the fire. The hair band is ready. Hair band with ribbon flower in canzashi technique
 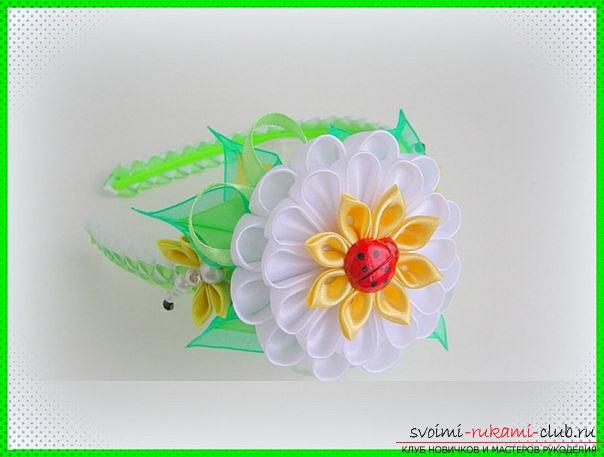 For work you will need:
- Wrap for hair;
- Tape of satin (5 cm wide white, green, yellow, 4 cm wide white, 2.5 cm wide white and green);
- Organza of green color;
- Candle or lighter;
- A piece of plastic for a white base;
- Needle and thread;
- Glue (the optimum version of the glue is the moment of the crystal);
- Scissors;
- A soldering iron or a burner for wood;
- A button in the form of a "ladybug";
- Ruler.
To create chamomile, you need to cut whitea wide ribbon on the squares. Need 12 pieces. Now turn them into circular petals. Below are the step-by-step photos of creating such blanks. It is necessary to fold the satin box in half diagonally, shining outward. Bend line from the top. Now the right and left corners are added to the middle. The figure resembles a rhombus. The right and left corners of the diamond are bent to each other on the wrong side, as shown in the photo. 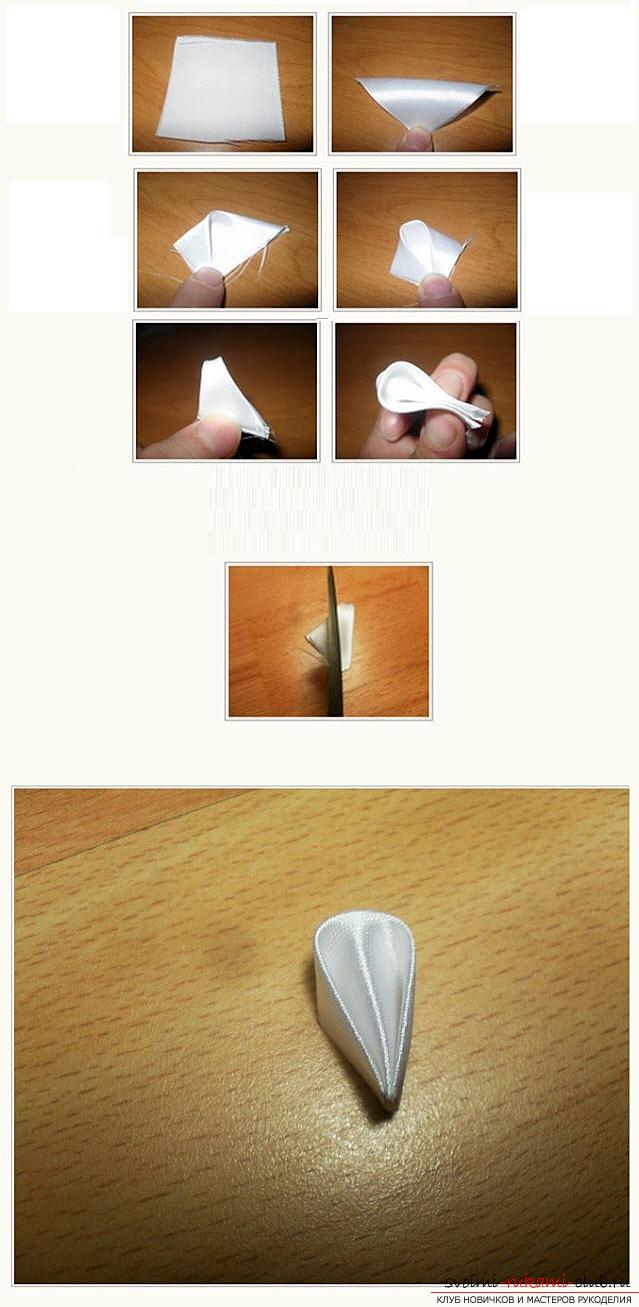 Now you need to cut the bottom corner of the workpieceand melt over the fire. We collect all the petals on the thread. They need to be leveled so that you can see what the diameter of the inner hole of the future chamomile is for the core. Turn the workpiece upside down and melt the edges of the petals, thus gluing the flower into one. We join two petals, we melt and compress them with fingers.
 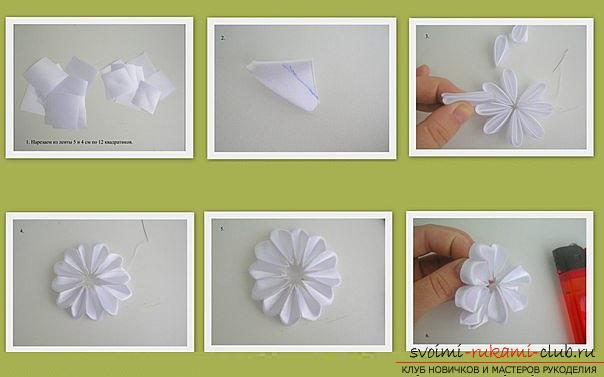 Similarly we make a blank from tape 4cm wide. The flower will be a little smaller. For the base, where we will fasten the petals we cut out a circle from plastic. You can take a piece of cardboard. We sew the circle with a white satin ribbon. We turn the base with a seam upward. Apply the glue and attach a larger flower. From above, we glue a smaller flower, placing the petals in a staggered manner relative to the first tier. Using the Moment Moment Crystal is the best choice for such crafts. It dries out quickly enough (2 - 3 minutes), you do not have to wait a few hours, and there will be time to find the optimal arrangement of petals
 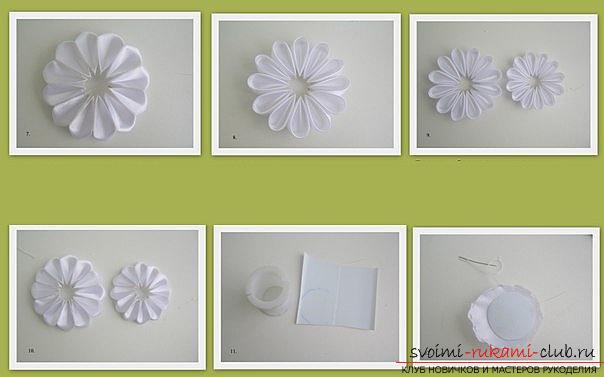 The next stage is the creation of a core. From the yellow tape we cut out the squares with a side of 3.5 cm. We need 8 pieces. They turn off with sharp petals. Fold the box diagonally. The shining side is outward, the fold line is on top. Now again fold the workpiece in half (right corner to the left) and again. It remains to melt the edges and the petal is ready.
 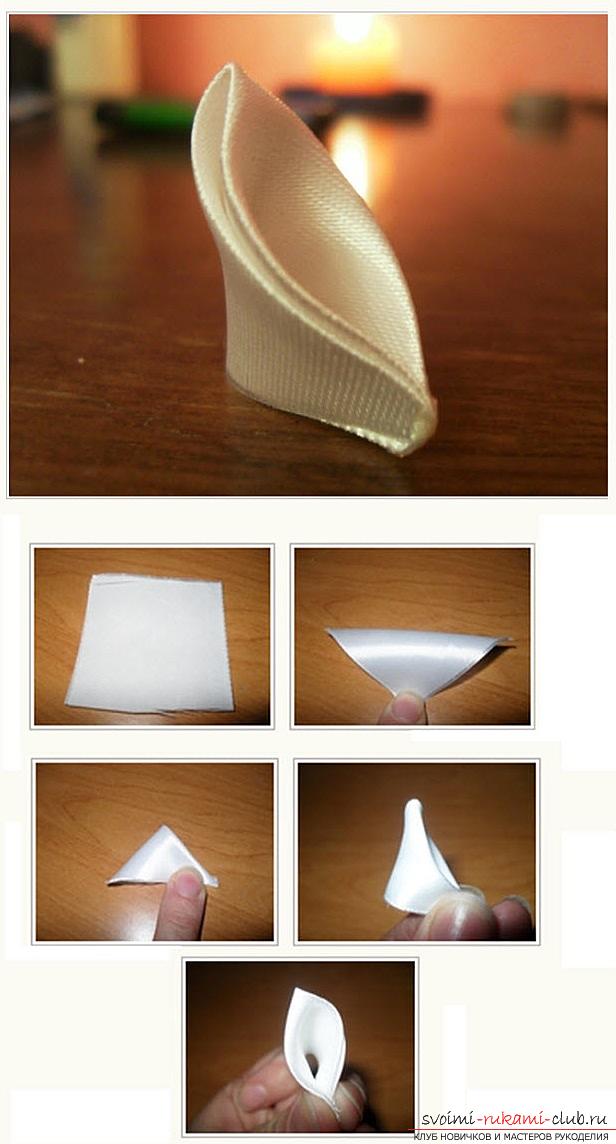 We fasten the petals with a needle and thread. On the wrong side to the bottom, glue a circle of yellow tape. He needs to melt the edges so that they do not start up.
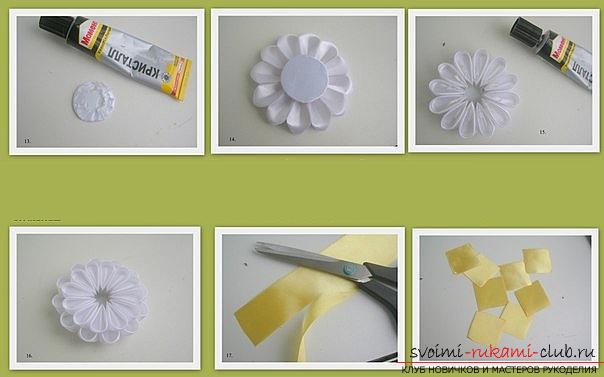
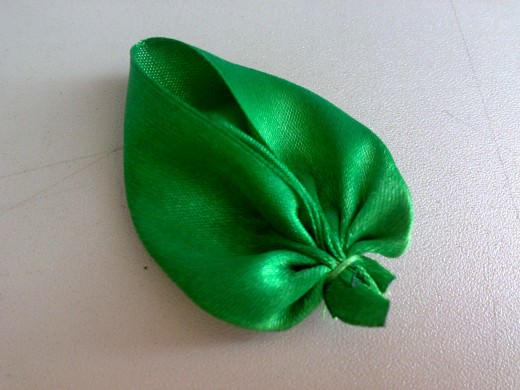
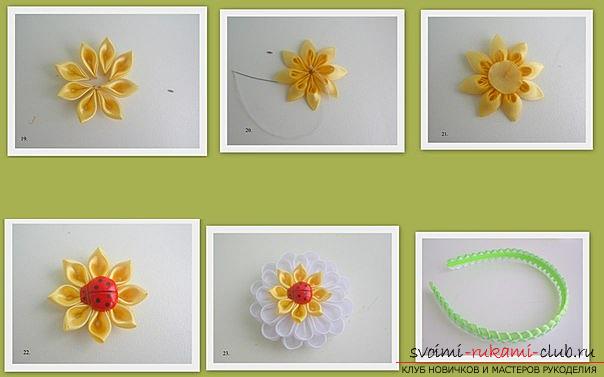 Now glue on the front side yellowthe core of a bead or button in the form of a ladybug, and now the entire structure is attached to two tiers of white petals. For the leaves cut the green and yellow ribbon, as well as the organza on the rectangles 11 x 2 cm. Fold in pairs: organza with ribbons of different colors. You will need 4 pairs of blanks. Now we have the strips to ourselves and fold them in half. Organza is obtained by the top layer. Now put the workpiece on a flat surface (preferably ceramic), apply the ruler diagonally, not reaching the corner, and conduct a soldering iron or incinerator on wood. At the resulting blank, the edge immediately becomes melted. If you do not have the tools you need, just swipe over the fire.
  We connect the leaves with a yellow and green ribbon inpair (see photo). We decorate with thin ribbons of white and green color. It remains only to paste first the leaves, and then the flower to the rim, and the hair ornament from the satin ribbon is ready. Another version of the hair ornament can serve as the next flower.
 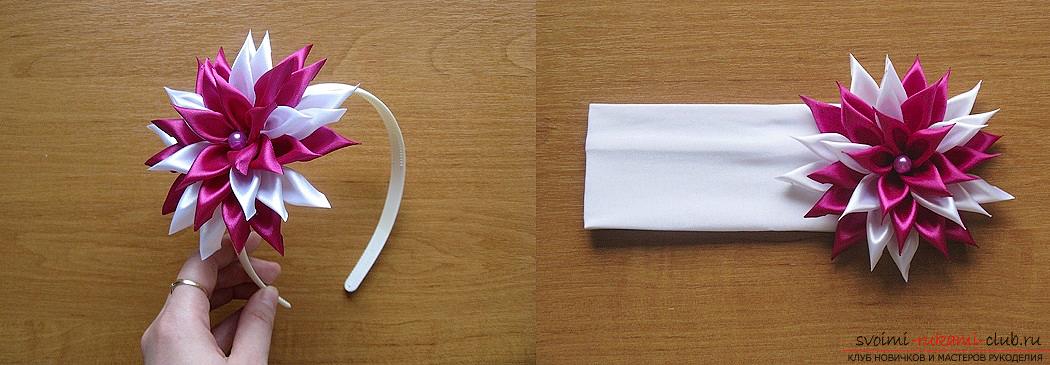 Materials and tools:
- Tape of satin white with a width of 2.5 cm and a length of about 75 cm, and a square 5 x 5 cm;
- The tape from the wine atlas is 2.5 cm wide and 1 m long;
- Bead in tone tapes;
- Instant glue (the moment the crystal is suitable);
- Tweezers;
- Candle or lighter.
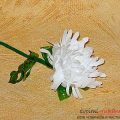
In this master class, the flower is obtainedtwo-tone, but you can choose one or several colors according to taste or creative idea. Cut ribbons 2.5 cm wide by rectangles 5 cm in length. It will take 15 white and 20 pieces of wine. In order to make a petal, fold the satin slice in half along the shining side outward. Cut off one corner and melt the cut over the fire to make it glued together. Now the two lower free corners are wrapped on the front side, as in the photo. Slightly cut and melt over the fire. Similarly we make white petals. 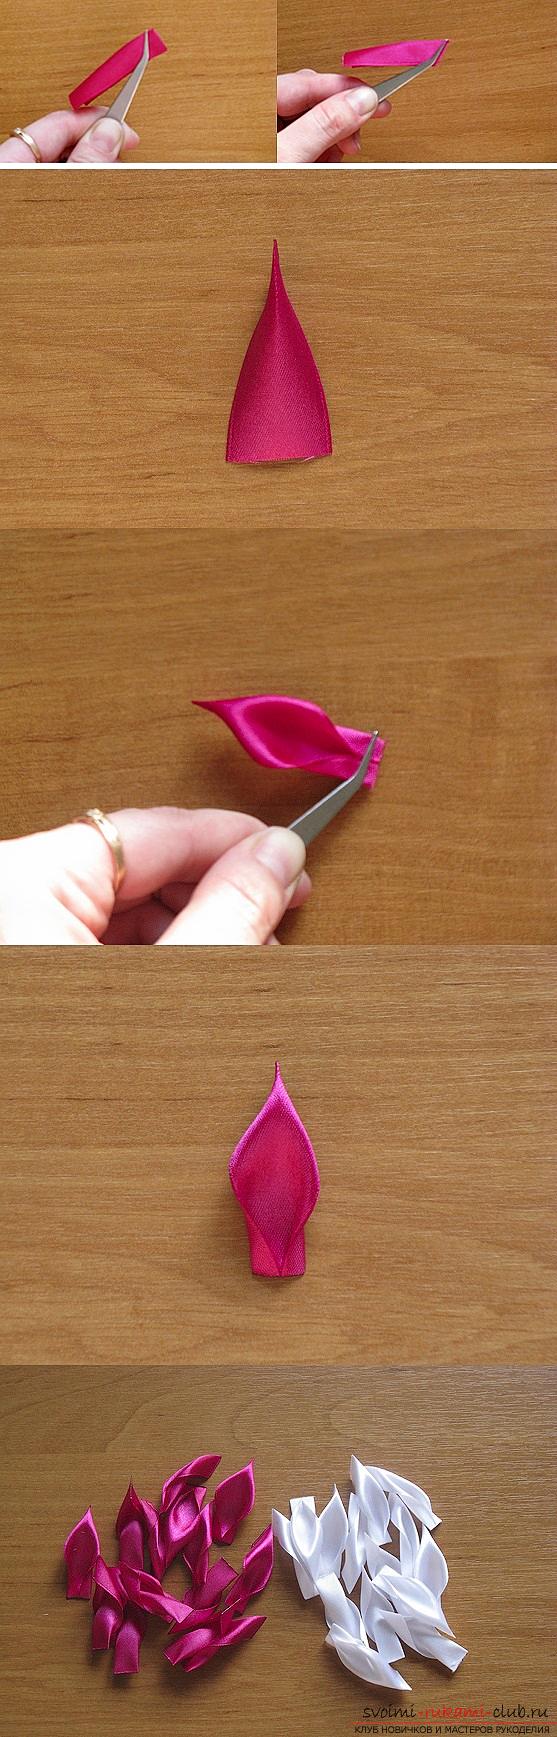 From a white square 5 x 5 cm cut out the circle andwe melt the edges above the flame. We put it shiny side from ourselves and begin to glue 10 petals, grabbing about 1/3 of the circle from the edge. Strip the colors. The next tier is staggered in relation to the first at a distance of about 2/3 of the edge of the circle. Similarly, glue the third and fourth tiers.
 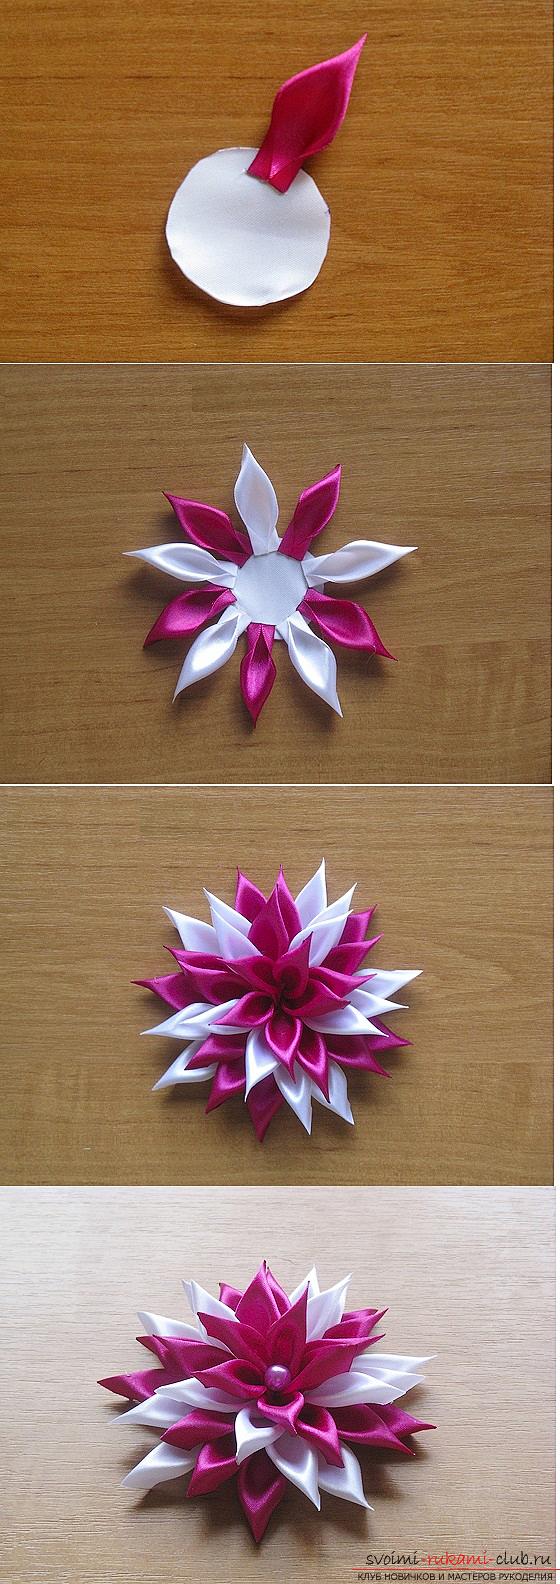 In the center, attach the bead and the flower is ready. It can be attached to a barrette, a hair rim, a pin for a brooch. Or maybe you will have your own version for such a beautiful decoration made of ribbons. Tapes can serve not only to create hairstyles. From the bright pieces of the atlas, the original elements for the interior decor are obtained. Aromatic basket of satin ribbons
 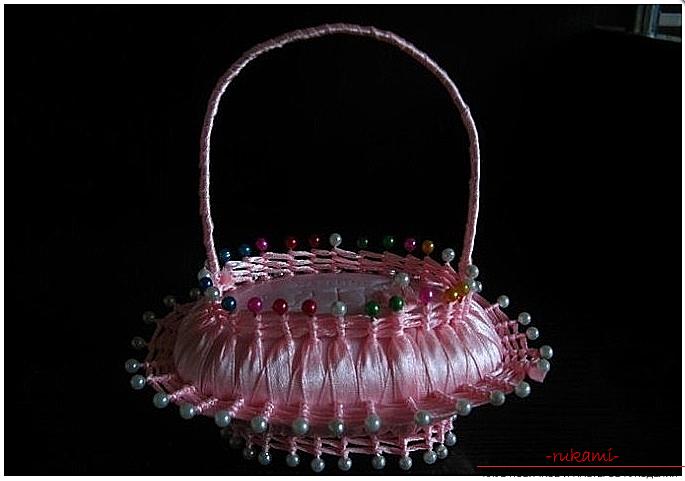 Materials and tools:
- Soap (the shape can be round or oval, and the smell is necessarily beloved);
- Ribbon satin 5 mm wide (its edges should be protected from stratification, it can be fused over fire or applied glue);
- A thin wire;
- English pins (with balls at the end).
Soap in this design will perform a rolebaskets. First you need to make marks at a distance of 5 mm from the edge. Now we have four pins in the opposite ends of the soap. Further symmetrically we have the remaining pins. Now you need to perform the same manipulation with the second side of the soap. For the bottom, it will be necessary to retreat from the edge approximately 0.7 - 1 cm. Do not push the pins too deeply. 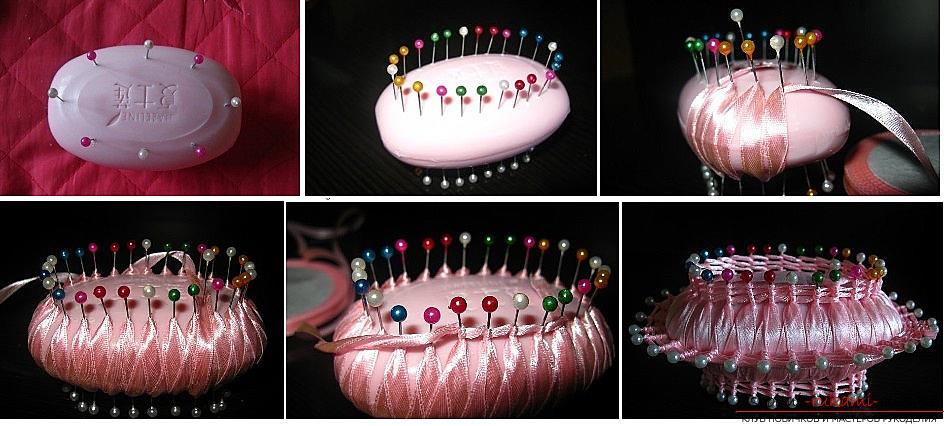 We turn the workpiece back and pick it upribbon. In order to fix it, you need to pull out one of the pins, chop the end of the ribbon onto it and insert it back into the hole. Now, following the step-by-step photos, we start wrapping the workpiece, engaging the tape in the upper, then in the lower pins. It looks like a figure of eight. It is necessary that the ribbon covers completely the side parts of the soap. It is possible for this you need to walk in several layers. When the sides of the basket become visible, the tape can not be cut off. Now it is necessary to make turns around each pivot and top and bottom. To make the article look more original and beautiful, after you finish braiding, you need to stick the pins on the side flat side. They are braided similarly: we make a turn with a tape around the pin in a clockwise direction. As a handle of the basket you can use a wire. It is also necessary to wrap it with a ribbon. On request, you can decorate the basket with flowers, beads or any other decorative elements. Satin ribbons are great for decorating bottles. In the master class below, we suggest decorating a bottle of champagne. Such a wonderful souvenir is perfect for any holiday, be it a birthday, a wedding party or a New Year's Eve. Bottle of champagne decorated with ribbons
  Materials and tools:
- Tape of satin of the liked color of 5 sm (approximately 4 meters);
- A ribbon made of brocade is golden (about 2 meters);
- Glue;
- Scissors;
- A bottle of champagne;
- Elements of decor (beads in color ribbon, lace, thin ribbons of brocade);
- Stationery knife.
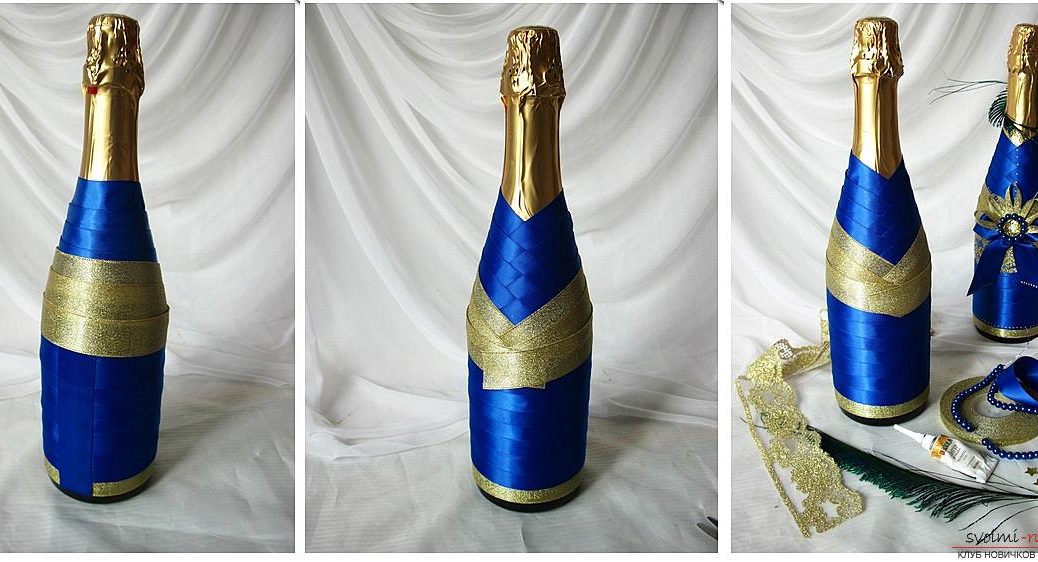
When you choose champagne for thiscrafts, give preference to the bottle with a gold foil without inscriptions. This master class uses a tape 5 cm wide. Keep in mind that the width of the tape will depend on its consumption in length, the thinner the tape, the more it will be required. You can work in two versions - pieces of ribbons, the length of which will be equal to one turn or wrap the bottle, cutting off the ribbon as needed. When they are coated with glue, try to make a pinpoint application so that excess glue does not spoil the appearance of the bottle. The first segment of the tape is fixed in such a way that the edge of the paper golden wrapper is hidden. Stretch the tape well before attaching it permanently. Make sure that the ends of the bands follow the order of the weave (see photo). A pattern resembling a pigtail should pass along the central vertical line of the bottle. We attach 4 pieces of tape of the first color. In the weave, the right ends of the tape of each turn are on top, and the left ones are from the bottom. 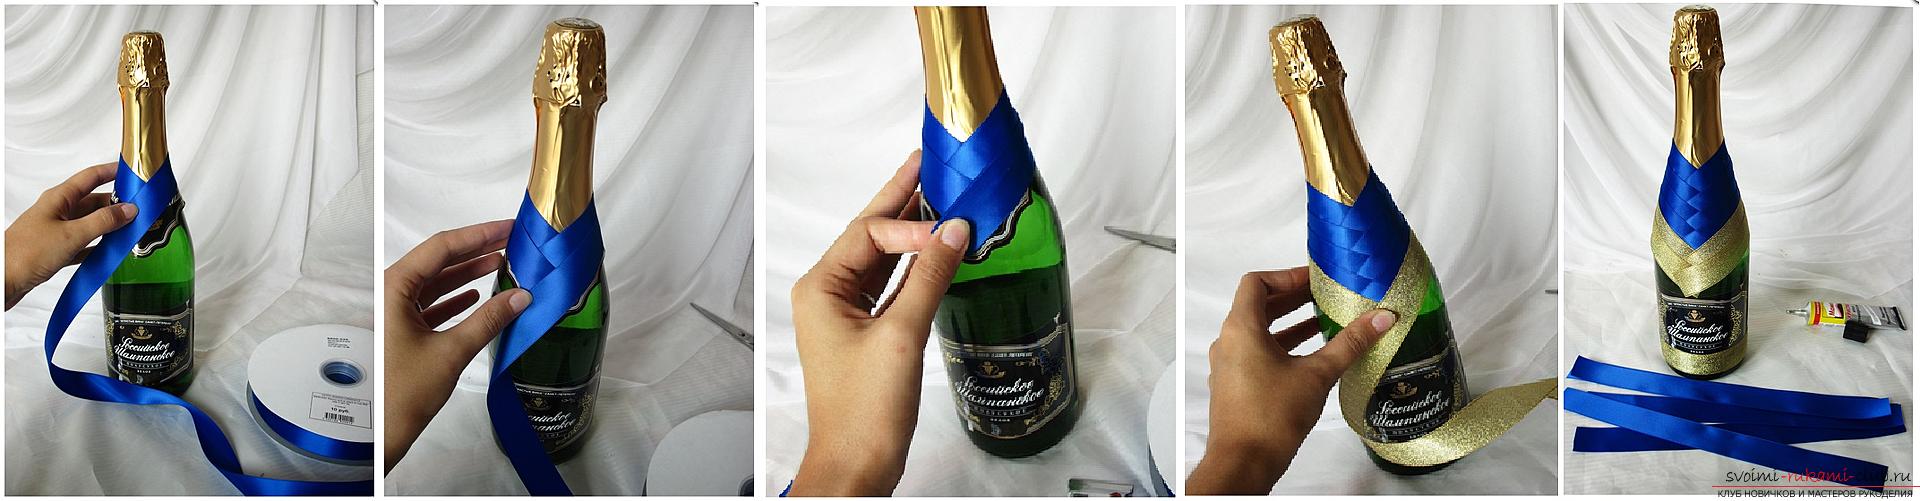 Now proceed to decorate the golden ribbon onanalogy with the previous steps. At this stage, there may be difficulties, because Brocade is poorly stretched and has a rigid structure. We paste 2 strips and proceed to decorating the bottom of the bottle.
 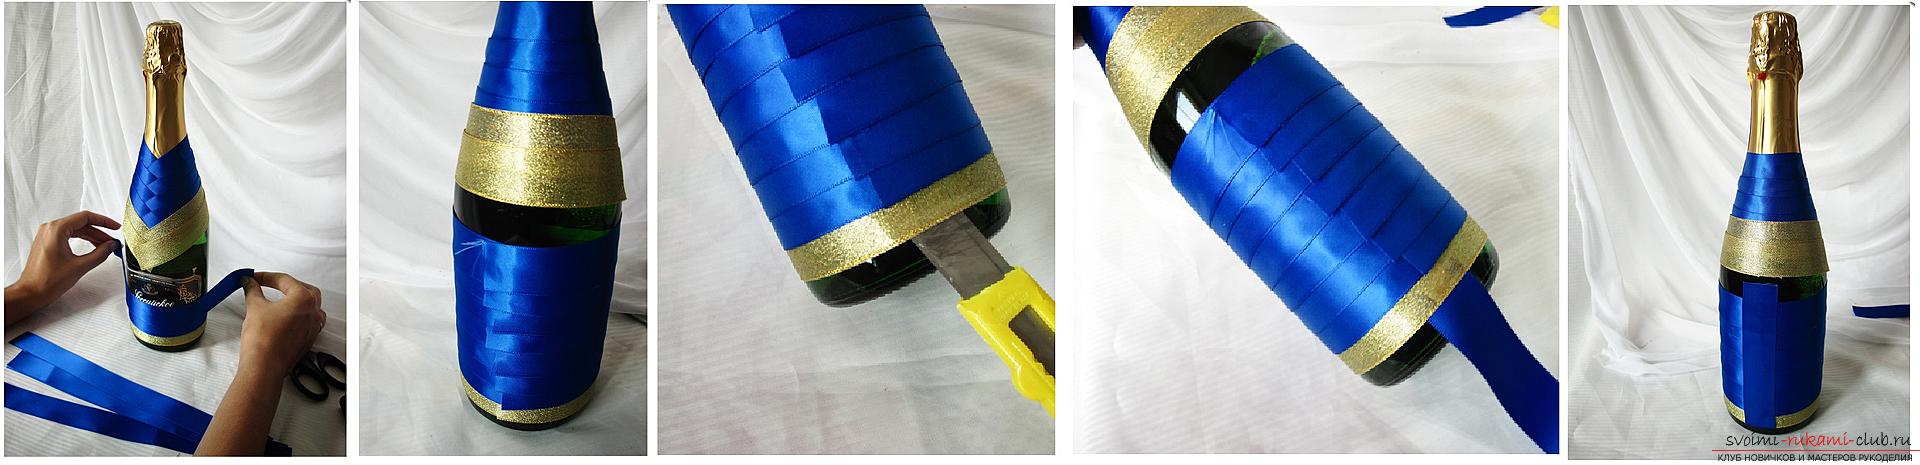 At the very bottom of glue a golden strip. Above are the satin ribbons. In this part of the bottle, the lines must be horizontal, not oblique, as before. The line for connecting the strips is strictly vertical at the back of the bottle. To disguise it, you need a piece of satin ribbon. With a stationery knife, gently pull the lowest ribbon and place the end of a new segment, glued with glue, into this hole. Now we apply glue on the entire surface of this piece of satin ribbon pointwise, paying special attention to the edges. It remains only to glue it on the seam, formed by horizontal strips.
  Now you can decorate the bottle with lace, beads, bows or any other elements of decor.
Comments
Related posts:
 Decorations from plastic bottles. Making beads by your own hands
 Crafts from plastic bottles with their own hands, how to make flowers from plastic bottles, cornflowers from plastic bottles, roses from bottles with their own hands.
 Sheep from beads: different ways to create your own hands (diagram)
 Herdan bead workshop creating unusual decorations (photo)
 Pictures from tapes: lessons of creating chic panels (photo)