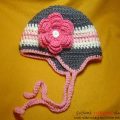
Knitting an original children's hood crochet for beginners, using a detailed master class with photos and charts
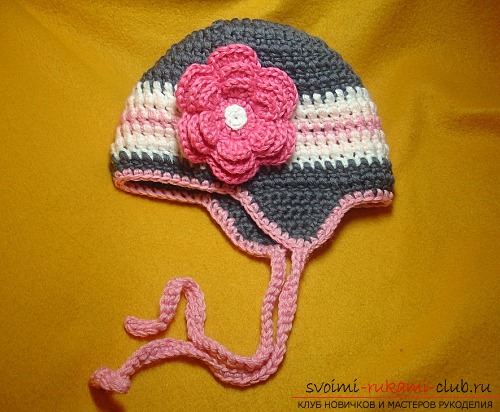
Crochet knitting pattern for childrenBeginners When you are again faced with the choice of headgear for your daughter, think: maybe it's worth trying to tie a hat with your own hands? Moreover, it is quite simple and exciting. In this master class we will consider an example of crocheting a crocheted cap on a girl with a head size of 48 centimeters and an age of one and a half to three years. The front edge of the cap will be 18 centimeters, and the back - 20 centimeters. 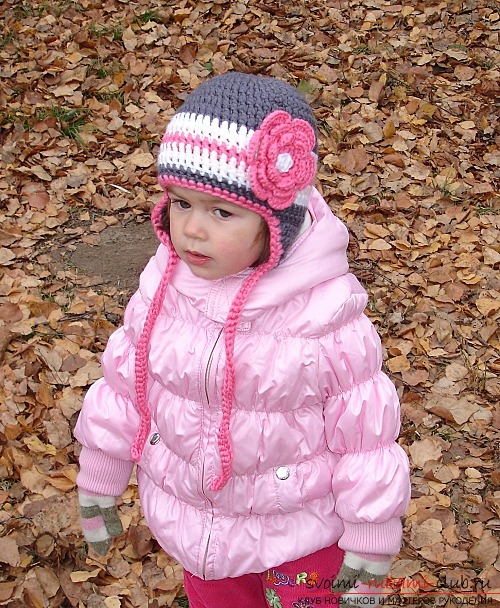 The set of necessary materials and tools for this needlework is quite small:
- needle;
- yarn (pink, white, gray and peach flowers) with a density of approximately 360 l / 100 g, which will need to be folded threefold;
- Crochet hook number 3,5 (for the flower);
- scissors;
- crochet hook number 4 (for loosening the headgear).
The distribution of rows according to the colors of the yarn will bethe following: gray yarn - from the first to the eighth rows, the fourteenth, fifteenth and ears; white yarn - the ninth and thirteenth series; pink - the eleventh row; Peach - the tenth and twelfth rows. 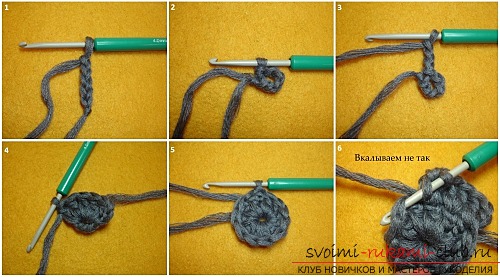 We transmit 5 VP (air loops). As a rule, knit begins with the 6th VP. But we deliberately underestimated their number so that the hole on the vertex turned out to be smaller. Then the chain is closed in a ring with the help of a half-column. Then we sew in a circle. In order to climb another row of columns without a cape (RLS), you must bind three VIs. First row. We send 12 RLS. In this case, the hook can be inserted directly into the VP or, specifically, from the ring halo (in this example, we chose the second option). Second row. Now we are tying twenty-four RLSs from the top of the preceding twelve columns, in other words, from each column we knit two new ones. Here we draw your attention to the use of the "deep puncturing" method, when the crochet hook is inserted into the top of the column from the bottom row, and not into its loops. Thanks to this technique, we avoid skewing in the pattern of our headdress. Third row. We form thirty-six CIH (a column with one crochet). To do this, squeeze out two columns from each second column of the previous row.
  The fourth row. We knit forty-eight CIH, i.e. we unfasten each third column of the previous row. Fifth and sixth row. We send forty-eight CIH. The seventh row. We send fifty-four CIH, in other words, we add six columns. For this purpose, the increase is made in every eighth column. For beginners it is recommended to regularly recalculate the number of columns. This will significantly reduce the number of errors. On the seventh row, the addition was over. The eighth and all subsequent series will be released with a constant number of columns - fifty-four. The only thing you should pay attention to during the knitting of the eighth - the fourteenth series - is the color of the yarn, do not forget to change it according to the scheme. After this, conditionally we divide our headdress into three parts: ten columns per "ears"; twenty-two CIH in front of the caps; twelve CIH on the occipital part. For one of the "ears" the beginning will be the place of joining the rows, that is, the area where we constantly tied the VP lift.
 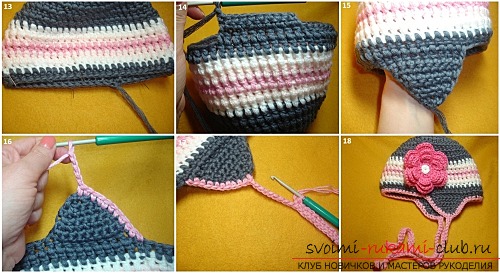 Let's go to the knitting of the last (the fifteenth,incomplete) row of columns. Twenty-two transfer columns remain untied, that is, from the beginning of one "ear" to the beginning of the second. We unfold our knitting and go to the "ears". Now it is necessary to knit by turning rows of RLS, and not in a circle, - the way of "deep puncturing" is no longer used. One tab needs ten columns. The crochet knitting scheme is as follows: First and second row. We send a scot of ten. The third and fourth row. There are eight RLSs. Fifth row. We fix six RLS. The sixth row. We subtract two more bars and knit four RLS. The seventh row. We send two RLSs. At the end, we cut off the thread and remove it from the loop. By analogy, another "ear" is tied together. Now go to tying the cap. We knit along the edge of the RLS with a pink yarn. As soon as you reach the end of the "ear", go to the bandage of the strings, and do not cut the thread. After tying forty-three EPs, go back with columns without a cape and continue tying. After completing the work, carefully hide the excess threads. To decorate the cap, you can tie a flower of your choice. To arrange the flower, choose the place of joining the rows. In addition, that this will bring a certain zest to the headdress, it will hide the flaws resulting from knitting. So, you tied your first baby hat!
Comments
Related posts:
 A master class on knitting a baby cap for newcomers. Photo, description and diagram of knitting
 Master class on crochet of children's hats for girls Strawberry summer with descriptions of steps and photos
 This detailed master class of crochet for beginners will teach how to crochet an openwork kerchief.
 Master class on knitting hats with a bow for a girl, a detailed lesson with a photo and description
 Knitting with knitting needles for women. Detailed diagram with photo and description for beginners