A stylish and seductive outfit that will accentuate your slim figure. Simple patterns of dress-tunic. Detailed diagrams and photos
Sew outfits without using patterns - this issecret dream of all who are only acquainted with the art of creating beautiful and stylish clothes with their own hands. Let's consider some models of tunic dresses, which are very easy to sew, because you do not need to know anything about this and the sewing experience does not matter. The first model of the outfit will sit perfectly on each girl, however, one should sew this outfit out of chiffon, stiffon, elastic fabric and other thin and airy materials. Rigid and spattering matter will not work. Do you want to sew a one-color dress? Then before the opening itself, it is necessary to correctly calculate the width and length of the future outfit. Calculate the width of the tunic dress. It is equal to twice the length of the shoulder plus the width of the sprout. The length of the shoulder should be measured according to the figure. It should be remembered that the sprout is the neck of the back halves of the dress. The width of the sprout and throat of this model should be 7-7.5 centimeters. After accurate calculations of the width of the future product, it is necessary to fold the matter in half with the inside sides. Trim the edge and the excess of the panel. Exactly in the middle of the panel draw a line of the shoulder, mark the point, which indicates the border of the shoulder and sprout-neck. To draw a shoulder, measure the depth of the neck. The depth of the sprout will be about 3 centimeters. Now you should mark out the armhole. In the right and left sides of the shoulder line we measure 25 centimeters, and set the notches. Be sure to mark the waist lines in two directions. Calculate the distance from the shoulder to the waist. It is equal to the length of the shelf to the waist, and add 5 centimeters. The length of the shelf should be measured according to the figure.  To make armholes, you can use"Moscow" seam. When the armholes and throats are decorated, the side seam should be sewn and swept. Then we perform the kuliska on the shoulder and waist. For the kuliska on the shoulder from the inside, it is necessary to prick the oblique bake and lay a decorative ribbon in it. At the waist, you should line the line with a rubber band. Under this model, a beautiful wide belt will fit. The bottom of the tunic dress can be made with a seam with a ruler. If the outfit is made in two colors and with a side seam, then the layout of the fabric does not change. The edge of the armhole is best cut, so that it does not delay the matter. The fold of the panel in the presented case goes along the vertical of the side seam-armhole. The shoulder is sewn, and the seam allowance is used to decorate the cusp. It should be remembered that the sprout-neck in any case is covered without allowances on the seams. As a result, despite the simple cut, you should remove only three measures - the length of the shelf to the waist, the depth of the neck and the length of the product. The beginner dressmaker will initially find it quite difficult to decorate the armhole at the incision site, while not stretching and not mowing the sprout neck. The best way is to choose a piece of cloth that does not require the processing of slices.
 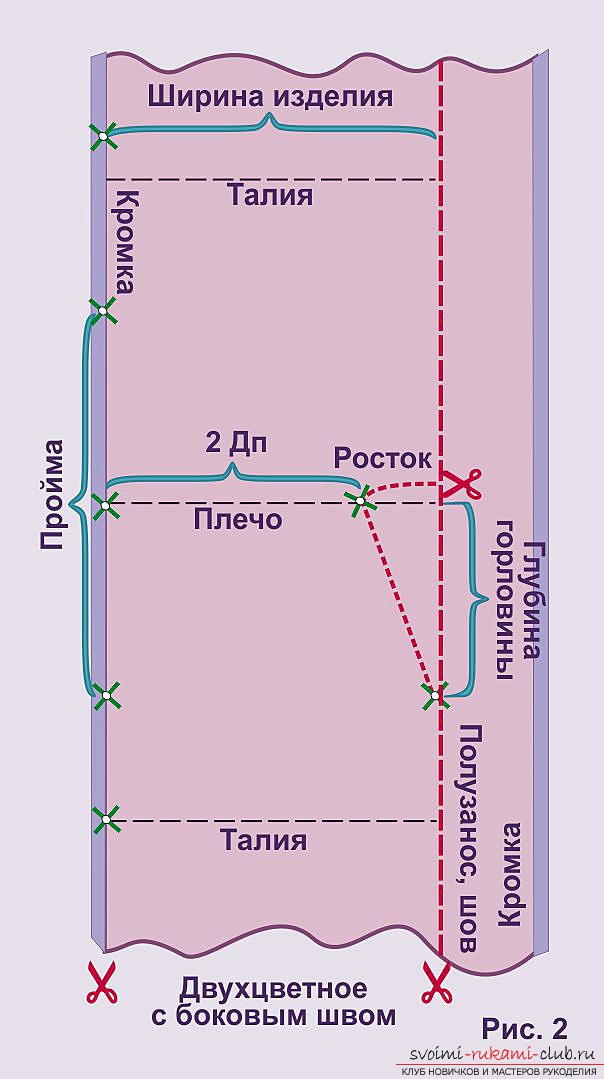 The second dress model is a tunic dress thatconsists of a voluminous bodice and a skirt-rectangle. To sew the presented outfit you will need a dense stretch fabric. Consider cutting more detailed. The skirt, as already said, should be rectangular in shape. The width of the bottom is equal to the width of the hip volume with a slight correction for the stretchability of the web. The bodice should also be sewn rectangular of arbitrary length and any width. In order to correctly determine the width of the bodice, you will need the width of the sprout-neck and the length of the shoulder.
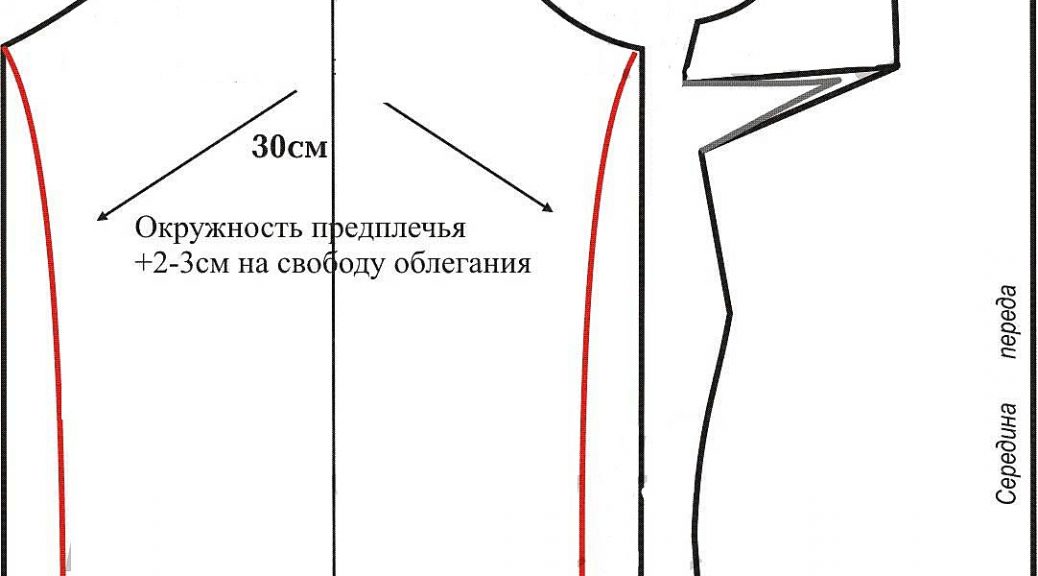
 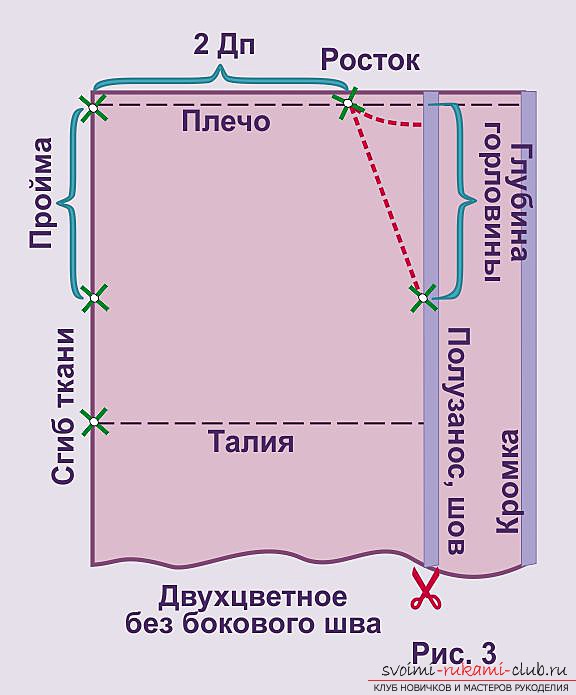 The width of the sprout-neck can be measured directly byfigure, as the distance between its extreme points. The width of the neck must be divided into two equal parts, before being used in the circuit. Shoulder length for this model should be increased by 1.5 - 2 times. The length of the armhole should be determined from the circumference of the shoulder. There will not be any difficulties with tailoring, if you do not handle the throat sections, armholes and the bottom of the product. On the third model, an even simpler cut is used, based on a rectangle. The width and length of the tunic dress, as well as the width of the neckline, are measured by the figure. Пройма - 25 - 30 centimeters, but in it it is possible to insert an elastic band.
 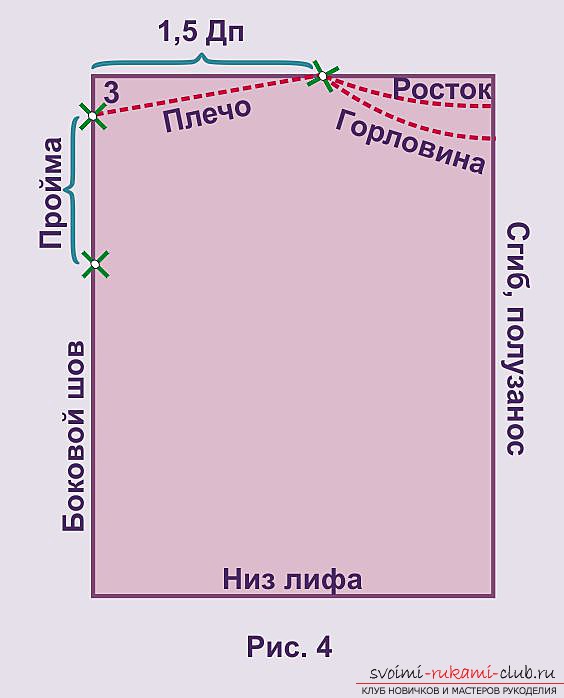 If there is a desire, then the tunic can becomplement the sleeve-rectangle. It can be cut to the bottom by a few centimeters. The lateral seam can be made straight or rounded. For tailoring use any matter in which you will be comfortable. But the presented outfit is not difficult. Do not save on fabric, especially if sewing costs you free!
  The fourth model of a dress of a tunic From presentedopenwork tunics can not tear off the eyes! But it is not difficult to create such an amazing outfit. Let's start modeling the outfit. To design and sew a tunic is simple, there will be no complications even for a beginner dressmaker. It will take very little time for tailoring. It is not necessary to do a hemming of sleeves, a cut of a mouth and a dress bottom.
 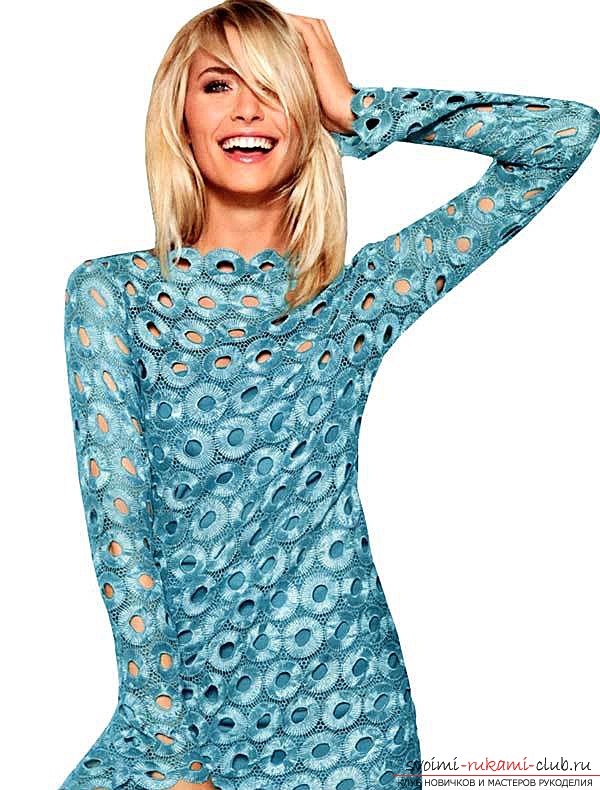 The details of the pattern must be placed on a panelso that the festoons are located at the bottom of the sleeves, pass the tunic and back, as well as the neckline of the two halves. On the pattern of the dress on the front, close the breast tuck, moving it to the side. The resulting dart shall be shortened by 2 centimeters. Cut out the neck of the front part under the ruler. A thawed tuck on the front half is removed, having dressed the tunic dress on the side in the waist area. Pattern the back of the model according to the pattern. Talevymi tuck back the back, zauziv back half in the center.
 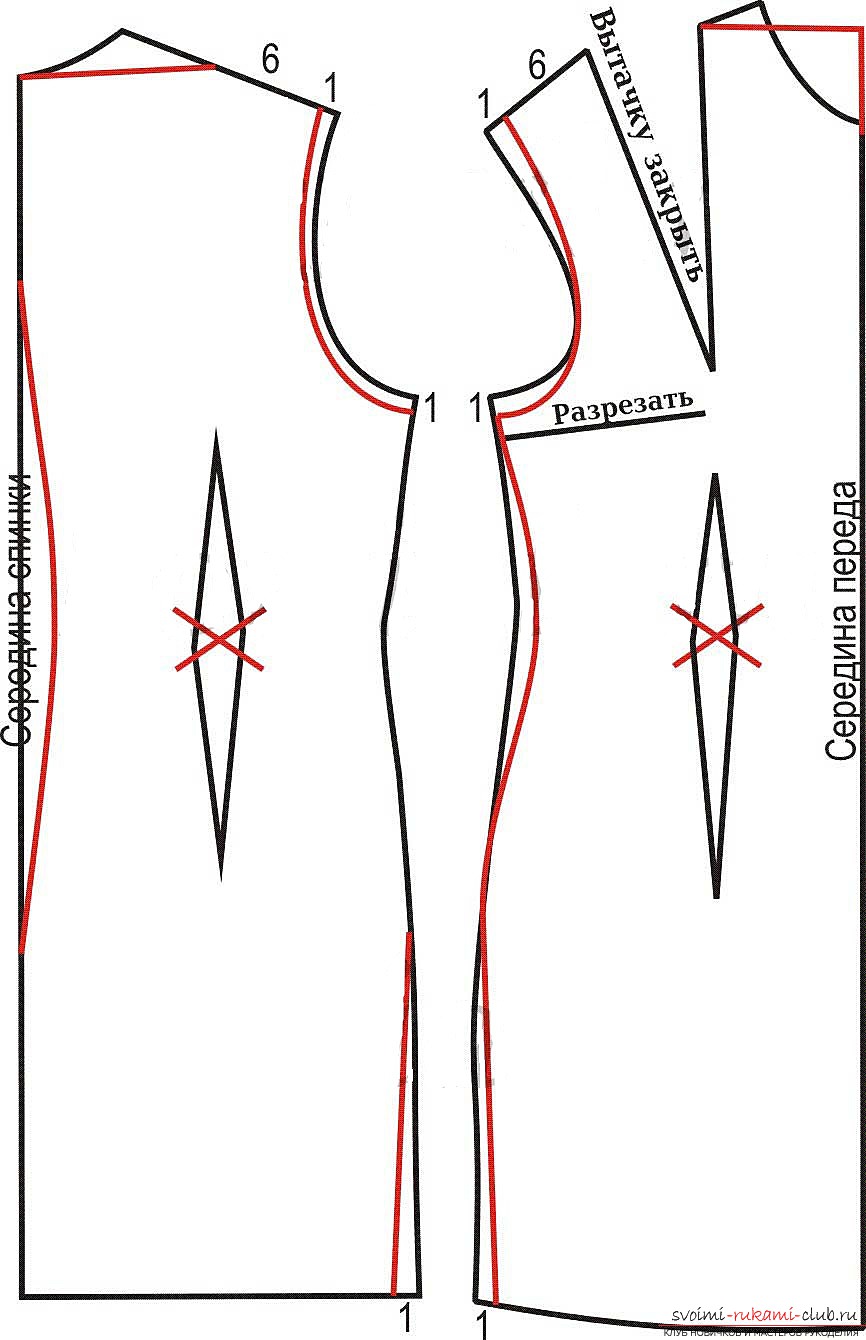 You should know! In the middle of the back halves, the dress does not have a seam, so to get the desired tapering along the middle line of the back, when cutting, the material must be placed so that the fold line of the cloth coincides with the pattern line along the back. Therefore, lightly pull the matter at the waist line level. The sleeve of the tunic should also be cut to size and shortened. What details should be cut?
- The front half of the tunic dress is 1 piece;
- Back of dress of tunic - 1 piece;
- Sleeve - 2 pieces;
- Allowances for seams - 1 centimeter.
Now proceed directly to sewingthe latest model. Sweep, and then grind the side seams together with the shoulder seams. The allowances must be processed. Sweep and stitch the seams of the sleeves. Allow the allowances to be processed and processed. Put the sleeves on the casing and sew in armholes. 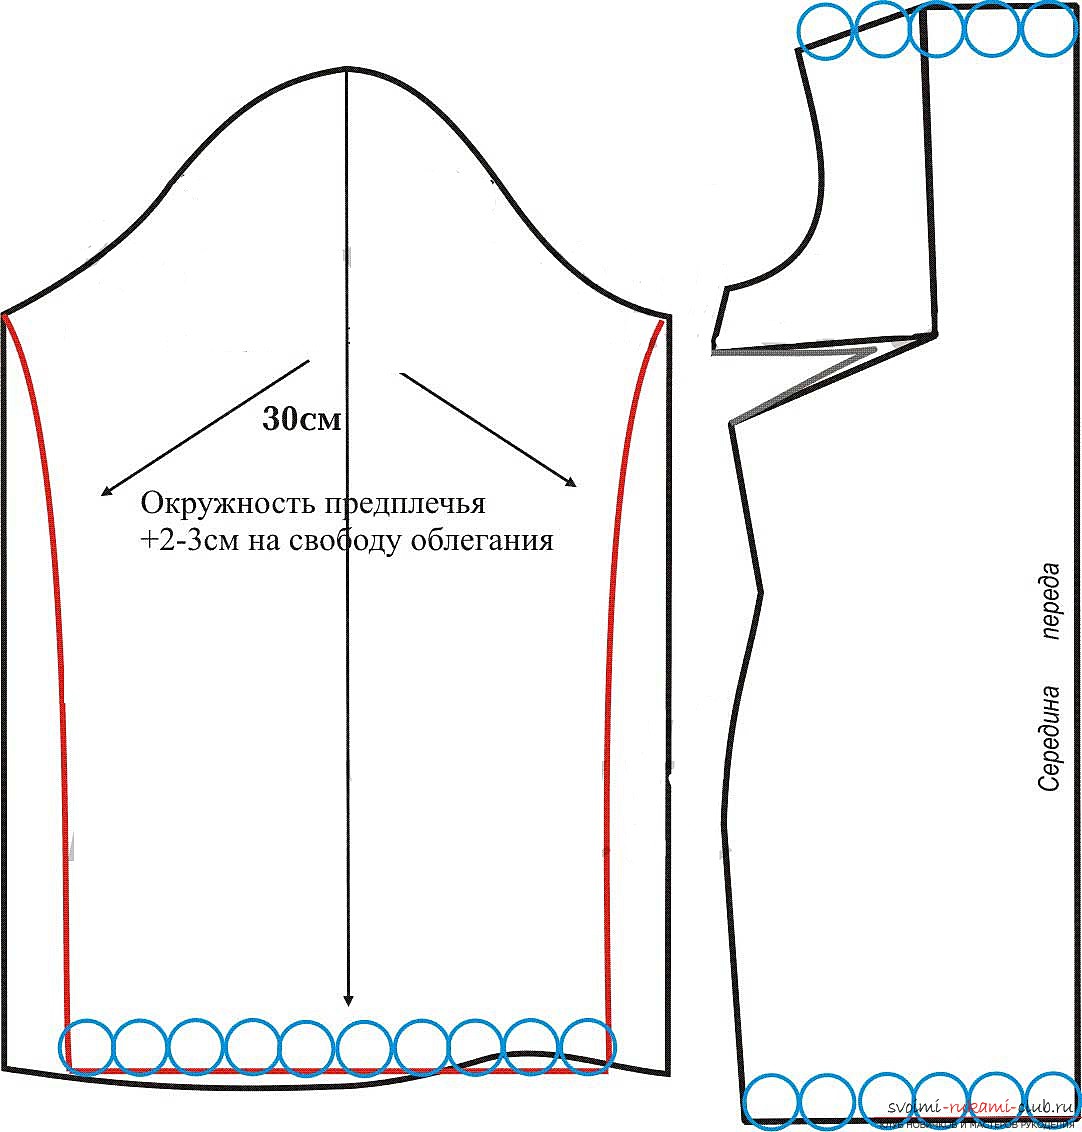 The next model of the tunic dress is ready. This outfit is perfectly combined with both classic trousers and jeans. A stylish and fashionable image can be supplemented with beautiful accessories that will only emphasize your personality.
Comments
Related posts:
 The original design of the pattern of a stylish dress-transformer. A beautiful outfit for a beautiful woman. Photos and instructions
 Getting ready for winter. We make a warm hat together, which will not allow you to freeze. Simple patterns of high-quality winter hats, instructions and photos
 We are preparing for the summer heat correctly. We make a pattern of a light dress-sundress with our own hands. Simple diagrams and photos
 We make our wardrobe more diverse. We make a pattern of a simple dress base with our own hands. Simple diagrams and photos
 Patterns of a dress, for his tailoring yourself. Photos of dress patterns and their application.